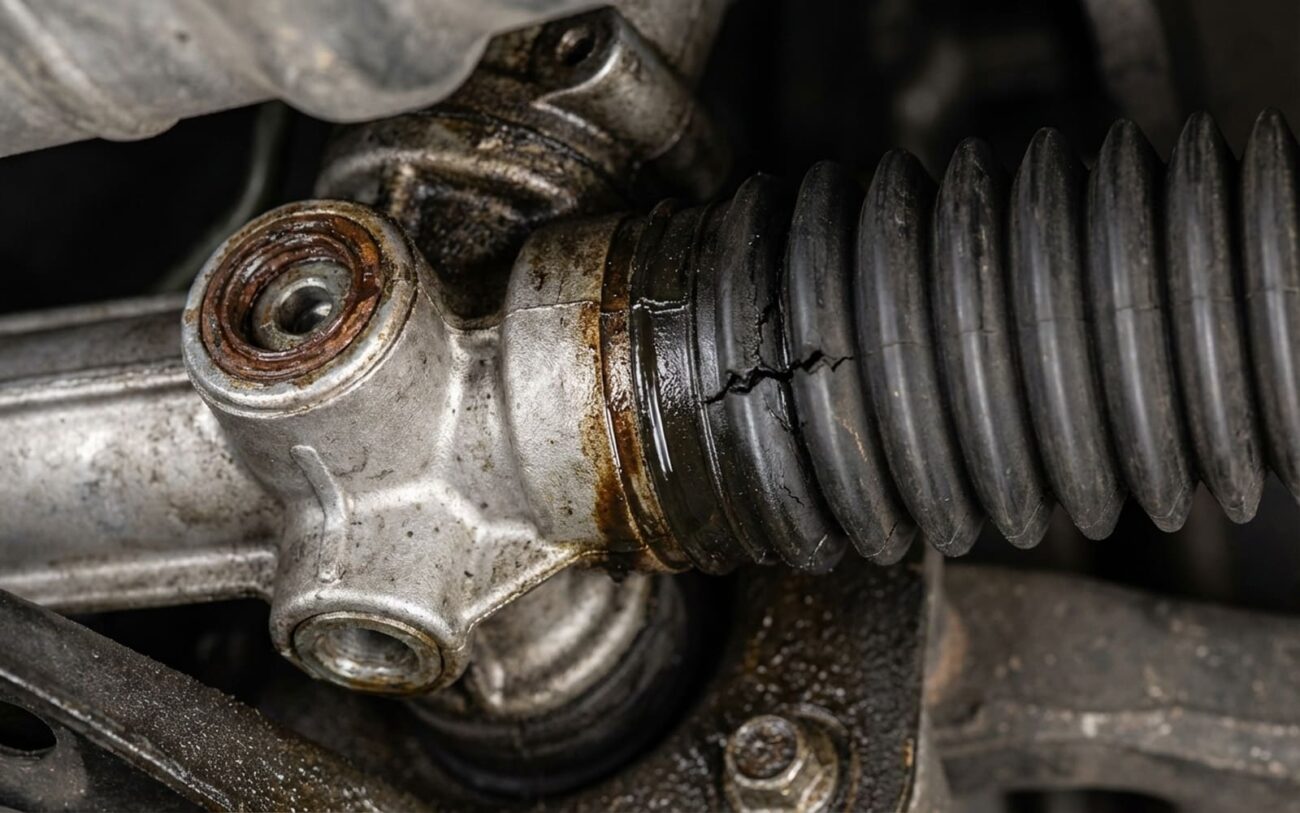
Alright, let’s talk power steering leaks on your VW Golf. After 25 years under the hood, I’ve seen enough of these to know the drill. You spot that reddish-brown puddle under the front end, usually right between the wheels, and your first thought is probably, “Oh great, the steering rack.” And you’re often right, but it’s not always that simple. This isn’t a job for guesswork; it’s a job for methodical diagnosis.
The Puddle Problem: How I Pinpoint the Real Leak
When a customer comes in with a power steering fluid leak, the first thing I do is get it on the lift. That puddle might be directly under the steering rack, which sits right behind the front crossmember. That’s a good indicator, but here’s the catch: the high-pressure and return hoses connect right to that rack body. So, a leak at those fittings will drip in the exact same spot. A puddle alone doesn’t confirm the rack itself is bad.
STEERING MONITOR
Status: PRESSURE LOSS
So, how do I tell the difference? First, I clean everything thoroughly with brake cleaner. I mean spotless. Then, I add some UV dye to the power steering fluid reservoir. I’ll run the engine, turn the wheel lock-to-lock a few times to build pressure, then shut it off. A few minutes later, I’m under there with a UV light. If the leak is at a hose fitting, you’ll see the glowing fluid right there. If it’s coming from the rack housing itself – say, an input shaft seal or a crack – that’ll light up too.
But what if you’re losing fluid, the reservoir keeps dropping, and there’s no visible puddle? That’s when I head straight for the inner tie rod bellows. These are the rubber boots on either end of the steering rack, protecting the inner tie rod joints. If one of those bellows is swollen or, more definitively, if you carefully unclamp it and fluid pours out, then you’ve got an internal leak. That means the piston seal inside the rack has failed, and fluid is bypassing into the bellows instead of circulating properly. This is the definitive test for an internal rack leak, no question about it.
And speaking of low fluid, don’t ignore that whining noise when you turn the wheel. That’s usually the power steering pump cavitating because it’s starving for fluid. While the whine itself points to the pump, the reason it’s starving is often a leak somewhere else, like the rack. Run that pump dry for too long, and you’ll be replacing it too. Worse, a complete internal rack seal failure can cause sudden loss of power assist or even hydraulic binding, making steering dangerously stiff. That’s not just an inconvenience; it’s a serious safety risk.
Why It Fails: The Root Causes of Rack Leaks
Once I’ve confirmed the leak is internal to the rack, the next question is always “why?” From what I’ve seen over the years, it almost always comes down to a few key culprits.
The number one cause is seal degradation. Those internal piston seals and O-rings, typically made of rubber or Teflon, just don’t last forever. Heat cycles, fluid contamination, and just plain old age cause them to harden and lose their elasticity. Once they can’t maintain a tight seal, the high-pressure fluid bypasses them, often ending up in those inner tie rod bellows. High-mileage racks are also prone to internal bore wear. The aluminum housing that the piston slides in can develop scoring or wear, especially if the fluid breaks down or, even worse, the wrong type of fluid is used.
Listen up: Fluid matters!
VW specifies Pentosin CHF 11S or VW G 004 000 M2 for a reason. These ZF or TRW racks are engineered and calibrated for that exact fluid chemistry. I’ve seen countless racks fail prematurely because someone topped it off with generic power steering fluid or, heaven forbid, ATF. That stuff accelerates seal swelling, shrinkage, and corrosion. Don’t cut corners here.
Another common failure point is the input shaft seal, right where the steering column connects to the rack. This seal relies on a precise fit between the pinion gear and its bearing. If that bearing starts to wear out, the pinion can wobble, and that’ll chew up the seal in no time. In colder climates, especially where they use a lot of road salt, I’ve also seen electrochemical corrosion (galvanic corrosion) pit the aluminum rack housing. This weakens the structure and can create tiny micro-leaks in the fluid passages that are a real pain to track down.
Fixing It Right: Repair Options & What I Recommend
High-Pressure Safety First
Working on hydraulic steering systems means dealing with high pressures. We’re talking hundreds, sometimes thousands, of PSI. Proper torque specs and specialized tools like flare nut wrenches are absolutely mandatory. Skimp here, and you’re looking at a catastrophic failure, or at least a leak that just won’t quit.
Once we know where the fluid’s coming from, we can talk about how to fix it. Here are the common pathways:
External Hose Union Repair
Full Seal Kit Overhaul
Complete Rack Replacement
After the Repair: Making Sure It Sticks
Finishing the job isn’t the end of it. You absolutely have to verify the repair actually worked. If it was just an external union, I’ll run the engine, turn the wheel lock-to-lock several times, then shut it off and let it cool. I’ll repeat this 2–3 times to cycle pressure and temperature. Then, I’ll inspect the fitting closely – no seepage, no wetness. If I used UV dye, I’ll check it under black light. Even a slight sheen means it’s not sealed right.
For a rebuilt or replaced rack, the validation is more involved. First, refill with the correct fluid – I can’t stress enough how important it is to use Pentosin CHF 11S or VW G 004 000 M2. Then, bleed the system meticulously according to VW specs; air in the system will cause noise and erratic steering. After that, I’ll drive the car for 50–100 miles, making sure to hit some turns. Then, I’ll recheck the reservoir level. It should stay stable. I’ll also pull a wheel and inspect those bellows again – no new fluid accumulation. The steering should feel smooth and consistent from lock to lock, with no binding or notchiness.
The Bottom Line: Costs, Risks & Your Wallet
This is where the rubber meets the road, so to speak. When I’m talking to a customer about a power steering rack leak, we have to weigh the cost against the car’s value and how long they plan to keep it. Here’s a general breakdown of what you’re looking at:
| Repair Type | DIY Cost (Parts Only) | Shop Cost (Parts & Labor) | My Success Rate Estimate |
|---|---|---|---|
| External Union Seal | $10–$50 | $150–$300 | 95% (if done right) |
| Seal Kit Overhaul | $100–$200 | $500–$800 | 70–80% (it’s a gamble) |
| Rack Replacement | $250–$400 | $900–$1,400 | 98% (most reliable) |
A minor leak at an external fitting is usually a quick, affordable fix. But when you’re looking at an internal rack leak, that’s where the decision gets tougher.
Minor Leak Fix
This covers external washers, a fluid flush, and labor for those easy union leaks. No big deal.
Rebuild Kit
This is labor-heavy, and frankly, risky. If the internal aluminum bore is already scored, you’re likely to be back in the shop for a full replacement later. I usually steer folks away from this unless the car isn’t worth much and they just need a temporary fix.
Full Replacement
This includes a quality remanufactured rack, the necessary alignment, and fresh, correct fluid. It’s the only 100% reliable fix for internal leaks. If you plan to keep the car for a while, this is the smart money.
My rule of thumb: if the repair cost exceeds 50% of the vehicle’s market value, it’s time to seriously reconsider. A seal kit repair can be a calculated risk, but for long-term reliability and peace of mind, a full rack replacement is the only safe path.
Keeping It Healthy: Prevention & What to Watch For
My Maintenance Checklist for Power Steering
-
Always use the right fluid: Only Pentosin CHF 11S or VW G 004 000 M2. I’ve seen generic ATF destroy seals faster than anything else. Don’t cheap out here.
-
Inspect tie rod bellows at every oil change: Just a quick look. If they look wet, swollen, or cracked, that’s an early warning of internal failure. Catch it early, and you might save the pump.
-
Check your reservoir level monthly: This takes five seconds. A dropping level, even without a visible puddle, tells you something is wrong. It could be a small hose leak, or it could be the start of an internal rack issue.
Mechanic’s Tip
Remember, some steering issues get misdiagnosed. Always clean the rack thoroughly and use UV dye to confirm the exact source of the leak before authorizing a $1,000+ replacement. It’s worth the extra few minutes of diagnostic time.
