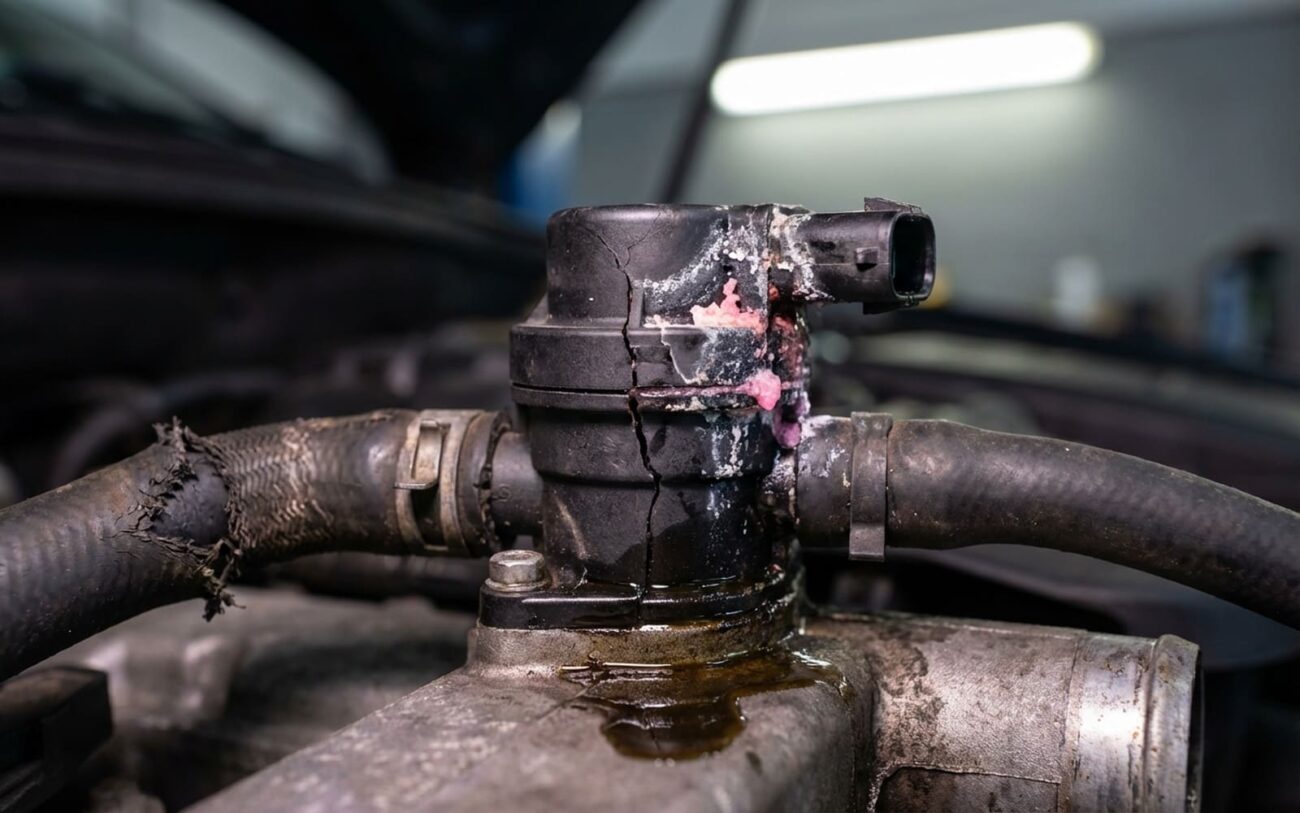
Alright, let’s talk about coolant flow control valves (CFCVs). In my 25+ years turning wrenches, I’ve seen these little devils cause more headaches than they should. They’re not always the first thing you think of when a car overheats or loses heat, but when they go bad, they can really mess things up. This isn’t just about a simple thermostat anymore; modern cooling systems are complex, and the CFCV is often the traffic cop for coolant flow to the engine, radiator, heater core, and even things like turbos or battery cooling circuits.
Symptoms: What I Look For First
A failing CFCV can absolutely cause overheating, but so can a dozen other things. The trick is recognizing the pattern of symptoms that screams “CFCV” rather than just guessing. I’m looking for specific combinations.
Engine Overheating & No Cabin Heat: The Classic Stuck-Closed Valve
This is my prime suspect. If the engine’s running hot – especially under load or at idle – and you’ve got no hot air blowing from the vents, even with the HVAC cranked, that’s a strong indicator. It means the valve is likely stuck closed, blocking coolant flow to both the main radiator and the heater core. This dual failure is pretty rare with other components. Yeah, a stuck thermostat or a failed water pump can overheat the engine, but they usually don’t kill cabin heat entirely. That combination is where I start thinking CFCV.
And don’t ignore what that kind of heat can do. I’ve seen engines toast themselves in minutes if the valve blocks radiator flow completely. That level of heat degrades oil, reduces lubrication, and can lead to spun bearings or total engine failure. I’ve seen it happen. If your car’s doing this, pull over. Seriously.
Normal Engine Temp & No Cabin Heat: Valve Stuck Open
On the flip side, if the engine temperature reads normal but you still get no heat, the valve might be stuck open, diverting coolant away from the heater core. This can sometimes mimic a clogged heater core or a big air pocket. But unlike those, an electrically actuated CFCV can fail in position without warning. For example, on some BMWs or Audis with multiple coolant circuits, this is a common failure mode.
Erratic Temperatures & Fluctuating Heat: A Sticking Valve
If the temperature gauge is bouncing around, or your cabin heat comes and goes, that often points to a valve that’s sticking or modulating erratically. You might even hear gurgling or pulsing noises from behind the dashboard. That’s the sound of turbulent flow or air getting trapped because the valve isn’t moving smoothly. While a failing water pump or air in the system can sound similar, a noisy CFCV is more likely to correlate with that fluctuating heat output.
How I Diagnose It: Isolating the True Source
Once I’ve got a symptom pattern, it’s time to confirm. We don’t just throw parts at problems in my shop. We test. Here’s how I narrow it down:
No Cabin Heat, Engine Temp Normal
This usually means the valve is stuck closed to the heater core circuit. It could also be a clogged heater core, an air-bound system, or a faulty blend door actuator (that’s for air, not coolant, but it’s a common confusion). Here’s how I check:
-
Infrared Thermometer: With the engine warmed up and HVAC set to max heat, I point an IR thermometer at both heater core hoses where they enter/exit the firewall. The inlet hose should be hot (near engine coolant temp, say 190-200°F). The outlet should be noticeably cooler, maybe 140-160°F, as heat is exchanged. If the inlet is hot but the outlet is cold, and I’ve already confirmed no blockage in the core itself (sometimes by backflushing, carefully), then the CFCV is the likely culprit.
-
Scan Tool for Electronic Valves: For electronically controlled valves, I’ll connect my scan tool and command the actuator to open and close. If I hear no movement, or the position feedback doesn’t change, the valve assembly is dead.
Engine Overheating, Cabin Heat Works Normally
This scenario points to the valve being stuck closed to the main radiator or cooling circuit. Common mimics here are a stuck-closed thermostat, a failed water pump, or a clogged radiator. My approach:
-
Visual Flow Check & Hoses: With a cold engine and the radiator cap off (or reservoir cap, depending on the system), I’ll rev the engine to about 2500 RPM. I’m looking for strong coolant flow in the radiator neck. Good flow rules out a completely failed water pump. While the engine warms up, I’ll feel the radiator hoses. If the upper hose stays cold while the engine overheats, flow is blocked downstream, potentially by the CFCV or a thermostat.
-
Scan Tool Monitoring: I use a scan tool to monitor commanded CFCV position and real-time engine coolant temperature (ECT). If the ECU commands the valve open but the temps keep climbing, that valve is stuck.
Erratic Temperature Gauge & Fluctuating Cabin Heat
This is where a valve is sticking or modulating erratically. It can mimic a failing engine coolant temperature (ECT) sensor, air in the system, or a sticking thermostat. Here’s what I do:
-
Graphing with a Scan Tool: I’ll connect a scan tool and graph ECT readings alongside commanded CFCV position during a test drive. If the temperature swings align with erratic valve commands – or if the valve moves when it shouldn’t – it’s failing. For mechanical valves, I’ll monitor inlet and outlet hose temps during the fluctuations; inconsistent flow confirms a sticking valve.
One more thing: newer vehicles, especially European models and EVs, have incredibly complex cooling strategies. For example, some electric water pumps keep running after shutdown to manage heat soak, and a failed CFCV can screw that up, leading to weird symptoms. In hybrids and EVs, issues like a failed battery cooling pump might trigger thermal management faults that overlap with traditional cooling concerns. Always verify which circuit is actually affected.
Why These Valves Go Bad: Root Causes I See
When I say a CFCV has failed, I mean the problem is inside the valve assembly itself, not just a leaky hose or a bad sensor somewhere else. Here’s what typically gives up the ghost:
-
Material Degradation: Many of these valves use plastic housings or internal gates. Over years of thermal cycling – hot, cold, hot, cold – those plastics get brittle. If someone used the wrong coolant, especially one lacking proper inhibitors, or didn’t service the system on schedule, chemical attack just accelerates the cracking. I’ve pulled valves apart where the gate literally snapped off from thermal stress and, frankly, poor material choice by the manufacturer. It’s a design and maintenance failure, not just age.
-
Mechanical Binding: Old coolant, especially if it’s been mixed with tap water or other contaminants, forms scale and sludge. This stuff builds up on the valve’s shaft or sealing surfaces, preventing smooth movement. In some cases, the gate just sticks open or closed and won’t budge, even with the actuator trying to force it. That’s an internal failure of the valve’s moving components.
-
Actuator Failure (for Electronic Valves): For electronically controlled valves, the actuator is often the weak point. The small DC motor or stepper motor can burn out. Plastic gears in the gear train strip under load. Or the internal position feedback sensor fails, sending bad data to the ECU. The computer thinks the valve is moving, but it’s frozen solid. This is an integral failure of the valve module itself – no external part can fix it.
Manufacturers know about these issues. There are documented service advisories for specific models where the CFCV fails due to internal corrosion or actuator degradation, often leading to no-heat conditions or overheating. While I won’t list specific TSBs here (they vary too much), the failure mode is well-known in the trade.
What’s NOT a CFCV Failure?
A coolant leak at a hose connection or O-ring seal? That’s a sealing issue, not a valve malfunction. If the engine coolant temperature sensor fails and sends incorrect data, the ECU might command the wrong valve position, but the valve itself is fine. Always test the signal and feedback circuits before condemning the valve. Don’t waste money.
Getting It Fixed: DIY or Shop?
Once you’ve confirmed the CFCV is faulty, replacement is almost always the only real fix. How difficult that is depends entirely on where the manufacturer decided to put it.
Accessible, External Mounting DIY-FEASIBLE
Buried or Integrated Mounting Professional Only
Internal Valve Failure Non-Repairable
Don’t Skip This: Post-Repair Checks
Replacing the valve isn’t the end of the job – it’s the beginning of the verification process. You need to prove the system works as designed, or you’ll be doing it again.
-
Functional Test: On a cold engine, turn the heater to max. You should feel hot air within 5–7 minutes as the engine warms. The temperature gauge or scan tool reading should stabilize at the expected operating range – usually around 195–220°F depending on the thermostat rating – and stay steady under all conditions, including idle and highway speeds.
-
Leak Test: After driving and cooling down completely, inspect the repair area with a flashlight. Repeat this after two more full heat cycles. Thermal expansion and contraction will expose any weak seals or improperly tightened connections.
-
Infrared Thermometer: Check heater core hoses again – there should be a 30–50°F drop from inlet to outlet when the heat is on.
-
Scan Tool: For electronic valves, command position changes and verify the response. Watch live data for smooth transitions and accurate feedback from the valve’s internal sensor.
-
Visual Inspection: After the engine cools, use a flashlight to check for any coolant seepage or residue (pink, green, or orange staining) at connections.
Making the Call: Cost, Risk & Value
The decision to repair often comes down to cost versus the car’s overall value. The CFCV itself isn’t usually expensive – $50 to $150 for the part – but labor can be, depending on where it’s located.
-
Accessible CFCV Replacement: If you DIY, you’re looking at just the part cost, maybe $50–$150. A shop will typically charge $200–$400, and the success rate is high (95%+) when the diagnosis is correct. The main risks are coolant leaks from improper reassembly or continued overheating if you misdiagnosed it.
-
Buried/Integrated CFCV Replacement: For the DIYer, it’s still $50–$150 for the part, but the labor is a bear. A shop will run $400–$800+, sometimes more. Success rate is still high with correct diagnosis, but the secondary risks are much greater: vacuum leaks, coolant leaks from disturbed components, or even intake gasket failure if not done carefully.
My Shop’s Economic Decision Rule
Here’s a rule I use in the shop: if the repair cost exceeds 40% of the car’s private-party market value, and it’s not a rare or sentimental vehicle, you really need to consider if it makes economic sense. On a reliable car with a solid body and drivetrain, a $600 repair on a $2,000 car might still be worth it. But if the car has other issues – suspension, electrical, transmission – that $800 repair could be the final straw. Always weigh the total cost of ownership, not just this one fix.
Keeping Your Cooling System Healthy: Prevention & Monitoring
You can’t prevent all failures, but you can definitely reduce the odds. The biggest factor? Coolant quality. Use only the type specified in your owner’s manual – OEM or an equivalent that meets the exact specs. That coolant has the right mix of corrosion inhibitors and is pH-stable for the plastics and seals in modern valves. Mixing types or using generic “universal” coolant can cause sludge, gelling, or seal degradation over time, and that’s a direct path to a failed CFCV.
To Prevent Recurrence
-
Change the coolant on schedule. Most manufacturers recommend every 5 years or 60,000–100,000 miles, but harsh conditions (like towing or extreme climates) may require more frequent changes. Don’t push it.
-
Pay attention to small changes. If it takes longer each week to get full cabin heat on a cold start, the valve may be starting to stick. Don’t wait for it to completely fail.
-
Listen for new gurgling from the dash after any coolant service – this could mean air isn’t purging due to a sluggish valve.
-
If your car has electronic climate control, use a scan tool occasionally to check CFCV position feedback for erratic movement or failed actuation commands. Early detection saves bigger headaches.
