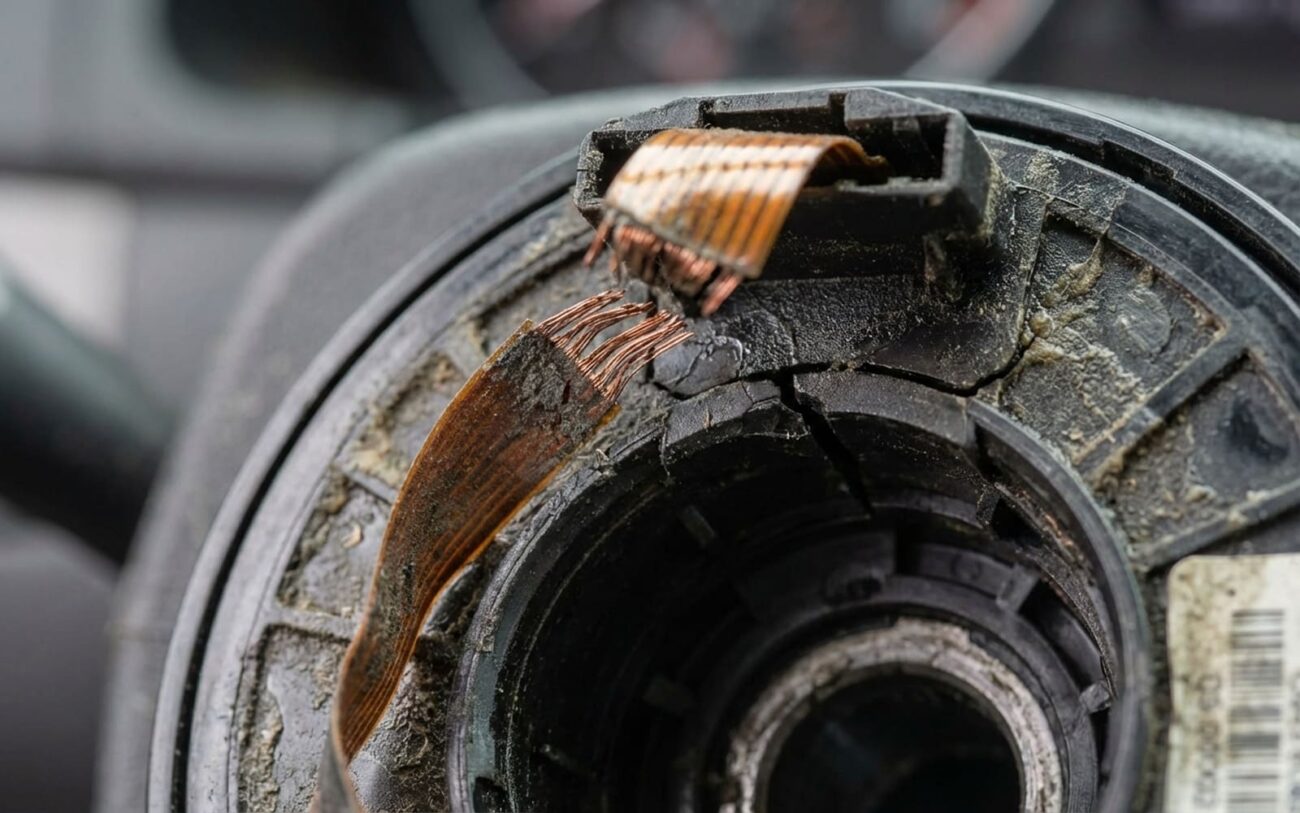
Alright, let’s talk about that dreaded airbag light. If it’s glaring at you from the dash, and suddenly your horn is silent, your cruise control is dead, or those steering wheel buttons aren’t doing a thing, then I’m willing to bet my diagnostic scanner that you’ve got a failed clock spring on your hands. We also call it a spiral cable in the shop.
So, what is this thing? Imagine a flat, coiled ribbon cable tucked right behind your steering wheel. Its whole job is to keep the electrical connection alive between the stationary wiring in your dash and all the stuff that spins with the wheel – the horn, the cruise control, and most critically, your driver’s side airbag. Every time you turn the wheel, that cable flexes and unwinds a bit, then winds back up.
SRS SYSTEM MONITOR
Status: FAILED
When that clock spring fails, it breaks those critical connections. That’s why you often lose several functions all at once. But here’s the kicker: this isn’t just an inconvenience. It’s a safety issue. If the airbag circuit has an open or high-resistance fault, the SRS (Supplemental Restraint System) control module will disable the airbag. It does this to prevent an accidental deployment, but it also means your primary safety device is out of commission. You’re not just without a horn; you’re without protection in a crash.
What You’ll See (and Hear) When a Clock Spring Fails
The combination of an illuminated airbag light and dead steering wheel controls is a dead giveaway for a clock spring. Every time you start your car, the SRS module runs a self-check. If it finds an open circuit, a short, or high resistance in the driver’s airbag wiring – which often throws a DTC B1000 or something similar – it’ll disable the airbag and light up that warning on your dash.
Now, why do the horn and other buttons go out too? They share that same ribbon cable, but their circuits are usually lower current and their traces are thinner. Often, these thinner wires are the first to break, which is why you might lose your horn or cruise control before the airbag circuit completely fails (though the airbag light will still be on due to high resistance). In my experience, it’s rare for just the airbag circuit to fail without affecting other functions, unless it’s a very specific type of internal short.
And sometimes, you’ll actually hear it. If you’re turning the wheel and you get a crunching, snapping, or grinding noise, that’s a strong indicator that the internal ribbon cable has physically torn or the plastic housing has fractured. That usually happens from the cable being over-rotated or just plain material fatigue over years of use.
The Concept
“Think of it like a bridge that’s collapsed. No matter how many cars (electrical signals) try to cross, nothing gets to the other side.”
My Diagnostic Approach: Confirming the Clock Spring (and Ruling Out Other Stuff)
Look, I’ve swapped out dozens of clock springs in my career, but I never just assume. While the symptoms are pretty classic, other issues can definitely mimic them. An airbag light could be a faulty airbag module itself, corroded connectors under the seat (especially common if you’ve ever spilled a drink), or even a failing SRS control module. And for just the horn, it could be a simple blown fuse or a bad horn relay. That’s why I always follow a systematic diagnostic process.
Critical Safety Step:
Before you touch anything related to the airbag system, always disconnect the negative battery terminal. Then, and this is crucial, wait at least 5 to 10 minutes. The SRS system has a backup capacitor that can still deploy the airbag even with the battery disconnected if it hasn’t had time to fully discharge. Trust me, you don’t want an airbag going off in your face.
First things first, you need a good quality OBD2 scan tool. And I mean a good one – not all generic tools can read SRS-specific codes. Hook it up, retrieve any stored Diagnostic Trouble Codes (DTCs), and document them. These codes will give you a roadmap.
Once you’ve got your codes, or even if you don’t, the next step is to get out your digital multimeter. You’ll want to perform continuity and resistance checks directly at the clock spring connectors. This is how you definitively isolate the fault: is it inside the clock spring, or is the problem further down the circuit, maybe in the wiring harness or the airbag itself?
| Symptom / DTC | Likely Clock Spring Issue | Common Mimics (Check These Too) | My Go-To Test |
|---|---|---|---|
| Driver Airbag DTCs (e.g., B1000) | Internal ribbon cable fracture or worn contact points. | Faulty airbag module, damaged harness under seat, corroded connectors at the module. |
Measure resistance across the airbag pins at the clock spring output. A good circuit is typically 1–3 ohms. An open circuit means the clock spring is bad. |
| Loss of Steering Wheel Controls | Broken or worn traces in the accessory circuits of the ribbon cable. | Faulty switch pack inside the steering wheel, a blown fuse for the accessory circuit, or damaged wiring lower in the column. |
Check for reference voltage (usually 5V or 12V) on the vehicle side of the clock spring connector, then compare it to the output side when buttons are pressed. No output = clock spring. |
| Crunching or Snapping Noise | Shattered plastic housing or a physically torn ribbon cable inside the unit. | A worn intermediate steering shaft or a failing steering column bearing. |
Remove the clock spring and visually inspect it. If the housing is cracked or the ribbon cable is kinked or broken, you’ve found your culprit. |
Why These Things Break (and How to Keep It From Happening Again)
Once you’ve confirmed it’s the clock spring, it’s worth understanding why it failed. These are wear items, sure, but a premature failure usually has a mechanical trigger. The biggest culprit I see is over-rotation. This happens when the steering wheel is turned past its normal mechanical stops, especially if the front wheels are off the ground.
Think about it: during an alignment, or even a tire change, if the steering wheel isn’t secured, it can spin freely. If it spins too far in one direction, it twists that delicate ribbon cable inside the clock spring beyond its limits. Snap! Internal traces are severed, and your clock spring is toast. I’ve seen this happen countless times because a tech didn’t use a steering wheel lock during service.
Some vehicles are definitely more prone than others. For instance, I’ve seen a lot of clock spring failures on certain Chrysler, Dodge, and Jeep models from the mid-2010s. It seems like the contact wear was a known issue on those. But just remember, a corroded connector at the base of the column or a failing airbag module isn’t a clock spring problem; it’s a different part of the system. That’s why precise diagnosis is so important.
The Repair: This Is Not a DIY for the Faint of Heart
Seriously, Leave This to the Pros
Let me be clear: clock springs are NOT repairable. You can’t splice or solder that ribbon cable and expect it to be reliable or safe. This is absolutely a professional-level repair. You’re dealing with a critical safety system, and there are specific safety protocols and precision alignment requirements that you just can’t skip.
Here’s what goes into doing this job right:
System Depowering CRITICAL
Precision Installation PROFESSIONAL ONLY
Steering Angle Sensor Recalibration
Making Sure the Fix Actually Stuck
Once everything’s back together, validation is absolutely critical. Don’t just assume it’s fixed because the new part is in. Start with a functional check: turn the key to the ON position (no need to start the engine yet). The airbag light should illuminate for about 6–8 seconds – that’s its bulb check – and then it must go out. If it stays on, you’ve still got a problem.
Next, test everything. Honk the horn, and make sure you do it at multiple steering angles, from full left to full right. Check every single steering wheel button – cruise control, radio, phone, whatever your car has. They all need to work flawlessly.
My Post-Repair Checklist
-
Clear any remaining SRS DTCs using your professional scan tool. Sometimes old codes hang around.
-
Verify the steering angle sensor reading is near zero degrees (I aim for ±5°) when the wheels are straight.
-
Turn the wheel lock-to-lock again, slowly, and listen carefully for any unusual noises, clicking, or binding.
-
If your scan tool has live data for the steering angle sensor, monitor it while turning the wheel to ensure the readings change smoothly without any sudden jumps or drops.
What This Repair Will Cost You (and a Final Word)
Just the Part (DIY)
This is just for the clock spring assembly itself. But remember, the risk of incorrect installation and immediate re-failure is extremely high if you try this yourself without the right tools and knowledge.
Professional Shop
This range includes the part, typically 1.5 to 3 hours of labor, the specialized tools needed for safe removal and installation, and the mandatory scan tool calibration. It’s worth the money for peace of mind and safety.
“Repair” Attempt
As I said, this isn’t a viable option. You’re looking at a 0% success rate for a reliable fix, and a very high risk of accidental airbag deployment. Don’t even think about it.
My Top Prevention Tip:
Seriously, never force the steering wheel against its mechanical stops. And if you’re getting an alignment or any front-end work, make absolutely sure the shop uses a steering wheel lock. This prevents the wheel from spinning freely and over-rotating the clock spring, which is hands-down the number one cause of these ribbon cables snapping.
