I’ve been fixing these network gremlins for over 25 years. Not the kind of “check engine” light nonsense—real, deep-down electronic ghosts that make drivers think their car’s gone psychic. You’re driving down the highway, adaptive cruise is holding the gap perfectly, lane keep gives that gentle nudge when you drift… but the dash shows nothing. No icons. No confirmation. It’s like the car’s working in stealth mode.
Here’s what you need to understand right now: if the system is functioning, the radar, camera, and ADAS module are all online and talking. The failure isn’t in the sensors. It’s in the phone line between the brain and the display. That line? The CAN bus. And when it breaks, the message doesn’t get through—even if everything else seems fine.
Diagnose Like a Pro: Symptom First, Then Science
Forget throwing parts at it. This is electrical diagnostics, not guesswork. I start with three tools: a decent scan tool that reads U-codes and module status, a digital multimeter, and—when things get weird—an oscilloscope. If your shop doesn’t have one, find one that does.
Here’s what I look for, based on what the car is (and isn’t) doing:
| Symptom | Likely Fault Area | Definitive Test to Confirm |
|---|---|---|
| ADAS works but no dash icons | Open/short in CAN_H or CAN_L between ADAS module and cluster |
Measure resistance between pins 6 (CAN_H) and 14 (CAN_L) at the OBD-II port with ignition off. You should see ~60 Ω. 120 Ω means one termination resistor is dead. 0 Ω? You’ve got a short. Then check the waveform with a scope—clean square waves only. Any rounding or noise, and the signal’s compromised. |
| No ADAS display + other systems acting up | Shorted CAN wire or a “babbling” module flooding the bus |
Do a “pull-and-snoop” test. Unplug modules one by one—start with gateway, cluster, ADAS—while watching communication return on the scan tool. If it comes back when you unplug one, that module’s likely the culprit. Also check for CAN lines shorted to power or ground—common in door harnesses. |
| Missing display only after key cycle | Failed internal termination resistor or boot-up glitch |
Measure resistance at OBD-II port. If it’s 120 Ω, disconnect major modules one at a time and re-measure. When it jumps to 60 Ω, you’ve found the module with the missing termination resistor. These are usually built into the cluster or gateway—replace the module. |
And let’s clear up one thing fast: this isn’t a camera or radar fault. If those were bad, the system wouldn’t work at all. Here, it is working—just not showing status. That’s a network issue, not a sensor issue. Same goes for software bugs after an update. Possible? Sure. But I test the physical layer first. Always.
Why the CAN Bus Dies: The Usual Suspects
Twisted pair wiring. Two wires, twisted together, carrying differential signals. It’s elegant, noise-resistant, and fragile as hell when routed through a real car.
Wiring damage is my top suspect. On the 2015–2018 Toyota Camrys I see weekly, the harness behind the driver’s kick panel rubs through on the metal bracket. Same with Fords—the door jamb harness gets flexed every time the door opens. Over time, the insulation cracks, wires short, and boom: CAN bus down. Water intrusion from a clogged sunroof drain? That’ll corrode the copper until resistance climbs and signals drop.
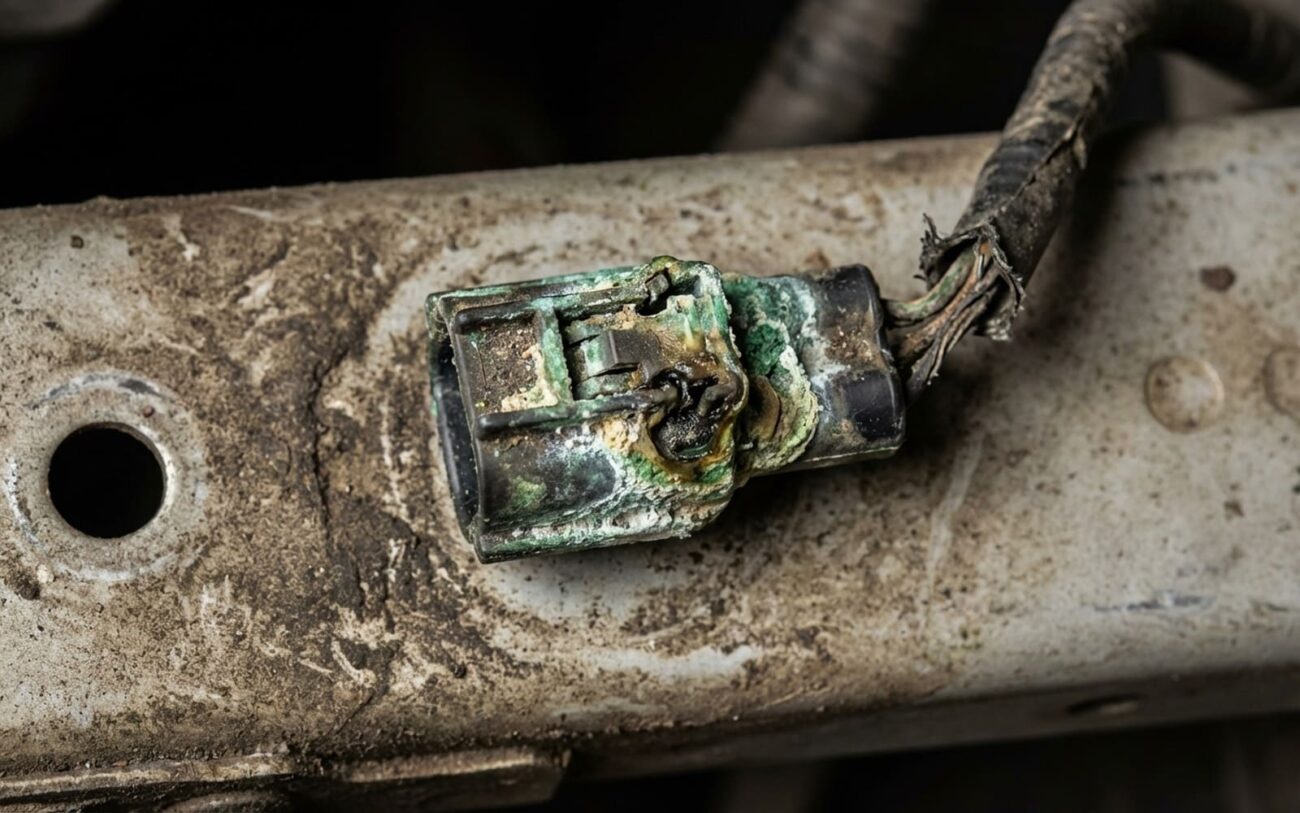
Connectors are the second-biggest killer. Moisture gets in, terminals corrode, and you get intermittent contact. I’ve pulled apart connectors where the pin looked fine—but it was loose in the housing. Vibration knocks it out of position, communication drops, then comes back. Nightmare to diagnose without a scope.
Internal module failure is less common but more expensive. Every CAN network needs two 120-ohm termination resistors—one at each end. In most cars, they’re inside the instrument cluster and gateway module. If one burns out (and I’ve seen it after a bad jump-start), the network can’t terminate properly. Signal reflects back, data gets corrupted. Or worse: a module’s CAN controller fails and starts “babbling”—flooding the bus with garbage data. That shuts down everything.
And yes, manufacturers know about this. There are TSBs for specific models—like the 2016–2017 Honda Accords where the CAN harness chafes behind the glove box. It’s not random. It’s a design flaw. Don’t let anyone tell you it’s “just wear and tear.”
How to Fix It: No Shortcuts
This Isn’t DIY Territory
I’ve seen too many botched repairs—splices wrapped in electrical tape, modules swapped without coding, CAN wires twisted and taped. These don’t last. They make the next diagnosis harder. If you’re not using OEM-spec tools and procedures, you’re gambling.
Harness splice repair Professional Only
Connector/terminal repair Professional Only
Control module replacement Non-Repairable → Replace Module
One old-school trick: if you suspect a missing termination resistor, you can temporarily install a 120-ohm, 1/4-watt resistor between CAN_H (pin 6) and CAN_L (pin 14) at the OBD-II port. If communication returns, you’ve found the issue. But remove it immediately. Leaving it in masks other problems and can destabilize the network. It’s a diagnostic crutch, not a repair.
Did It Stick? Here’s How to Know
Reconnecting the battery isn’t the end. It’s the beginning of validation.
Scan for U-codes. Clear them. Cycle the ignition three times. Scan again. No codes should return. If you see U0100 (lost ECM comms) or U0140 (lost cluster comms), the problem’s still there.
Test drive. Verify every ADAS icon appears and stays lit. Engage adaptive cruise. Drift into a lane line. Confirm the system responds and the display confirms it.
If you’ve got a scope, check the CAN signal at the OBD-II port. Clean, symmetrical square waves. Voltage swings: 1.5V to 3.5V on CAN_H, inverse on CAN_L. Any rounding, noise, or flatlining? Something’s still wrong.
For module replacements, confirm programming status on the scan tool. Look for “Module Coding Complete” and no pending faults. Recheck termination resistance—should be 60 Ω ±3. And don’t forget post-repair calibrations. A new radar or camera module won’t fix a CAN issue, but if it’s not calibrated, ADAS won’t work. Separate job. Same trip.
Cost, Risk, and When to Walk Away
Let’s be real: fixing this isn’t cheap. But it’s often cheaper than panic suggests.
| Repair Type | DIY Cost | Shop Cost | Success Rate | Secondary Risk if Failed |
|---|---|---|---|---|
| Harness splice repair | $50–$100 (wire, connectors, tools) | $200–$500 | 95% when done to spec | Intermittent faults, corrosion at splice |
| Connector/terminal repair | $100 (kit, tools, grease) | $300–$600 | 90% with proper tools | Poor contact leading to future drops |
| Control module replacement | N/A | $800–$2500+ | 98% if programmed correctly | Incorrect coding causing lockout |
But here’s the hard truth: if your car’s over eight years old and the repair costs more than 40% of its value, think long-term. These modules, wires, and connectors are all the same age. Fixing one doesn’t stop the next from failing. I’ve had customers fix a $600 gateway, then face a $900 cluster six months later. It’s not a scam—it’s entropy. Sometimes, living with the symptom (if the safety features still work) is smarter than chasing perfection.
Always check your vehicle’s warranty status—some manufacturers cover CAN bus repairs under extended electronics warranties.
To Prevent Recurrence
-
During oil changes or tire rotations, spend 30 seconds checking accessible harnesses—especially near door jams, firewall grommets, and kick panels. Look for chafing. A small rub today becomes a full break in 18 months.
-
Use correct fuse ratings. An oversized fuse won’t blow when it should—risking damage to CAN modules. And never jump-start without checking connections. Voltage spikes kill gateway modules fast.
-
Run a scan tool annually. Check communication error counters. Many modules log “dropped messages” before failing. Catch it early.
-
Keep software updated. Some manufacturers have released fixes for CAN boot issues. If there’s a TSB, take it.
