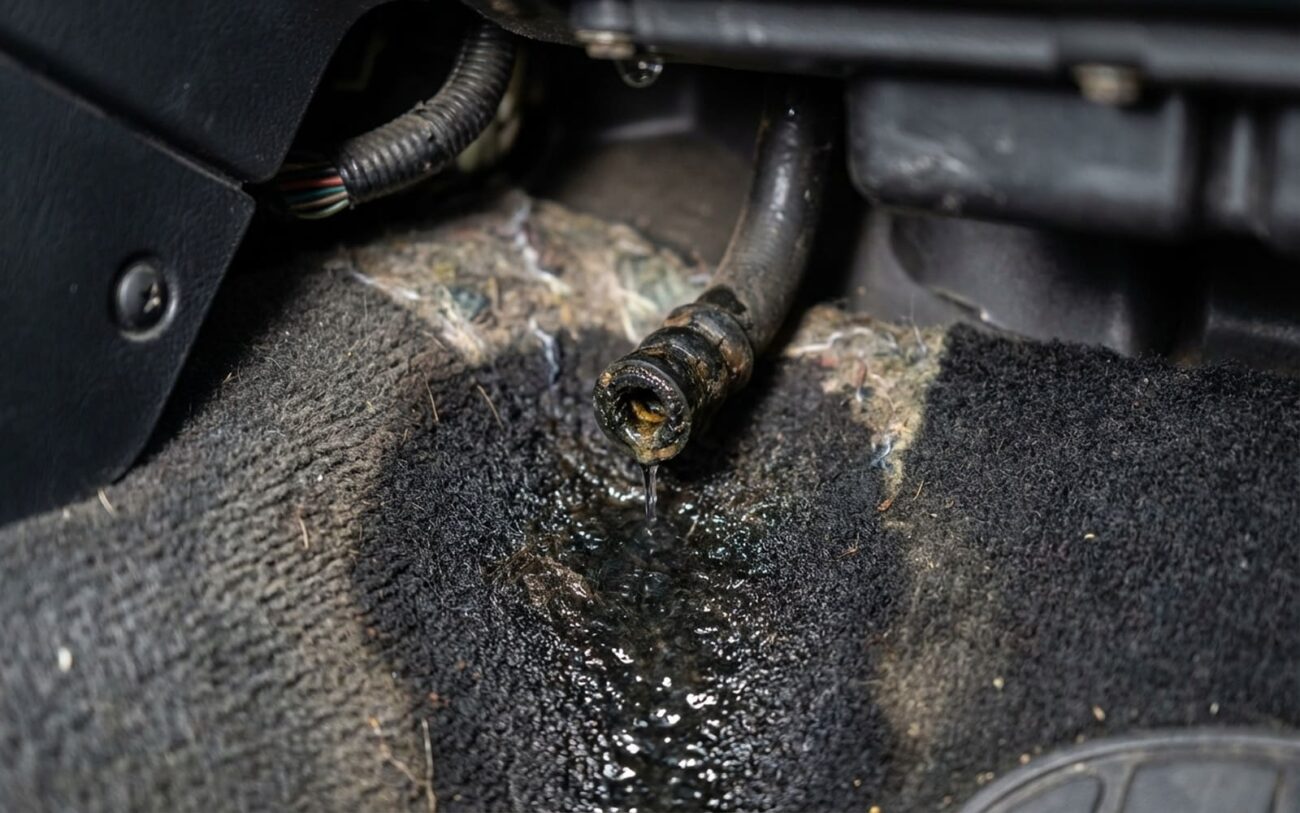
Water on the passenger floor? Don’t panic—let’s find where it’s coming from
I’ve seen this a thousand times: customer lifts the mat, sees soaked carpet, starts thinking flood damage or a blown heater core. But if the fluid is clear, cool, and doesn’t smell like antifreeze—chances are it’s just trapped AC condensate. The AC system pulls moisture out of the air like a dehumidifier. That water should drain outside through a small tube. When it doesn’t, it ends up on your floor.
And yes, that musty smell when you first turn on the fan? That’s not “just how it smells”—that’s mold growing in standing water. I’ve pulled out drain hoses packed with black sludge that smelled like a swamp after a rainstorm. It’s gross, but fixable.
First: Confirm it’s the AC drain—don’t guess
Before you start pulling dash panels, do this test. It takes 20 minutes and saves hours of wasted labor.
Park on a dry surface. Dry the floorboard completely with shop towels—this matters. Start the engine. Set the AC to max cooling, fan on high. Let it run for 15–20 minutes. Then, get under the car—passenger side, near the firewall. Look for a small rubber or plastic tube coming out of the HVAC housing. You should see a steady drip. One to two drops per second is normal.
No drip? Clogged drain. You’re seeing water inside because it has nowhere else to go.
Drip present but floor still wet? Then the tube is likely disconnected or cracked inside the cabin. Water’s draining—but not outside. It’s spilling into the footwell.
| Symptom Observation | Likely in AC Drain Hose/System | Common External Mimics | Definitive Test to Confirm Source |
|---|---|---|---|
| Clear, odorless water on front passenger floor; appears only after AC use | Clogged or blocked drain tube, disconnected hose, or restricted drain pan outlet | Leaking heater core (sweet smell, colored coolant), windshield seal leak (occurs during rain), clogged sunroof drain (water enters after rain or car wash) |
Run AC on max cooling in dry conditions. Check undercarriage for condensate drip. No drip = clog. Drip present but wet floor = internal disconnection or leak in cabin
|
What’s really clogging it? Spoiler: it’s not leaves
Most people think it’s dirt or debris from outside. But in 9 out of 10 cases, it’s biological gunk—mold, algae, and sludge formed from pollen, dust, and humidity. The evaporator drain pan is dark, damp, and never touched. Perfect breeding ground.
I’ve seen hoses packed solid with black, gelatinous crud that squished when you squeezed it. On a 2018 Honda CR-V last month, I pulled out three inches of this stuff—smelled like a wet basement. And no, it wasn’t from a leaky sunroof or bad windshield seal. The drip test confirmed it.
Physical debris does happen—especially on older trucks with poor fresh air intake seals. I once found a wasp nest inside a Ford Explorer’s plenum. But that’s rare. Most clogs are organic.
And don’t overlook the hose itself. On some Fords—especially the 2013–2019 Fusion and Escape—the rubber drain tube just pops off the HVAC case. Vibration, poor routing, age. I’ve seen it happen twice on the same car after a repair. Ford even issued a service bulletin (SB 17-2147) recommending a revised clamp and hose.
This isn’t a refrigerant leak:
If you’re seeing green, pink, or orange fluid, that’s coolant—likely a heater core. Oily residue mixed with water? That’s refrigerant oil. That’s a failed evaporator or seal. But plain water after AC use? That’s a plumbing issue. The system is working—just not draining.
How to fix it—three real-world scenarios
Professional Territory Only
Fixing AC drain clogs can range from DIY-feasible to professional-only. Working on internal components may require specialized tools, and full HVAC disassembly requires EPA-certified refrigerant handling. There’s no safe shortcut for complex repairs.
External clog at drain tube exit DIY-Feasible
Internal clog or disconnected hose DIY-Feasible to Professional-Only
Corroded drain pan or severe internal fouling Professional Only
Forget the vinegar trick—it doesn’t work
I’ve had customers pour vinegar, bleach, even CLR down the drain. It might help with light buildup, but it won’t clear a physical clog. And if the hose is disconnected? You’re just dumping liquid into the footwell. Makes the problem worse. I’ve seen soaked carpets lead to corroded wiring under the kick panel. Don’t waste time on this.
Did it work? Test it like I do
Don’t assume it’s fixed because the floor looks dry. Run the same test: 20 minutes of max AC in dry conditions. Get under the car. Confirm a steady drip. Then, place a dry towel on the passenger floor. Drive it for a full day. If it’s still dry, you’re good.
If not? The hose is still disconnected or cracked inside. And if the musty smell comes back? You’ve got mold in the evaporator fins or cabin air filter. Replace the filter—$15 part, 10 minutes. For mold remediation, I use a fogging treatment with a non-residual biocide. Spraying from the intake won’t cut it. You need to fog it while the blower is running, so the mist reaches deep into the ducts.
Prevent it from coming back
-
Once a year—before summer—pour a cup of warm water mixed with ¼ cup isopropyl alcohol down the drain access (if accessible). It helps dissolve early buildup.
-
After running the AC, turn off cooling a few minutes before shutting down—but leave the fan on. Lets the evaporator dry out. Reduces mold risk.
-
On models like the Toyota Camry or Ford Fusion, this is a known issue. Check the drain every 12 months. Takes 10 minutes. Saves hundreds in carpet cleanup later.
What you’re really paying for
External Hose Clearance
DIY: < $20 (drain brush, compressed air). High success rate for simple clogs. Risk: Continued water damage to floor, blower motor, or wiring.
Internal Access & Reconnection
DIY: $0 – $50 (hose replacement). Very high success rate when done correctly. Risk: Improper dash reassembly, rattles, or damaged trim clips.
Full HVAC Case Disassembly
Not applicable for DIY (refrigerant handling required). High success rate by experienced tech. Risk: Refrigerant leak from improper seal installation or O-ring damage.
Always weigh the repair cost against the car’s value, especially for Path C repairs on older vehicles.
Cost-Saving Tip
For Path B repairs, if you’re comfortable with basic dash disassembly, you can save on labor costs. However, for Path C, always defer to an experienced professional to avoid further damage or refrigerant leaks.
