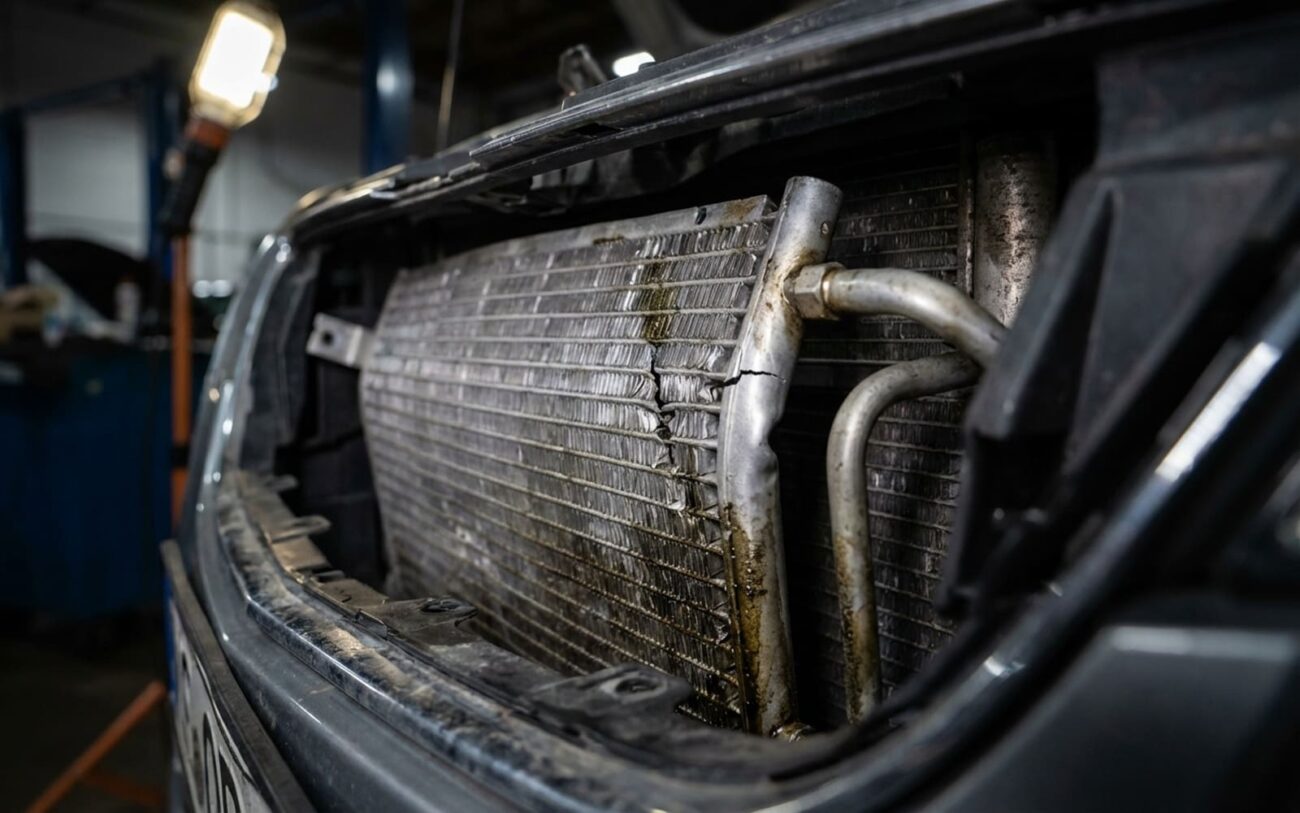
Alright, so you’ve had a little bump, maybe just a fender-bender, and now your AC is blowing warm air or doing absolutely nothing. I see this in my shop all the time—dozens of times a year, seriously. It’s a common headache after any kind of front-end impact. You hit that AC button, expecting that nice cold blast, and instead, you get… well, nothing. Or just hot air. It’s frustrating, but usually, the problem boils down to one of two main components: the AC condenser, which sits right up front, or the refrigerant pressure sensor that tells the computer what’s going on in the system. Let me walk you through how I approach these, so you can figure out what’s really broken and get it fixed right the first time.
First Things First: What’s It Doing?
When a customer rolls in with this issue, the first thing I ask is always, “What exactly happens when you try to turn on the AC?” The symptoms are key to narrowing down the problem.
If you press the AC button and you hear absolutely no click from under the hood—that distinct sound of the compressor clutch engaging—it means the system isn’t even trying to run. The car’s computer, the control module, has detected a fault and shut things down to protect itself. In my experience, the most common culprits here are a damaged refrigerant pressure sensor or a condenser that’s been crushed or internally blocked. But don’t jump to conclusions too fast; sometimes it’s simpler. That impact could have easily severed a wiring harness going to the compressor clutch or just blown a fuse. Always check those basic electricals first.
Now, if the clutch does engage and the compressor spins, but the air coming out is still warm, that’s a different story. If you’ve ever had gauges hooked up, you might see abnormally high pressure on the high side. That’s a classic sign of a restricted condenser—think bent or collapsed internal tubing inside the condenser itself. The refrigerant can’t flow or release heat efficiently, so pressure builds up, and you get no cooling. But be careful here: this symptom can sometimes mimic other issues, like a cooling fan that’s not working, condenser fins that are completely matted down with debris, or even just an overcharged system. You’ve got to test, not guess.
A visible leak is the easiest one to spot, of course. After a front-end hit, I always tell folks to look for any oily residue around the condenser, the receiver-drier, or the line connections. That oily stuff? That’s refrigerant oil, and it’s weeping out with the refrigerant. Cracks in the aluminum core of the condenser or fractured headers (where the tubes connect) are pretty common. Just remember, a leak near the condenser doesn’t automatically mean the condenser itself is toast. It could be a failed O-ring on a line or a leaking receiver-drier. Precision matters when you’re pinpointing the source.
And if your check engine light decided to join the party, definitely scan for diagnostic trouble codes (DTCs). Codes like P0532 (low refrigerant pressure circuit) or P0533 (high pressure) are strong indicators that your pressure sensor or the system’s overall integrity took a hit. The sensor itself might have physical damage, or its internal diaphragm could have ruptured from a sudden pressure spike during the collision. Wiring damage is also super common, especially if harnesses were pinched or stretched when things got bent.
How These Parts Actually Fail (It’s Not Always Obvious)
Understanding why these components fail after a collision helps immensely with diagnosis. It’s not always just a simple crack you can see.
The condenser is pretty fragile by design. It’s built with thin aluminum tubes and delicate fins—all to maximize heat transfer. A direct impact, even a minor one, can crush the front face, bend mounting brackets, or kink those internal passages. What’s tricky is that even if the fins look mostly okay, internal damage can occur just from the shock transmission. I’ve seen stress fractures develop at brazed joints or mounting points that don’t leak immediately but worsen over time. And if the radiator support or other mounting structure was bent, that condenser might now be vibrating abnormally, leading to fatigue cracks down the road.
The refrigerant pressure sensor is far more sensitive than most people give it credit for. It’s usually mounted on the high-side service port or somewhere near the receiver-drier. The housing is often plastic, so it’s prone to cracking on impact. The electrical connector can easily be ripped off if a harness gets displaced. But the real hidden failure is the internal diaphragm. At the exact moment of a collision, refrigerant can slosh violently, creating a sudden, massive pressure spike—think about shaking a soda can and then popping the top. That sudden spike can rupture the sensor’s delicate internal membrane, rendering it useless even if it looks perfectly intact on the outside.
Here’s a crucial distinction:
if you find a leak at the Schrader valve (that’s your service port) or at the O-ring where the pressure sensor screws in, that’s not a sensor failure. That’s a seal issue. Same goes for the condenser: a leak at the line connection O-ring isn’t a condenser failure—it’s a fitting or installation problem. Only when the leak is from the core body, a brazed joint, or a permanently attached component should you condemn the part itself.
My Diagnostic Approach: Pinpointing the Real Problem
Diagnosing AC failure after a collision isn’t about throwing parts at the problem. It’s about a logical, step-by-step process to isolate the root cause. This table lays out the common scenarios I see, what they usually point to, what might be faking you out, and how to test for the definitive answer.
| Symptom | Likely Culprit | Common Mimics | Definitive Test to Confirm |
|---|---|---|---|
| No clutch engagement, DTC for refrigerant pressure sensor (P0532/P0533) | Physically damaged pressure sensor (cracked housing, blown diaphragm, broken connector) | Wiring harness damage, blown fuse, failed AC control module, open circuit |
First, visually inspect the sensor for cracks or a damaged connector. Then, with the key ON, test the sensor circuit with a multimeter. You should verify a 5V reference voltage and a good ground at the connector. Next, measure the signal voltage. Compare this reading to an ambient temperature and static refrigerant pressure chart for your specific vehicle. A reading of 0V or 5V when it should be somewhere in the middle indicates an internal sensor failure.
|
| Compressor runs, but no cooling; high-side pressure elevated | Internally restricted condenser (crushed tube, damaged baffle, blocked passage) | Inoperative cooling fan, airflow obstruction (debris, bent fins), overcharged refrigerant, faulty TXV |
Perform a temperature differential test using an infrared thermometer. Measure the temperature of the condenser’s inlet line (coming from the compressor) and its outlet line (going to the receiver-drier). A properly functioning condenser should show a 20–30°F drop across it. A minimal or inconsistent temperature drop strongly indicates an internal restriction. Confirm this with manifold gauge readings: high head pressure combined with normal or low suction pressure is a dead giveaway for a blockage.
|
| Visible oil residue or refrigerant leak near condenser | Condenser core crack or header/connection joint failure | Leak from receiver-drier seal, line O-ring, pressure sensor fitting, or Schrader valve |
Thoroughly clean the suspected area. Then, either add fluorescent dye to the system and inspect with a UV light after running the AC for a bit, or use an electronic leak detector. A leak originating directly from the aluminum core, a brazed joint, or a permanently attached header confirms condenser failure. If the leak is at a threaded connection point, it’s more likely a seal or fitting issue, not the condenser itself.
|
Getting It Fixed: This Is Professional Territory
Seriously, Leave This to the Pros
AC work isn’t like changing your oil. It requires specialized tools, proper safety gear, and EPA-compliant refrigerant recovery and handling procedures. There are no safe shortcuts here, and trying to DIY can be dangerous and illegal.
Temporary Fin Repair Professional Only
Condenser & Receiver-Drier Replacement Professional Only
Refrigerant Pressure Sensor Replacement Professional Only
Confirming the Fix: Don’t Skip These Steps
Once you’ve installed a new condenser or sensor, the job isn’t done until you’ve verified everything. I always perform a vacuum decay test. You need to pull a deep vacuum—at least 29 inches Hg—and hold it for a minimum of 15 minutes. If that gauge climbs at all, even a tiny bit, you still have a leak. And even a tiny leak will compromise performance and lead to premature failure. After passing the vacuum test, recharge the system with the exact amount of refrigerant specified by the manufacturer—never guess.
Then, it’s time to test the actual performance. With the engine running at about 1,500 RPM, the cabin fan on high, and all the doors closed, measure the high-side pressure and compare it to the manufacturer’s chart for the ambient temperature. It absolutely must fall within spec. Also, repeat that infrared temperature check on the condenser: you should see a steady 20–30°F drop from the inlet to the outlet. No drop? You’ve still got a blockage or an airflow issue.
Finally, use an electronic leak detector to scan all connections, the condenser core, and the new sensor. A clean bill of health here means the system is sealed tight and ready for the long haul.
The Cost, the Decision, and Preventing Future Headaches
Let’s talk numbers, because sometimes, the repair just doesn’t make financial sense for the vehicle.
| Repair Type | DIY Cost (Parts Only) | Shop Cost (Parts & Labor) | Success Rate | Secondary Risk if Failed |
|---|---|---|---|---|
| Condenser & Receiver/Drier Replacement | $200 – $600 | $800 – $2,000 |
95%+ (if system is properly flushed, evacuated, and charged)
|
Debris contamination can destroy the compressor, leading to an additional $1,000–$2,000 in repairs.
|
| Pressure Sensor Replacement | $50 – $150 | $200 – $500 |
98%+
|
Incorrect diagnosis may leave a refrigerant leak unresolved; no further system damage likely if the sensor itself was the only issue.
|
Here’s my personal rule of thumb: if the repair cost for your AC system exceeds 40% of your car’s private-party value (check Kelley Blue Book or NADA for a realistic number), and the vehicle has over 120,000 miles or other known issues, you need to seriously consider if this repair makes financial sense. Putting $1,500 into a car worth $3,000 might not be the best use of your funds, especially if the next item on the maintenance list is a timing belt or transmission work. I’ve seen customers do it anyway because they love their car, and that’s perfectly fine. But go into it with your eyes wide open.
To Prevent Recurrence
-
After any front-end collision—no matter how minor—always have the AC system thoroughly inspected.
-
A quick visual check through the grille can reveal bent condenser fins, shifted mounting points, or tell-tale oil stains.
-
Confirm that both cooling fans operate correctly. Even if the car seems to drive fine, hidden damage can degrade AC performance over time.
-
If you notice your AC isn’t as cold as it used to be after an accident, don’t ignore it. Shut the system off and get it checked immediately. Early diagnosis can save your compressor and keep the repair limited to one component. In practice, catching it early is often the difference between a $200 sensor and a $2,000 system rebuild.
