Your Window Won’t Stay Up? Here’s What’s Really Going On.
Alright, let’s talk about power windows. After more than 25 years wrenching on cars, I’ve seen thousands of these things. When a window won’t stay up, or it’s acting funny, it almost always boils down to one of two things: the window regulator or a bad window guide. Knowing the difference isn’t just about saving a buck; it’s about diagnosing it right the first time and preventing bigger headaches.
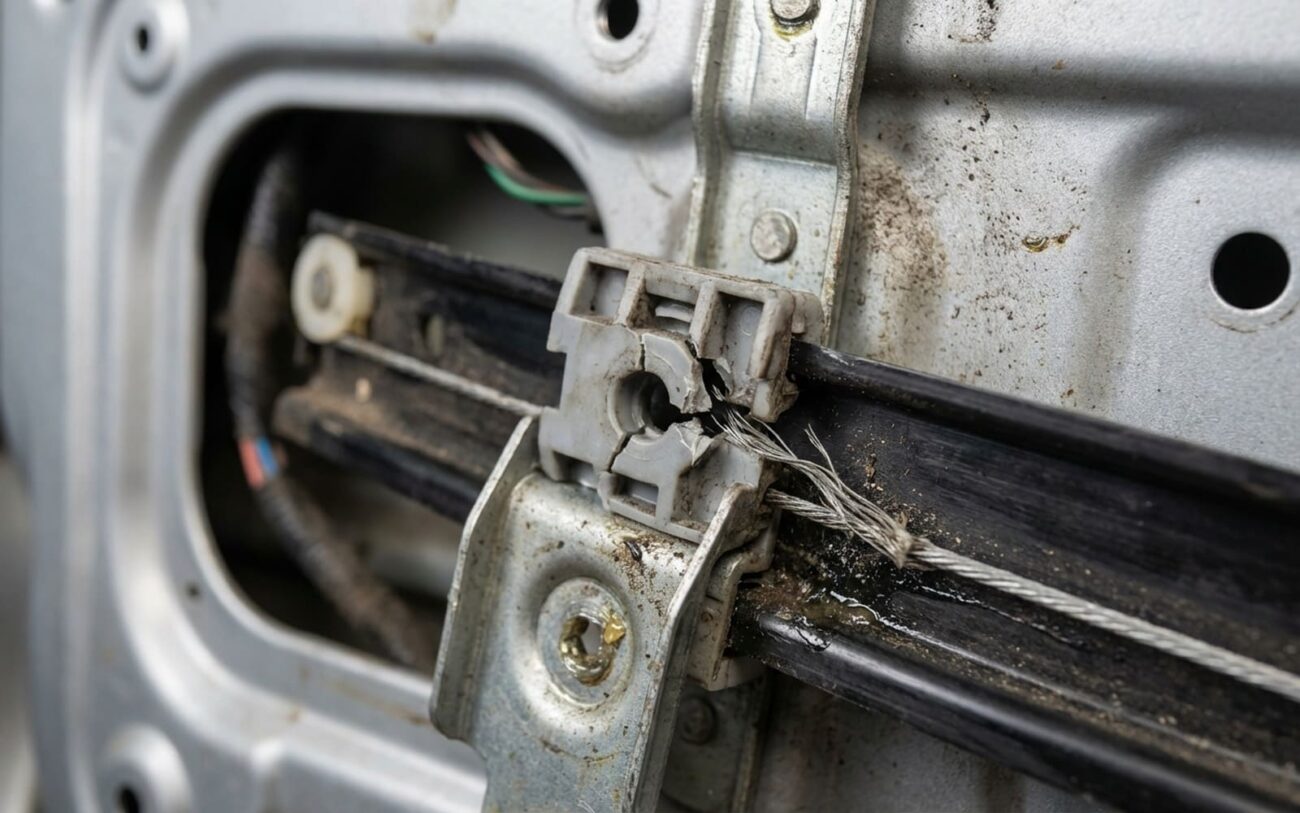
Here’s the classic regulator failure: you hit the switch, the glass goes all the way up, but the second you let go – or even just tap it – it drops right back down into the door. That’s not your motor being weak; that’s the regulator’s internal mechanism, usually a gear or cable system, failing to hold tension. It’s stripped, broken, or just plain worn out.
Now, if the window is tilting, binding, or making grinding, scraping, or popping noises as it moves, then I’m looking at the window guides. These guides are critical for keeping the glass aligned. When they fail, the glass wobbles, jams, or drags against the door frame. I’ve seen this put so much stress on the regulator that it eventually takes that out too. Don’t ignore those noises – they’re your window telling you it’s struggling.
How I Diagnose It: Getting to the Root Cause
Figuring out if it’s the regulator or the guide isn’t always obvious, especially since both can make the window drop or act up. But the mechanics are different, and so are the solutions. This table shows you how I narrow it down in the shop.
| Symptom | What I Usually Find (Guide/Regulator) | Common Misdiagnoses | My Definitive Test to Confirm |
|---|---|---|---|
| Window falls down after reaching top | Stripped plastic gear or broken cable inside the regulator. | Faulty anti-pinch sensor, weak motor, or electrical problem. |
First, pull the door panel and moisture barrier. Then, manually try to lift the glass by pushing up on the regulator’s glass mounting plate. If the glass goes up but the motor gear just spins freely, or you see a frayed/snapped cable, your regulator is shot.
|
| Window binds, tilts, or scrapes during travel | Detached guide block or worn-out liner in the guide channel. | Bent regulator arm, damaged glass bracket, or obstructed felt channel. |
Again, door panel off. Find the window guide – it’s usually a plastic block on the lower rear corner of the glass. See if it’s popped out of its vertical metal track. Look for loose bolts, cracks in the guide itself, or black plastic dust in the track. That dust tells you the liner is disintegrating.
|
| No movement, but motor runs or clicks | Not a primary guide or regulator mechanical failure. | Blown fuse, bad switch, broken wire in the door boot, or a seized motor. |
This is electrical. I’d grab my multimeter and test for 12V and ground at the motor connector while someone operates the switch. If you’ve got power but no movement, then you’re looking at a seized motor or a broken wire. A seized regulator can draw excessive current, but if the motor isn’t even trying, it’s usually power delivery.
|
Why They Break: Common Failure Modes I See
Knowing why these parts fail can help you understand the repair and even prevent it next time. Let’s start with the window guide. These things take a beating – constant movement, temperature swings, road vibration. What I typically see:
- Brittle Plastic: Over time, the plastic guide block just gets brittle from all the heat and cold cycles. It’ll crack or split, and then the glass loses its support.
- Worn-Out Liners: Inside that metal guide channel, there’s usually a low-friction liner. It wears out, turns to powder, and then the guide can’t slide smoothly. It binds, puts stress on everything, and eventually jumps track.
- Loose Fasteners: Vibration is a killer. The bolts holding the guide to the door can back out, especially if thread locker wasn’t used at the factory. Once it’s loose, it’s only a matter of time before it fails completely.
Now, the window regulator is where you often see design flaws. A lot of modern regulators use plastic sector gears to keep costs down and reduce noise. In my experience, they just don’t hold up. I’ve replaced countless regulators where the gear teeth, especially the final drive, are completely stripped. That’s not really wear; it’s a design limitation. Some manufacturers, like certain GM and Ford models from the mid-2000s, even had service bulletins advising to replace the regulator and motor as an assembly because the original plastic gears were so prone to failure.
Cable-type regulators have their own issues. The steel cable can corrode and fray inside its sheath, especially if you’re in a coastal area or where they use a lot of road salt. Once a single strand breaks, the whole cable weakens fast and usually snaps mid-operation. Then your window is just gone. Scissor-type regulators, which you don’t see as much anymore, can develop stress cracks at pivot points or weld joints, leading to a sudden collapse.
One more thing: a working window motor doesn’t automatically mean your regulator is fine. The motor can spin all day, but if the regulator’s gears are stripped or the cable is broken, that motion isn’t going anywhere. Also, a binding outer glass run channel – that rubber or felt seal around the door frame – can mimic a guide failure. It’s not the guide itself, but it puts extra load on both the guide and the regulator, accelerating their wear.
Fixing It Right: Your Repair Options
Once you’ve nailed down the diagnosis, the repair path depends on what’s actually broken and how bad it is.
Guide Re-securement (DIY Friendly)
Complete Regulator Replacement Professional Recommended
Regulator Gear Kit Upgrade Advanced / Professional
After the Fix: Making Sure It’s Done Right
Once everything’s buttoned up, you can’t just assume it’s fixed. Proper validation is key to ensure you don’t have to tear that door apart again next week.
Post-Repair Checklist
-
For any guide repair or realignment, run that window up and down at least ten times. It needs to move smoothly, no hesitation, no weird noises, and absolutely no binding. When it’s fully up, the glass should sit flush with the body line and stay put. If it tilts or drags, you’ve got to go back in – something isn’t aligned right, or a bolt is loose.
-
After a regulator replacement, the window should operate at factory speed and smoothness. If your car has auto-up/down with an anti-pinch feature, you must test it. Roll up a shop towel or a piece of cardboard and place it in the window’s path, then close the window. It should reverse direction immediately upon contact. If it doesn’t, that system needs reinitialization. Some cars just need you to hold the switch past the full-up position for a few seconds; others, especially newer models, might require a scan tool to clear fault codes or reset the motor’s position.
-
Most of the time, a good visual and functional test is enough. But if the anti-pinch system is throwing codes or acting up after a regulator swap, especially on a modern vehicle, you might need a professional-grade scan tool. These systems often communicate with the body control module, and sometimes, clearing codes or performing a specific relearn procedure is the only way to get it right. It’s a lot like how advanced driver-assist systems (ADAS) need recalibration after a windshield replacement.
The Bottom Line: Costs, Risks, and When to Walk Away
Repair costs can swing wildly depending on your vehicle, the quality of parts you choose, and local labor rates. Here’s a rough breakdown of what I usually tell customers to expect:
| Repair Type | DIY Cost (Parts Only) | Shop Cost (Parts & Labor) | Success Rate (When Diagnosed Correctly) | What Happens if it Fails Again |
|---|---|---|---|---|
| Guide Re-securement | $5–$20 (bolts, clips, thread locker) | $150–$300 | High (>90%) – Pretty straightforward. | Continued binding will eventually damage the regulator or crack the glass. |
| Complete Regulator R&R | $80–$250 (for a good quality aftermarket or OEM) | $400–$700 | High (>95%) – It’s a common job. | Improper installation can crack the glass, damage the new motor, or tear up your door panel. |
| Regulator Gear Kit | $30–$60 (for a steel gear upgrade) | $200–$400 | Medium (80%) – Really depends on the tech’s skill. | Bad press-fit or misalignment will destroy the new gear or burn out the motor. |
Here’s a rule of thumb I use with my customers: if the shop repair cost for this (or any) issue starts pushing past 40% of the car’s private-party value – check Kelley Blue Book or NADA for a realistic number – and the vehicle has over 150,000 miles or other major repairs looming, it’s time to seriously consider if the investment makes sense. A window fix should extend the usable life of your car, not suck you into a money pit. For really old cars, sometimes I’ve seen folks just remove the motor and operate the window by hand as a last resort, but that’s not practical for a daily driver.
Always think about the overall value of your vehicle before sinking big money into repairs.
Keep Your Windows Rolling: Prevention & Monitoring
You can definitely extend the life of your window system with some basic care. Every 18 to 24 months, I tell my customers to hit the window guide channels and all the moving points of the regulator – especially cable sheaths and pivot joints – with a silicone-based lubricant. And I mean silicone, not WD-40 or grease. Petroleum-based products attract dirt and turn into an abrasive mess over time. Silicone stays clean and reduces wear on those plastic parts.
Listen to your windows. Seriously. Any change in the motor sound – it sounds strained, moves slower, hesitates – that’s usually the first sign of trouble. Same goes for any visible wobble or tilt in the glass. Catching a binding guide or a dry track early can save you from having to replace the whole regulator later.
If you live in an area with road salt or high humidity, it’s a good idea to inspect inside the door periodically if you’re comfortable with it. Pull the panel and look for rust on the regulator cables, pivot points, and guide tracks. Corrosion is a silent killer; it weakens metal parts long before they actually fail. Just like how a tiny coolant leak can cause major engine damage, hidden corrosion inside your door can lead to a sudden window failure.
Finally, and this might sound obvious, but don’t slam the switch. Use smooth, deliberate inputs. Aggressive operation puts a lot more stress on those gears and cables, especially when it’s cold out and plastics are more brittle. Treat your power windows like the precision mechanisms they are.
