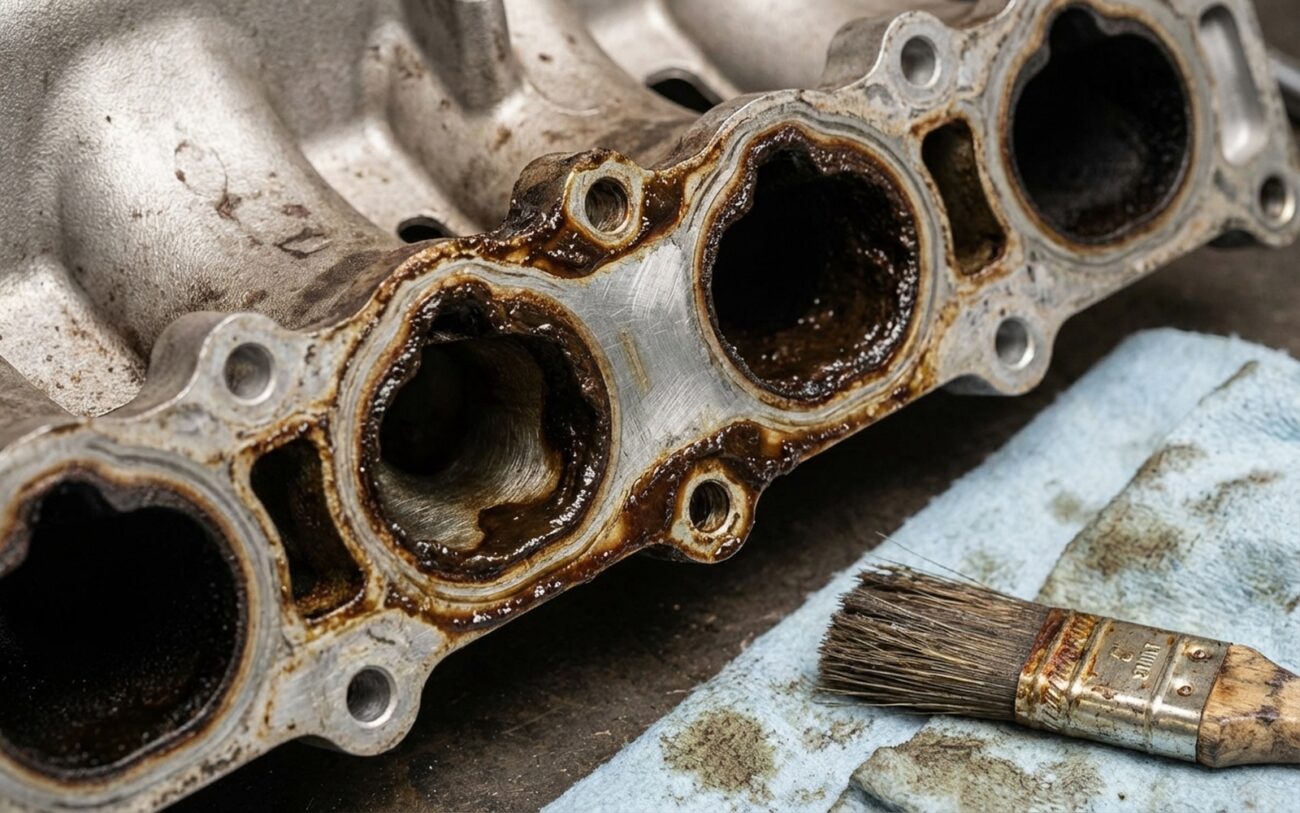
Alright, let’s talk about something that can drive you absolutely nuts: that feeling when you hit the gas, and your engine just… hesitates. It stumbles, maybe even misfires, especially when you’re asking for power—climbing a hill, trying to pass on the highway. Most folks, and rightly so, think “spark plugs” or “fuel filter.” And yeah, that’s where I usually start too. But if you’ve already thrown parts at it and the problem’s still there, it’s time to dig deeper. After a quarter-century in this business, one of the sneakiest culprits I’ve seen is oil sludge building up inside the intake manifold.
What Sludge in the Intake Manifold Does to Your Engine
When that oily crud starts coating the inside of your intake runners, it’s like trying to breathe through a clogged straw. It restricts the airflow to the cylinders, plain and simple. That throws off the air/fuel ratio, making the engine run lean. And a lean condition? That’s a recipe for persistent misfires. Your engine control module (ECM) sees this, and it tries to compensate by dumping more fuel in—you’ll see your long-term fuel trims (LTFT) creeping up, sometimes way up, into the +15% to +25% range. That’s a screaming indicator that the engine isn’t getting enough air, or there’s a vacuum leak somewhere.
Sometimes, you can even hear it. A weird, wet gurgling sound from under the hood, especially when you accelerate, can mean oil is literally sloshing around in the intake tract. And if you’re constantly topping off your oil—say, a quart every 1,500 miles—but there’s no puddle under the car, that oil isn’t magically disappearing. It’s getting sucked into the intake system. Grab a flashlight and peek behind the throttle body; if you see a thick, oily residue pooling there, that’s not just dirt. That’s a symptom of a deeper problem.
My Approach: How I Diagnose Intake Manifold Sludge
Before you start tearing things apart, you absolutely have to confirm the source of the problem. Misfires, oil consumption, a rough idle—these can come from a dozen different issues: clogged fuel injectors, failing ignition coils, vacuum leaks, worn valve seals. Jumping straight to cleaning the intake without a proper diagnosis is just wasting time and money. I see it all the time.
The most reliable way to confirm sludge? You gotta see it. In my shop, I use an articulating borescope. I’ll snake it through the throttle body opening, or sometimes through a removed MAP sensor port if it gives me a better view. What you want to see are clean, smooth surfaces. What you don’t want to see is thick, tar-like deposits, especially around any bends, EGR ports, or those Intake Manifold Runner Control (IMRC) valves. Now, dry, crusty carbon buildup is common in direct injection engines—that’s a different animal. Oily sludge is sticky, dark, and often has a glossy sheen to it. That’s the stuff we’re looking for.
Here’s how I typically differentiate sludge-related issues from other common problems:
| Symptom I See | Why Sludge Causes It | Other Common Culprits | My Diagnostic Steps to Confirm |
|---|---|---|---|
| Misfire under load | Sludge messes with smooth airflow, leading to a lean condition. | Clogged fuel injectors, weak ignition coil, dirty MAF sensor, vacuum leak. |
First, check for lean codes (P0171, P0174) and monitor fuel trims with a scan tool. If LTFT is high, and a relative compression test shows good compression, then it’s likely an airflow restriction. Final confirmation: borescope the intake runners. |
| Oil in throttle body / intake piping | Sludge builds up in the PCV return path or just pools in the manifold. | Failed PCV valve, blown turbo seal, overfilled crankcase, worn valve guides. |
I’ll pressure test the PCV system according to manufacturer specs. If it holds pressure, the valve itself is likely good. Then, remove the throttle body and use the borescope to inspect the manifold interior for pooling oil. |
| High intake air temps (IAT), reduced boost (turbo engines) | Sludge acts like an insulator, reducing how efficiently the intake can cool the charge air. | Failing intercooler, boost leak, dirty air filter, failing IAT sensor. |
Monitor IAT sensor readings. I’ll measure the temperature drop across the intake manifold (pre-manifold vs. post-manifold) with an infrared thermometer. Then, visually confirm with the borescope through a sensor port. |
| Rough idle, poor throttle response | Sludge can bind up the IMRC (Intake Manifold Runner Control) valves or flaps. | Vacuum leak, dirty throttle body, failed IMRC actuator, carboned-up intake valves. |
Using a good scan tool, I’ll command the IMRC valves to cycle. Listen for any binding or sticking. If there are no external vacuum leaks (confirmed with a smoke test), then an internal restriction or binding is highly likely. Final confirmation is always with the borescope. |
Why This Oily Mess Happens: The Root Cause
Look, the intake manifold isn’t the problem itself; it’s just the unfortunate victim. The real source of this sludge is almost always the PCV (Positive Crankcase Ventilation) system. Its job is to pull blow-by gases—things like air, unburned fuel vapor, and oil mist—out of the crankcase and route them back into the intake to be burned off. Good for emissions, right?
But on a lot of modern engines, especially those with high-pressure EGR systems or really tight emissions tolerances, that oil mist isn’t fully separated before it gets dumped back into the intake. Over time, that oil vapor condenses on the cooler walls of the intake manifold, particularly in areas where airflow is low, like tight bends or dead zones. Add exhaust gas recirculation (EGR) into the mix, and you’re introducing hot, soot-laden exhaust gases that combine with that oil. That’s how you get that hard, crusty, tar-like sludge. This is especially prevalent in direct injection (DI) engines, where the fuel is sprayed directly into the cylinder, so it doesn’t get a chance to wash over the back of the intake valves and keep them clean. Those deposits just accumulate, unchecked.
From the Manufacturer’s Mouth:
Some manufacturers have actually owned up to this. For example, Ford put out service guidance for certain 5.0L V8 engines, noting oil accumulation in the intake due to PCV system design. They even revised PCV valves and routing. Similarly, I’ve seen plenty of turbocharged four-cylinder engines from European brands with known issues of oil carryover, either from the turbocharger’s compressor side or just poor crankcase ventilation design. It’s not always user error.
It’s absolutely critical to figure out if the sludge is from normal PCV flow or if it’s a symptom of a bigger mechanical failure. A leaking valve cover gasket, a blown turbo seal, or a cracked crankcase breather can all dump excessive oil directly into the intake. Cleaning the manifold without fixing that underlying source is pointless—it’s like trying to clean a sink while the faucet is still running full blast. You’ll be right back here in a few months.
Your Options: How I Tackle the Sludge
The right repair path depends entirely on what that borescope reveals. Don’t guess; confirm it first. Here are the options, from easiest to most involved:
Throttle Body & Upper Plenum Cleaning DIY-FEASIBLE (for light cases)
Full Manifold Removal & Deep Clean Professional Recommended
Chemical Intake Cleaning (Additives) Temporary / Last-Resort / Use with Caution
Manifold Replacement
Verifying the Fix: How I Know It’s Actually Done
Don’t just assume it’s fixed because you cleaned it. Verification is absolutely key. I’ve seen too many people put everything back together, and the problem’s still there because they missed something.
After reassembly, get your scan tool hooked up. The engine should idle smoothly, within about 20 RPM of its target. Then, I monitor fuel trims—both Short Term (STFT) and Long Term (LTFT)—at idle and during a steady cruise. They should stabilize within ±10%. If your Long Term Fuel Trim is still hanging above +15%, you’ve still got a lean condition. That means either a restriction remains, or you’ve introduced a vacuum leak during reassembly. (And yes, that happens more often than you’d think.)
I’ll also perform a wide-open throttle (WOT) snap test and check for any misfire counts. If those trouble codes come back, especially P0171 (System Too Lean) or P0174 (System Too Lean Bank 2), you’re going back in. If I’ve replaced the manifold, I always do a smoke test to confirm the new gaskets are sealing perfectly. No leaks, no worries.
The most telling test, though? A follow-up borescope inspection after 50 to 100 miles of driving. If you see a fresh oily film already building up, the root cause—likely a PCV issue or internal engine oil consumption—isn’t resolved. That’s when you need to dig deeper into crankcase ventilation problems, piston ring wear, or valve seal leakage. That’s a whole different ballgame.
What This Will Cost, and When to Walk Away
Costs, as always, vary wildly based on the repair level and whether you’re tackling it yourself or bringing it to a shop. Here’s a realistic breakdown of what I see:
| Repair Type | DIY Cost (Parts Only) | Shop Cost Estimate | My Success Rate (if root cause addressed) | Secondary Risk |
|---|---|---|---|---|
| Throttle Body/Plenum Clean | $25–$40 | $150 – $300 | High (for minor sludge) | Debris ingestion into engine, new vacuum leaks if not torqued correctly. |
| Full Manifold Remove & Clean | $60–$100 | $500 – $1,000 | High (if PCV system is also addressed) | Cracked manifold during removal/reinstall, stripped bolts, damaged sensors. |
| Manifold Replacement | $400 – $1,200 | $1,200 – $2,200 | Very High (assuming proper installation and root cause fix) | Incorrect gasket alignment, improper PCV hose routing, sensor damage. |
Now, here’s where the tough decisions come in. If your car has chronic oil consumption—meaning you’re burning oil because of worn piston rings or valve seals—then cleaning the intake is just a band-aid. The real fix might require a PCV system upgrade, new piston rings, or even a short block replacement. If the total repair cost starts to climb past 50% of the vehicle’s private-party value (check Kelley Blue Book or Edmunds for a realistic number), you really need to ask yourself: does this make financial sense? I’ve seen people drop $2,000 trying to save a $4,000 car. Technically possible, sure, but often not the smartest move for your wallet in the long run.
Keeping That Sludge From Coming Back
Prevention is always better, and cheaper, than a full cleaning. Start with your oil. Use the exact viscosity and specification your manufacturer recommends—whether it’s Dexos1, API SP, or ACEA C3. These oils are formulated to reduce volatility and control sludge formation. Don’t cheap out here. If you do mostly short trips, which means your engine rarely gets to full operating temperature, follow the “severe service” oil change interval. Frequent cold starts mean moisture and fuel dilution build up faster, and that accelerates sludge formation.
My Proactive Maintenance Checklist
-
After any intake cleaning, or even just as good practice, always inspect and replace the PCV valve, its hoses, and any oil separator (if your engine has one). Some engines have a factory service interval for the PCV system—don’t skip it. It’s cheap insurance.
-
For high-mileage vehicles, especially direct injection engines, consider installing an aftermarket oil catch can. It won’t eliminate PCV flow, but it can trap a significant amount of that oil vapor before it ever reaches your intake manifold. It’s a solid upgrade.
-
Stay proactive. Every 30,000 miles or so, use a borescope to peek inside the intake through the throttle body. And keep an eye on your fuel trims with an OBD2 scanner. If your Long Term Fuel Trim slowly climbs from, say, +5% to +12% or higher, that’s your early warning sign—airflow restriction is starting. Address it early, and you’ll save yourself a full teardown down the road.
