After twenty-five years wrenching on Audis, I’ve seen my share of Torsen differentials come through the shop. And believe me, when these things start to go, they give you a warning. The trick is knowing what to listen for before a small problem turns into a major headache. This isn’t a light repair, so catching it early can save you thousands.
The Early Warnings: What to Listen For
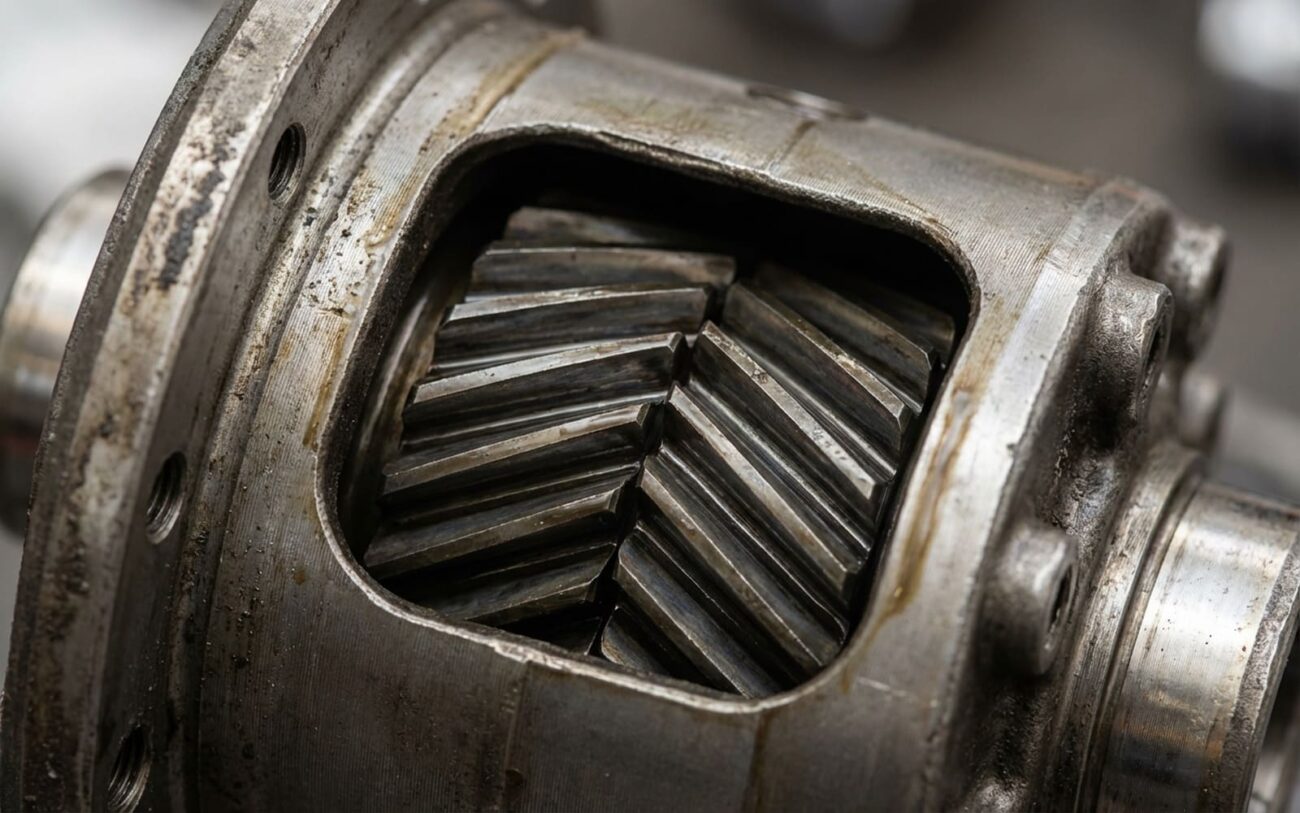
The first sign of Torsen trouble is almost always mechanical, and it’s subtle at first. What I typically hear is a distinct whining or grinding noise that pops up during slow, tight turns. Think parking lots, U-turns, or really any maneuver where one wheel is turning significantly faster than the other. This isn’t your typical driveline noise that scales directly with speed; it’s torque- and angle-dependent. It’ll feel like it’s coming from right under the center console or the floor hump, and that’s because it is — that’s where your Torsen lives.
This sound isn’t just random gear chatter. It’s the Torsen’s internal worm gears, made of hardened steel, grinding against the softer bronze worm wheels. The differential relies on precise friction between these dissimilar metals to bias torque between the front and rear axles. When the oil can’t maintain that interface, those gears start to wear, and you hear the result. In my experience, this noise often gets mistaken for a transmission issue or a wheel bearing, but remember, it doesn’t track with speed alone. It gets worse under load and during actual differential rotation.
Confirming the Diagnosis: It’s All About the Evidence
Before you start tearing anything apart, you need to confirm that the noise is definitely coming from the Torsen and not something else mimicking it. A bad wheel bearing, for instance, will usually whine steadily as speed increases, regardless of your steering angle. A worn CV joint, on the other hand, typically clicks or clunks on full-lock turns. The Torsen issue is different: it’s centralized, sensitive to load, and directly tied to the differential action itself.
Step 1: The Drain Plug Inspection
When you perform a fluid service, or if you’re just checking things out, pull that magnetic drain plug and inspect it closely. If you see a fine, sparkly residue with a gold or brass hue, that’s bronze from the worm wheels. That’s not normal wear; that’s active damage. If you’re seeing silver or gray ferrous shavings, that’s a different beast altogether – usually ring and pinion or bearing failure, which is a more advanced problem. As I always tell my apprentices: “If the glitter on your drain plug is yellowish, it’s a clear message: the lubricant failed the Torsen.”
Step 2: The Stethoscope Test
If you’re hearing the noise, here’s how to pinpoint it. Get the vehicle safely lifted on a hoist so you can run it in gear under light load. Carefully use a mechanic’s stethoscope directly on the differential housing. A healthy Torsen should be relatively quiet. If you hear that distinct grinding or whining amplified through the housing, you’ve found your culprit.
Step 3: Used Oil Analysis (UOA)
For the ultimate confirmation, especially if the symptoms are subtle, send a sample of the used differential fluid for a Used Oil Analysis. This lab test will show elevated levels of copper and tin – the primary components of bronze – which definitively confirms Torsen-specific wear. It’s a small investment that can prevent a lot of guesswork.
The Root Cause: Why the Wrong Oil is a Death Sentence
So, why does the wrong oil destroy a Torsen? It’s not just about viscosity, though that matters too. It’s about chemistry and material compatibility. The Torsen unit uses hardened steel worm gears meshing with softer bronze worm wheels. That bronze provides the precise friction needed for torque biasing. But it’s also incredibly vulnerable.
Standard GL-5 gear oils contain sulfur-phosphorus extreme pressure (EP) additives. These are fantastic for steel-on-steel contact, protecting gear teeth under heavy loads. The problem is, those same additives can corrode yellow metals like bronze over time. They literally eat away at the gear surfaces, degrading them and ruining that critical friction interface.
The Non-Negotiable Standard:
You absolutely must use fluid that meets VW/Audi specification G 052 145. This isn’t a suggestion; it’s a requirement. This fluid ensures compatibility with bronze components, provides the correct EP protection, and maintains the proper friction characteristics. I’ve seen countless issues from using the wrong fluid, and it’s always an expensive lesson.
And then there’s the friction modifier issue. The Torsen’s ability to transfer torque front-to-rear depends on a stable coefficient of friction between those gears. If the fluid doesn’t have the right frictional properties, you’ll get chatter, shudder, or even a total loss of torque bias. Viscosity matters too, of course. Too thick, and the oil won’t circulate properly; too thin, and it shears under load, losing its protective film. It’s a delicate balance.
Resolution Pathways: Fixing the Problem
Technician’s Tip: Don’t Skimp on the Details
Never reuse old seals or guess on torque settings. Most Audi differential plugs require 40–50 Nm. A leak now means a repeat job later, and potentially more damage if the fluid level drops. Use new crush washers, every time.
Incorrect Fluid Correction DIY-Feasible
Professional Flush and Refill Professional Only
Differential Carrier Replacement
Post-Repair Validation: Did It Work?
After any fluid change or, heaven forbid, a carrier replacement, you need to confirm the repair worked. Don’t just drive it around the block. Put the car through its paces with multiple tight, slow turns. Figure-eights in an empty parking lot work really well for this. Listen carefully for any new noise or binding. There should be none. Then, at your next service interval – or even sooner, say 5,000 miles – pull the drain plug again. Inspect it. You should see clean oil and, critically, no new brass-colored debris.
Advanced Validation (Carrier Replacement Only)
If you’ve gone through the expense of replacing the entire carrier, simply having a quiet differential isn’t enough. The torque bias function must be fully restored. A skilled technician with a factory-level scan tool can observe wheel speed sensor data during a controlled traction event to confirm the system is actively and correctly managing torque. It has to work like a quattro, not just sound like one.
Cost & Economic Decisions
Let’s talk money, because this is where the early detection really pays off. A simple fluid correction, if you catch it before any damage, can be under $200 if you DIY, or around $300–$500 at a shop for a professional flush with OEM fluid. That’s pocket change compared to the alternative.
If you’re looking at a differential carrier replacement, you’re in for a significant hit. Parts and labor typically run anywhere from $3,500 to $6,000 or even more, depending on the model and where you get the work done. I always tell my customers: if the repair cost starts to exceed 50% of your vehicle’s current market value, you need to seriously consider your options. Is it worth it, or is it time to move on?
Prevention & Ongoing Monitoring
My Maintenance Checklist for Torsen Health
-
Always, and I mean always, use only VW/Audi G 052 145 fluid or a manufacturer-approved equivalent like Pentosin FFL-3. There are no shortcuts here.
-
Perform a final drive service (drain and refill) every 40,000 to 60,000 miles. Don’t wait for symptoms.
-
Inspect the magnetic drain plug for any gold/brass glitter at every service interval. This is your early warning system.
-
Fix any pinion seal or cover gasket leaks immediately. Low fluid levels lead to overheating and accelerated wear.