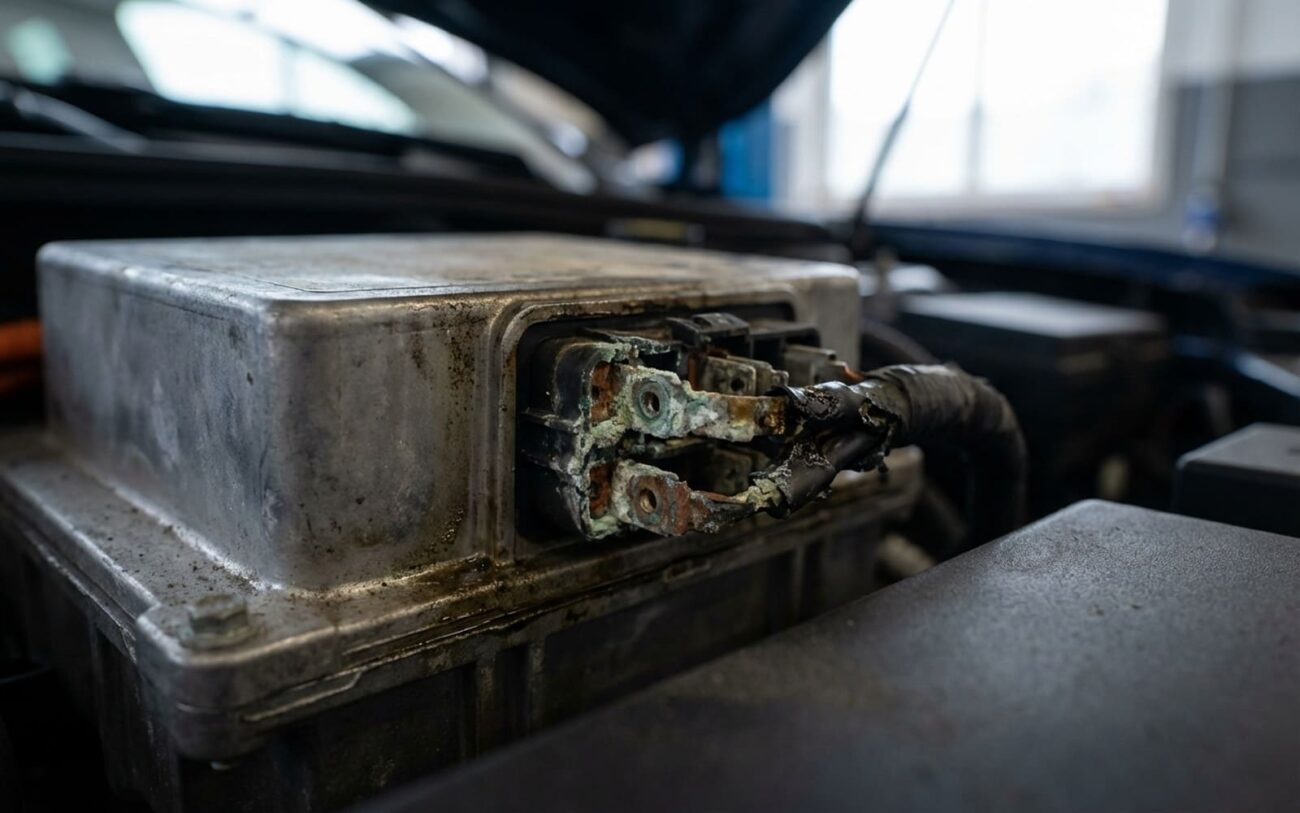
The Dead EV: Why Your 12V Battery Is Flat (and it’s not the battery)
Alright, let’s cut to it. I’ve seen this scenario play out more times than I can count in the shop: a customer plugs in their EV, the big high-voltage battery charges right up to 80% or more, everything looks normal. They go to bed, wake up, and the car’s a brick. No dash lights, no response from the key fob, nothing. Dead as a doornail.
So, they jump-start the little 12V battery, or maybe they throw a charger on it overnight. Suddenly, the car wakes up, ready to go, and guess what? The main high-voltage battery is still showing full charge. That right there is your first, biggest red flag. If the big battery is charged, the 12V system should be fully powered. The missing link, almost every time, is the DC-DC converter.
Think of the DC-DC converter as the EV’s alternator. In a gas car, the alternator uses a belt to spin and generate 12-14 volts to keep the small battery charged and power everything else. In an EV, there’s no engine to spin an alternator. Instead, this converter takes the high-voltage DC power from the main battery pack and steps it down to that familiar 12-14 volts. It’s what keeps your lights on, your radio playing, your computers running, and your 12V auxiliary battery topped up when the car’s “on” or in accessory mode.
When this converter goes south, the symptoms are pretty consistent, and they tell a clear story. The primary one, like I said, is a dead or deeply discharged 12V battery after the car’s been parked, even though the main high-voltage pack is fully charged. Secondary symptoms? The car just won’t “wake up” properly. You might get some warning lights, but no “READY” mode, or it won’t let you shift into gear. That’s because all the control modules in an EV—and there are a lot of them—rely on that 12V power. If it’s not there, the car can’t complete its startup sequence.
Another big clue I often find is a parasitic draw that just never shuts off. A healthy EV should settle down into a sleep mode, pulling less than 50 milliamps. But a failed DC-DC converter can get stuck in a kind of semi-active state, drawing hundreds of milliamps constantly. That’ll kill a 12V battery overnight, no problem. I’ve diagnosed plenty of cases where the DC-DC module itself was the source of that drain, not some stuck body control module or an aftermarket gadget.
My Diagnostic Approach: Is it Charging? Or is it Drawing?
Pinpointing whether it’s the DC-DC converter or something else mimicking the problem takes a methodical approach. You need to answer two key questions: Is the converter charging when it’s supposed to? And is it drawing power when it absolutely shouldn’t be?
The tricky part is that a bunch of other faults can make it look like a bad converter. I’ve seen faulty sleep states in the Body Control Module (BCM), telematics units, or even the infotainment system. Sometimes it’s a damaged High-Voltage Interlock Loop (HVIL) or just a software glitch preventing the HV system from even engaging. That’s why you can’t just throw a new converter at it based on a hunch. You need solid data.
Testing for a Parasitic Draw
When I suspect a constant draw, the fuse-pull method is my go-to. It’s the most reliable way to isolate it. You’re basically doing the same thing you would for a constant draw from a fuel pump circuit. Hook up an amp meter in series with the 12V battery’s negative terminal. Make sure the car’s fully asleep—that can take 15 to 30 minutes, sometimes longer on some models. Once it’s settled, start pulling fuses one by one. If the draw drops significantly when you pull the fuse for the DC-DC converter (it’s often labeled “PCS,” “DCDC,” or “Aux Pwr” depending on the OEM), then you’ve found your culprit. You’re not guessing; you’re measuring and eliminating variables.
Testing for No Charge Output
If the 12V battery isn’t getting charged, even when the car is in “READY” mode, that’s another clear sign. First, make sure the car actually is in READY mode. Then, measure the voltage directly at the 12V battery terminals. It should jump up to around 13.8–14.8V. If it stays at battery voltage (say, 12.4V or less), the converter isn’t doing its job. A good scan tool can also be invaluable here. I’ll often monitor the commanded state of the DC-DC converter versus its actual output voltage and current. If the car’s computer is telling the converter to charge, but I’m seeing no output, then the converter’s likely failed internally.
| Symptom I See | Likely DC-DC Converter Issue | Common External Mimics | My Go-To Test |
|---|---|---|---|
| High parasitic draw (>50mA) in full sleep mode. | Internal control circuit failure, converter stays partially awake, draining the 12V battery. | Faulty BCM, Telematics Unit, infotainment system not sleeping; stuck relay; aftermarket alarm. |
Perform a parasitic draw test. Pull the fuse for the DC-DC converter (often “PCS” or “DCDC”). |
| 12V battery not charging in READY mode. | Failure of the converter’s power stage (blown MOSFETs, diodes, transformer windings), no output voltage. | Open HV interlock loop, damaged HV cable, failed BMS command, or software fault preventing HV engagement. |
Measure voltage at 12V terminals in READY mode. Use OBD2 to monitor commanded state vs. actual output. |
Critical Diagnostic Boundary: Don’t Blame the Converter (Yet)
Here’s the boundary you must respect before condemning the DC-DC converter: if the main high-voltage contactors aren’t closing, or the Battery Management System (BMS) isn’t sending the “enable” command—maybe due to a software fault or an issue in the High-Voltage Interlock Loop (HVIL)—then the converter won’t charge. But that’s not the converter’s fault. Always, always rule out proper command and HV power delivery to the converter before you decide the unit itself is bad. You’ll save yourself a lot of headaches and wasted parts.
What I Find When They Fail: Common Root Causes
When the DC-DC converter itself is the problem, the root causes are almost always tied to its internal electronics. We’re talking about the circuit board, the power semiconductors (like MOSFETs), the transformers, and how well it handles heat. These aren’t really “wear-and-tear” items in the traditional sense; they fail because of stress, the environment they’re in, or sometimes just a design limitation.
One of the most common failure points I’ve run into, and it’s documented in service literature for some vehicles, is cracked surface-mount ceramic capacitors. On certain EVs, like the 2017–2019 GM Bolt EV, that constant thermal cycling—heating up during operation, cooling down when parked—can cause tiny microcracks in these capacitors. Once they crack, they lose their capacitance or go open-circuit, which throws off the control logic and can shut the whole module down.
Thermal cycling also wreaks havoc on solder joints, especially on the power MOSFETs and transformers. Over time, that constant expansion and contraction fatigues the solder, creating what we call “cold solder joints.” These can be a real headache to diagnose because they might work fine when cold, then fail intermittently under load. And in units mounted in hot engine bay environments, electrolytic capacitors can dry out. When that happens, they can’t filter voltage properly, leading to instability or complete shutdown.
Contamination is another real-world killer. If the seals around the connectors or the housing start to degrade, moisture and road salt can get inside. That leads to corrosion on the circuit board traces or component leads, creating opens or shorts. I’ve pulled modules from cars in coastal areas where saltwater ingress had completely destroyed multiple traces on the board.
And then there are voltage transients. These can kill a converter instantly. A big spike from the high-voltage side—say, during aggressive regenerative braking—or even a poorly executed jump-start on the 12V system can send a surge through the control circuit, basically vaporizing a MOSFET or a diode. These aren’t gradual failures; they’re catastrophic and usually irreversible.
Getting It Fixed: My Recommended Pathways
How you go about fixing this really depends on what the root cause is, and honestly, your access to the right tools and expertise. One thing is non-negotiable: safety is paramount. We’re dealing with high-voltage systems here, so only properly trained technicians should be poking around inside these things.
External Connection Service (Always Start Here)
Component-Level PCB Repair Professional Only
Full Module Replacement Professional Only
Temporary Workaround (If You’re Stranded)
Post-Repair Validation: Don’t Just Assume It’s Fixed
Never, ever assume the repair worked. Validation is absolutely critical, especially with high-voltage systems. You don’t want to send a customer out only for them to be stranded again tomorrow.
For simple connector service or cleaning, the test is pretty straightforward: with the car in READY mode, measure the voltage at the 12V battery terminals. It should read a solid 13.8–14.8V. Then, turn on all the major electrical loads—headlights on bright, defroster on, HVAC on max. The voltage might dip a little, but it should stay above 13.2V and recover quickly. A significant drop tells me there’s still resistance in the charging circuit or the repair wasn’t complete.
For a component repair or a full module replacement, I go a few steps further. First, I always perform a parasitic draw test. I let the car go through its full sleep cycle (again, 15–30 minutes, sometimes more). Once it’s asleep, I verify the total draw is under 50 milliamps. If it’s higher, something is still preventing shutdown—it could be the new converter, or maybe another module that was affected by the original failure.
Second, I take the car for a good 20–30 minute drive. While I’m driving, I’m monitoring the DC-DC converter output via an OBD2 scan tool. The voltage needs to remain stable within the OEM range—typically 13.5–15.0V—no matter the driving conditions. Sudden drops or spikes indicate instability, and that means the problem isn’t truly solved. You’ll need a quality digital multimeter, a DC clamp meter for draw testing, and a capable scan tool that can read live DC-DC data to do this right.
The Money Talk: Cost, Risk, and Making the Right Call
Let’s talk real numbers and risk, because this is where the rubber meets the road. Repair cost is going to depend heavily on the approach you take and your shop’s labor rates.
| Repair Type | DIY Cost (Parts) | Shop Cost (Parts & Labor) | My Success Rate | Secondary Risk if it Fails |
|---|---|---|---|---|
| Connector Service | $20 (cleaner, grease) | $100–$200 | High (>80%) | Minimal; you just move on to the next diagnostic step. |
| Component-Level PCB Repair | $50–$150 (components, tools) | $300–$600 | Low to Moderate (<50%) | Wasted time and money; potential for further damage if not done right. |
| Module Replacement | $800–$2,000 (part only) | $1,200–$3,000 | High (>95%) | Significant financial loss if the initial diagnosis was wrong. |
The economic decision becomes really critical when the repair cost starts to approach 40% of the car’s market value. A DC-DC converter failure is serious, no doubt, but replacing it on an older, lower-value EV might not make financial sense for the owner. You’ve got to weigh the repair cost against the car’s remaining usability and its resale value. I’ve seen owners fix the same converter twice on a 5-year-old EV—sometimes it pays off, sometimes it just doesn’t. It’s a tough call, but it’s one I have with customers regularly.
Prevention & Monitoring: Keeping Your EV Healthy
Prevention always beats repair, every single time. The health of your 12V auxiliary battery directly impacts that DC-DC converter. A weak or failing 12V battery forces the converter to work harder and longer to maintain charge, which means more heat and more thermal stress on those internal components. That constant high-load operation accelerates wear on the capacitors, MOSFETs, and solder joints—the very things I mentioned failing earlier.
So, here’s my advice: replace that 12V battery on schedule. Don’t wait for it to die completely. Most EVs use AGM batteries, and they typically last 5–7 years. If you start noticing slow cranking (yes, even in an EV, you’ll hear the contactors engage slower), dim lights after parking, or frequent “12V battery low” warnings, get it tested early. It’s cheap insurance.
Monthly monitoring takes two minutes and can catch issues before they become big problems. Grab a digital multimeter: with the car completely off, check the 12V battery voltage. It should be above 12.4V. Then, start the car (get it into READY mode) and check again. The voltage should immediately jump to 13.8–14.8V. If it doesn’t, or if it’s sluggish, your DC-DC converter isn’t charging. Some EVs even display the converter output on their energy screens—keep an eye out for inconsistencies there.
