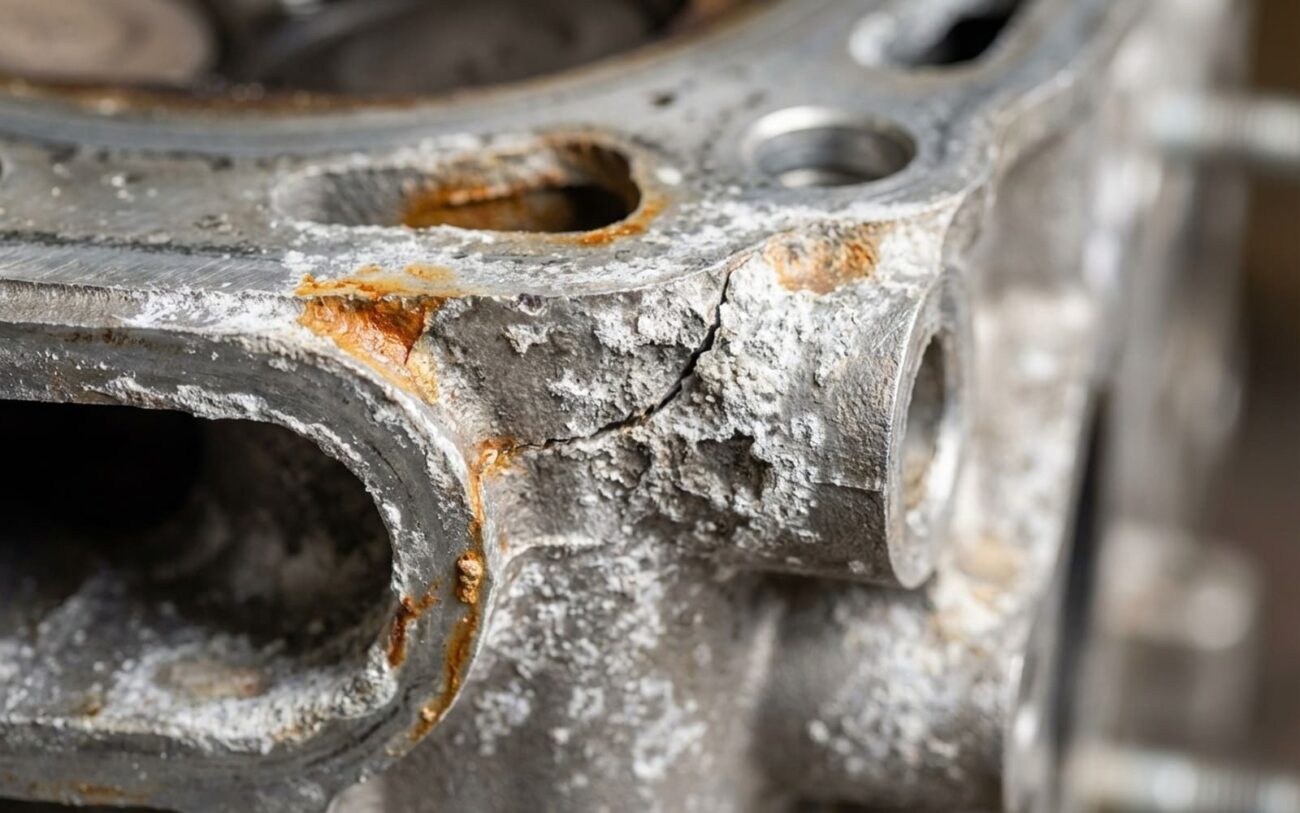
Alright, let’s talk aluminum cylinder heads. After twenty-five years wrenching on engines, I can tell you that internal corrosion in these heads is one of the trickiest problems out there. It doesn’t usually make a dramatic entrance; it’s a slow, quiet killer that often gets mistaken for a dozen other cooling system headaches. But if you know what you’re looking for, the signs are pretty distinct. And believe me, knowing these signs early can save you a whole lot of grief – and money.
The Red Flags: What I Look For
When a customer comes in with what they think is a “mystery leak,” my mind immediately goes to internal head corrosion if we’ve ruled out the obvious stuff. Here’s what usually tips me off:
1. Chronic Coolant Loss with No Visible Leak
This is probably the most common first clue. You’re topping off the reservoir every week, but there’s no puddle under the car, no sweet smell in the cabin from a heater core, no drips from hoses or the radiator. A standard cooling system pressure test often won’t show anything either – at least not externally. That’s a huge red flag. It means the coolant is going somewhere inside the engine, not just evaporating. This usually points to internal porosity in the water jacket walls, where the aluminum is literally getting eaten away from the inside out.
2. The “Dirty Coolant” Test
Pop the radiator cap (ONLY when the engine is stone cold, folks!) and take a good look at the coolant. It should be bright and clear, whatever color it’s supposed to be – pink, green, orange, blue. If it’s murky, brownish, or has a slimy texture, you’ve got trouble. Even worse? If you see visible white or gray specks floating around. Those aren’t just dirt; those are aluminum oxide particles, direct byproducts of your cylinder head breaking down. It’s like watching your engine slowly dissolve. I see this a lot when people use the wrong coolant type or mix different kinds, which triggers nasty chemical reactions that strip away the aluminum’s natural protective layer.
3. Overheating, Especially Under Load
If the engine starts running hot, particularly when you’re working it hard (towing, climbing hills, or just stuck in heavy traffic), and you’ve already checked the usual suspects like a clogged radiator, a weak water pump, or a stuck thermostat (we cover those elsewhere, but rule them out first), then internal corrosion is a prime candidate. What happens is the corrosion builds up scale inside the narrow coolant passages in the head, especially around the exhaust valve seats and ports. This scale acts like insulation and chokes off flow. The heat gets trapped, and your engine starts cooking.
4. Coolant in the Engine Oil (The “Chocolate Milk” Warning)
This is the big one, the absolute deal-breaker. If you pull your dipstick and the oil looks like chocolate milk, or has a frothy, milky consistency, you need to STOP DRIVING IMMEDIATELY. I can’t stress this enough. This means corrosion has created a direct pathway between a coolant passage and an oil gallery inside the head casting. Coolant in the oil is a death sentence for your engine’s bearings and other critical components. Even a few minutes of running like this can wipe out the bottom end. This isn’t a “get to the shop next week” issue; it’s a “tow it here now” emergency.
5. Combustion Gases in Coolant (Without Oil Contamination)
Sometimes you’ll get combustion gases in the cooling system, but the oil looks fine. A block test (for hydrocarbons in the coolant) will confirm it. This usually points to a head gasket, but if the gasket checks out, it could be a corrosion-induced pinhole from a water jacket directly into a cylinder. It’s rarer, but I’ve definitely seen it. Even rarer, after cleaning everything off, you might spot actual coolant weeping directly from the head casting itself, bypassing the gasket entirely. That’s not a gasket problem; that’s the metal itself failing.
My Diagnostic Approach: Separating Corrosion from Imposters
Look, a lot of these symptoms overlap with other, more common cooling system failures – a blown head gasket, external leaks, a bad water pump. You can’t just guess; tearing down an engine is expensive work. My job is to isolate the true source, and that means targeted testing. Here’s how I go about it:
Step 1: The Pressure Test – The Foundation
I always start with a cooling system pressure test. I’ll hook up the tester and bring the system up to the OEM specified pressure (typically 16–20 psi). Then I let it sit for at least 30 minutes, sometimes longer. If the pressure drops, but I can’t find any external leaks – no drips, no steam, no wet spots anywhere – that’s a big clue. This tells me the coolant is going somewhere internal. If I then follow up with a combustion gas test (a “block test”) and it comes back negative (no hydrocarbons in the coolant), it strongly suggests internal coolant loss not tied to combustion. That points me right back to corrosion porosity in the head casting. Sometimes, if I pull the valve cover, I can even spot weeping from the head itself.
Step 2: Coolant Analysis – What’s in the Juice?
We talked about dirty coolant earlier. But beyond just looking at it, I’ll often flush a small amount of coolant out and examine it closely. If I see those aluminum oxide particles, that’s a near-certain indicator. I also use coolant test strips to check the pH and reserve alkalinity. If the pH is below 7.5, that coolant is acidic and actively attacking the aluminum. This isn’t just “old coolant”; it’s corrosive coolant.
Step 3: Targeting Coolant-in-Oil
If I suspect coolant in the oil, beyond just the dipstick check, I’ll do a specific test. With the engine cold, I’ll pressure test the cooling system again, but this time, I’ll remove the oil filler cap. I’ll watch closely for any coolant seepage or a rising oil level in the valve cover area. If the vehicle has an oil cooler (many do), I’ll often disconnect it and pressure test it separately to rule it out as the culprit. A cracked engine block can also cause this, but with aluminum heads, the head is usually the first place I look.
Step 4: Pinpointing Overheating Issues
For overheating with contaminated coolant, after ruling out the radiator and water pump, I’ll use an infrared thermometer to scan the cylinder head surface. I’m looking for localized hot spots, which can indicate restricted flow in specific passages due to corrosion scale. Flushing the system and seeing those aluminum oxide particles come out just confirms my suspicion.
Step 5: When Combustion Gases are the Only Symptom
If I’m getting combustion gases in the coolant, but no coolant in the oil (ruling out a major head gasket breach into an oil gallery), I’ll perform a cylinder leak-down test. I’ll pressurize each cylinder with compressed air and watch the coolant reservoir. If I see bubbles in the coolant during the test on a specific cylinder, that confirms a path from that cylinder into the cooling system. Then, I’ll use a borescope through the spark plug hole to inspect the combustion chamber roof for pitting or erosion. That “steam cleaning” look on the piston or chamber roof is a dead giveaway that coolant has been leaking directly into the cylinder.
Why Aluminum Heads Fail: The Real Root Causes
It’s not bad luck when an aluminum head corrodes internally; it’s almost always a chemistry problem. Modern aluminum heads rely on a stable, protective oxide layer to keep them intact. The right coolant maintains that layer, but the wrong one? It strips it away. Here are the primary failure mechanisms I see in the shop:
1. Electrolytic (Galvanic) Corrosion
This is a big one. It happens when dissimilar metals – like an aluminum head and, say, a cast iron block or a copper radiator core – are connected electrically through the coolant. If someone uses an old-school Inorganic Acid Technology (IAT) “green” coolant in a system designed for Organic Acid Technology (OAT) or Hybrid OAT (HOAT), that chemical imbalance creates a galvanic cell. Think of it as a tiny battery forming inside your engine. The aluminum becomes the “anode” and starts corroding rapidly. It’s especially aggressive around joints or fasteners where different metals meet and current can flow. I’ve seen this play out on older GM LS engines and Ford’s EcoBoost platforms time and again when the wrong coolant was used.
2. Cavitation-Erosion Corrosion
You’ll often find this in areas with high coolant velocity, like near the water pump or in really tight passages within the head. Cavitation happens when vapor bubbles form in the coolant due to pressure changes, then violently collapse against the metal surface. This mechanical hammering literally strips away the protective oxide layer, exposing fresh aluminum to further attack. It gets much worse if someone’s running plain water or a low-quality coolant that lacks the proper inhibitors. Over time, this leads to deep, honeycomb-like pitting. A failing water pump can definitely contribute by creating excessive turbulence, but the root cause is still the coolant’s inability to protect against this mechanical wear.
3. Acidic Attack and pH Degradation
Coolant isn’t “lifetime,” no matter what some labels claim. It breaks down over time, especially if it’s pushed beyond its service interval. As it ages, its alkaline reserve (which we measure by pH) drops. What makes it worse is if combustion gases are leaking into the cooling system – even from a tiny, undetected head gasket breach. Carbon dioxide from the exhaust reacts with the water in the coolant to form carbonic acid. This acidic environment is incredibly aggressive and will rapidly attack aluminum, accelerating pitting and oxide buildup. This is why I always tell people to use coolant test strips annually to check pH and reserve alkalinity. If that pH drops below 7.5, your coolant is no longer protecting anything; it’s actively destroying it.
Now, it’s important to understand that head gasket failure and aluminum corrosion are distinct issues, but they often play off each other. Corrosion can ruin a gasket’s sealing surface, leading to a leak. Conversely, a leaking gasket can contaminate the coolant, speeding up corrosion. Some manufacturers have even put out service bulletins for specific engines where using non-specified coolant led to widespread head porosity. The big takeaway here? Coolant chemistry isn’t just about keeping things cool; it’s about structural protection for your engine.
The Hard Truth: Can You Fix a Corroded Aluminum Head?
Let’s be straight: most internal aluminum head corrosion is beyond repair. I’ve seen too many attempts that just don’t hold up. Your options depend entirely on where the corrosion is and how deep it’s gone. Here’s my breakdown:
When It’s Non-Repairable (Replace the Head)
If corrosion has created a pathway between a coolant passage and an oil gallery, or worse, directly into a combustion chamber, that head is done. Period. You’re looking at a NON-REPAIRABLE → REPLACE HEAD CASTING situation. Attempts to pin, weld, or impregnate these areas might seem like a good idea, but they rarely last. These parts of the head endure immense pressure and extreme thermal cycling. A failed repair here can be catastrophic – imagine losing all your coolant into the oil at highway speed. It’s just not worth the risk. The same goes for widespread pitting in the water jackets; chemical cleaning might remove the debris, but it doesn’t restore the original wall thickness or the structural integrity of the casting.
Limited External Repairs (Machine Shop Only)
In very rare, specific cases, if the corrosion is limited to a non-critical area – say, a small porous spot on the outside of the head, away from any combustion chambers or oil galleries – it might be repairable. This is strictly a PROFESSIONAL-ONLY – MACHINE SHOP REQUIRED job. It involves grinding the area down to bare, clean metal, degreasing it thoroughly (non-chlorinated, always!), and then applying a high-strength, aluminum-specific epoxy like Devcon or J-B Weld WeldStil. If this repair is on a gasket surface, the head absolutely must be resurfaced afterward to ensure perfect flatness. Success here hinges on proper prep and easy access to the surface. But let me be clear: this kind of patch will NOT hold on pressurized internal passages. Don’t even try it.
Temporary Sealants (Last Resort, High Risk)
There’s one scenario where a stop-gap measure might buy you a little time: minor, confirmed external seepage from surface porosity. In this situation, a manufacturer-approved sealant, like GM Cooling System Seal Tabs, could potentially work. But this is a TEMPORARY / LAST-RESORT solution. Never, ever use these for internal leaks. I’ve seen more than a few engines overheat because someone dumped a bottle of Bar’s Leaks into a failing system, only to clog the heater core, radiator tubes, or thermostat. These sealants aren’t a fix; they’re a gamble, and often a risky delay that leads to more damage down the road.
After the Fix: My Validation Checklist
Whether you’ve attempted a patch or replaced the entire head, you absolutely have to verify the repair. Guessing isn’t an option here; you need to know it’s done right. Here’s my checklist:
For an External Epoxy Repair:
The standard I follow is simple: no seepage after three complete thermal cycles. That means starting the engine cold, letting it reach full operating temperature, then letting it cool completely, three times. To catch any tiny micro-leaks, I’ll add UV dye to the coolant and inspect the area with a black light after each cycle. Once that looks good, I’ll hit it with a cooling system pressure test to OEM spec. If it holds for 30 minutes with zero pressure drop, then I’m confident in the repair.
For a Replaced Cylinder Head:
This requires a more comprehensive validation. First, I pressure test the entire cooling system to OEM spec for a full 30 minutes – zero drop is the goal. Second, I perform a combustion gas test (using a Block Tester or an exhaust gas analyzer in the coolant) for at least 5 minutes once the engine is at normal operating temperature. A negative result confirms no combustion leakage into the coolant. Finally, and this is crucial, after the vehicle has been driven approximately 500 miles, I test the engine oil. I’ll use a coolant-in-oil test strip, or better yet, send an oil sample for lab analysis. Confirming zero coolant contamination in the oil is the gold standard for a successful head replacement. Anything less, and you’ve got to re-evaluate.
The Hard Numbers: Cost, Risk, and Making the Call
For most owners, the decision to repair or replace comes down to one thing: cost versus the vehicle’s value. I’ve had this conversation countless times. Here’s a realistic look at what you’re up against:
| Repair Type | DIY Parts Cost | Shop Cost (Parts & Labor) | Success Rate (12-Month) | Secondary Risk if Failed |
|---|---|---|---|---|
| External Epoxy Patch | $50–$100 | $400–$600 | 60% | Failure causes sudden coolant loss, leading to rapid overheating and potential head warping or block damage. |
| Cylinder Head Replacement (New OEM) | $1,500–$3,000 | $3,500–$6,000 | 98% (if root cause corrected) | Low, provided correct coolant is used and installation is proper. |
Here’s the rule I always tell my customers: if the shop repair cost for a non-repairable head exceeds 50% of the vehicle’s current clean trade-in value (check Kelley Blue Book or NADA for a realistic number), it’s time to seriously reassess. Pouring $5,000 into a car that’s only worth $4,000 just doesn’t make financial sense. A used engine swap might be an option to extend the vehicle’s life, but only if the root cause – usually incorrect coolant type or poor maintenance – is definitively addressed. Otherwise, you’re just setting yourself up to repeat the same expensive problem down the road.
The Smart Play: Prevention is Key
After all this talk about diagnosing and repairing, let me tell you the absolute best way to deal with aluminum head corrosion: prevent it from happening in the first place. This isn’t rocket science, but it’s often overlooked.
Use the RIGHT Coolant, Period.
This is non-negotiable. Only use the coolant specified by the manufacturer – no substitutions, no “universal” stuff unless it explicitly meets the OEM spec. That means if your car calls for Honda Type 2, Toyota SLLC, BMW HT-12, or VW G13, that’s exactly what goes in. Each formulation is engineered for specific metallurgy and corrosion protection. Mixing different types, like IAT and OAT coolants, is a recipe for disaster; it neutralizes their inhibitors and leaves your aluminum exposed and vulnerable.
Follow Service Intervals & Monitor Regularly
Coolant isn’t “lifetime.” Change it according to the manufacturer’s schedule, typically every 5 years or 100,000 miles for OAT/HOAT types. And once a year, I recommend using coolant test strips to check the pH and freeze point. Remember, a pH below 7.5 means that coolant is acidic and actively corroding your system. Also, during every oil change, take five seconds to inspect the coolant in the reservoir. Is it clean and bright? Or dull, cloudy, and speckled? While you’re at it, pop the oil cap and look around the valve cover and thermostat housing for any white, chalky deposits – those are often early signs of electrolysis or coolant breakdown.
Catching coolant chemistry problems early, before they cause mechanical damage, is the only reliable way to avoid these incredibly costly repairs. It might not be the most exciting part of vehicle maintenance, but it’s effective. I’ve saved countless engines just by insisting on the right coolant and regular checks. Your aluminum head, and your wallet, depend on it.
