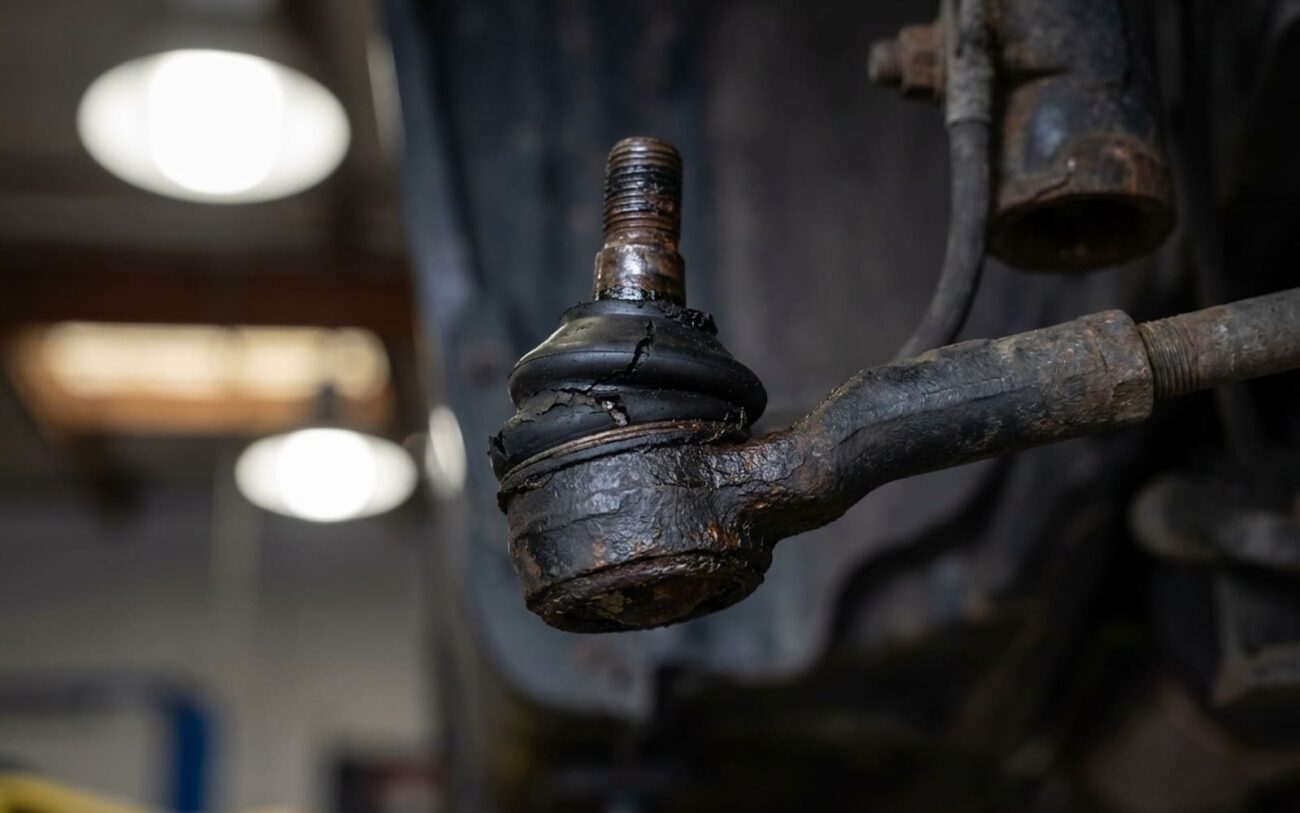
Alright, let’s talk Lane Keeping Assist (LKA) systems. When that warning light pops up – “LKA Unavailable,” “Assist Systems Limited,” or a steering wheel icon – most folks, and even some newer techs, jump straight to thinking it’s a camera problem or some kind of software bug. And yeah, sometimes it is. But in my 25+ years turning wrenches, I’ve seen a surprising number of these LKA headaches boil down to something far more fundamental, and frankly, a lot scarier: worn-out outer tie rod ends.
It sounds counterintuitive, I know. How can a mechanical steering part mess with a high-tech camera system? Well, modern Advanced Driver-Assistance Systems (ADAS) are smart. They cross-reference data from multiple sensors. Your forward-facing camera sees the lane lines, sure, but the steering angle sensor (SAS) is also constantly telling the computer exactly where your front wheels are pointed. When those tie rod ends wear out, they introduce slack – what we old-timers call “lash” – into the steering linkage. That means you can turn the steering wheel a bit, and the SAS reports that input, but the front wheels don’t actually respond right away. The camera sees the car still drifting, the SAS says the wheels are turning, and the computer goes, “Whoa, something’s not adding up here.” It then disables the LKA system as a safety measure. It’s not failing; it’s protecting you from unreliable data.
What You’ll See (and Feel)
The most common scenario is the LKA system just giving up entirely. You’ll get that “LKA Unavailable” message, or something similar, in your dash. Like I said, this isn’t random. It’s the system detecting that critical mismatch between what the steering wheel is doing (via the SAS) and what the car is actually doing in the lane (via the camera). That slack in the tie rod ends means the wheels aren’t reacting precisely, and the computer knows it can’t trust the steering input for accurate lane keeping. It’s a smart shutdown, not a failure.
Then there’s the more unsettling symptom: the LKA system fighting you. You might feel pulsing, jerky corrections through the steering wheel, almost like the car is arguing with you. While a misaligned camera or a flaky electronic power steering (EPS) motor can cause this, a binding or gritty tie rod end is a frequent culprit. If that joint isn’t moving smoothly, the EPS motor has to work harder and inconsistently to try and maintain steering, sending erratic feedback to the ADAS module. The system misinterprets this as instability and overcompensates. You’ll often notice a vague or “loose” feeling in the steering, too – that little bit of free play before the wheels actually turn. If you’re experiencing that alongside LKA warnings, put your money on a mechanical steering issue.
Pinpointing the Problem: My Diagnostic Approach
Before I start tearing into anything, I always rule out the easy stuff. A dirty camera lens, a misaligned camera (especially after a windshield replacement), a faulty steering angle sensor, or even just a weak 12V battery can all throw similar LKA warnings. But if the electronic fault codes line up with that loose or notchy steering feel you’re getting, my focus immediately shifts to the front end. The trick is to confirm whether the issue is truly mechanical or electronic, and that takes a blend of visual inspection and live data from a good scan tool.
| Symptom | Likely Tie Rod Issue | Common Electronic Mimics | The Real-World Test I Use |
|---|---|---|---|
| LKA Deactivation / “Unavailable” | Excessive play in the outer tie rod end’s ball joint. This creates a clear discrepancy between what the steering angle sensor reports and what the wheels are actually doing. | Misaligned camera, faulty SAS, low system voltage, or SAS needing recalibration after a battery disconnect. |
This is a two-person job. With the vehicle on the ground, have an assistant gently rock the steering wheel back and forth, just enough to take up any free play. Get down and watch the outer tie rod end where it connects to the steering knuckle. If the wheel rim moves but the tire doesn’t immediately respond, and your scan tool shows the SAS data changing, that slack is in the linkage. You should have zero play at that ball joint. Zero. |
| LKA Erratic / Pulsing Corrections | Binding or inconsistent friction within the tie rod end, usually from internal corrosion, dry joints, or a failed boot. | Faulty EPS motor or control module, binding intermediate steering shaft, or even incorrect tire size. |
Get the front wheels off the ground. Disconnect the outer tie rod end from the steering knuckle. Now, articulate the joint by hand. It should pivot smoothly, with consistent resistance, and no grit or notchiness. Any binding or gritty feel confirms internal damage. While you’re at it, if you have a scan tool, monitor EPS motor current during low-speed turning. Spikes or irregular draw can hint at mechanical drag in the steering system. |
My Go-To Physical Inspection:
This simple, hands-on check is absolutely crucial. With the car on the ground and the steering unlocked, have someone gently rock the wheel back and forth, just enough to take up that slack zone – no full turns. Get down and look closely at the tie rod end where the ball stud meets the housing. Any visible wiggle at the rubber boot, or between the metal components themselves, means it’s worn. Then, grab a pry bar and carefully lift the front tire from underneath, checking for vertical movement at the steering knuckle. There should be zero up-and-down play. Any movement confirms the joint is failing. This test often catches issues long before the LKA system even thinks about triggering a warning.
Why Tie Rod Ends Give Up the Ghost
So, why do these things fail? It’s not always just high mileage, though that’s certainly a factor. The root causes are usually pretty specific and internal to the component itself.
First, you’ve got your normal wear and tear. The ball stud pivots inside a polymer or brass-lined socket, kept happy by grease. Over time, usually between 60,000 to 100,000 miles, that bearing surface simply wears down, introducing play. It’s predictable, but harsh driving conditions will definitely speed it up.
But the biggest killer, in my experience, is seal degradation. That rubber boot isn’t just there for looks – it’s crucial. It keeps nasty road grit, water, and salt out, and the vital grease in. Once that boot cracks or splits, it’s game over. Contaminants get in, grease gets out, and that joint starts grinding itself to death. I’ve pulled apart tie rods that looked perfectly fine from the outside, but inside, they were packed with a gritty, corrosive sludge. That’s when wear goes from gradual to rapid.
Corrosion is another major factor, especially in places with salty winter roads or coastal climates. Moisture gets past a compromised boot and rusts the ball stud, causing it to bind up. This makes steering stiff and uneven. Sometimes, you’ll even see galvanic corrosion between dissimilar metals – like a steel stud in an aluminum housing – which can seize the joint solid. I tend to see this more on certain European models that use lightweight materials in their suspension components.
Finally, there’s mechanical fatigue. Repeated hard impacts – think hitting a deep pothole at speed – can cause tiny microfractures in the ball stud. Over time, these can lead to a sudden, catastrophic separation. It’s rare, thankfully, but when it happens, it’s extremely dangerous. And just to be clear: if you’ve got play in the inner tie rod or the steering rack itself, that’s a different, usually more involved, repair. Here, we’re strictly focusing on the outer tie rod end – that final pivot point connecting your steering to the wheel. If it’s worn, it directly impacts your alignment, tire wear, and obviously, your ADAS functionality.
Getting It Fixed: DIY or Call the Shop?
DIY Outer Tie Rod End Replacement
- Loosen the jam nut (also called a lock nut) on the inner tie rod, but don’t remove it.
- Use your separator tool to pop the ball stud out of the steering knuckle.
- Before you completely unscrew the old tie rod end, count the exact number of turns it takes to remove it from the inner tie rod. Seriously, count them. This is your best shot at getting the new one close enough to drive safely to the alignment shop without scrubbing your tires.
- Screw the new tie rod end on the same number of turns.
- Install the new ball stud into the knuckle, torque the nut to factory specifications (usually 35–50 ft-lbs, but always verify for your specific vehicle!), and secure it with a new cotter pin or stake it if required. Never reuse the old nut or cotter pin – they’re one-time use safety items.
- Finally, torque the jam nut to spec.
A quick tip: always use OEM or high-quality aftermarket parts. Cheap ones often wear out faster and can throw off sensitive ADAS systems again quicker than you’d think.
Professional Tie Rod End Replacement (Seized/Corroded) Professional Only
After the Fix: Making Sure It’s Right
Once those new tie rod ends are in, your job isn’t done. And if a shop did the work, make sure they followed these steps. First and foremost, a proper four-wheel alignment is absolutely non-negotiable. Replacing tie rod ends directly affects your toe settings, and if that’s off, your tires will wear out in a hurry, and your LKA system will still be confused. After the alignment, the steering angle sensor (SAS) often needs recalibration. This tells the car’s computer the new “straight ahead” position, which is vital for ADAS systems.
Finally, you need a thorough road test. Find a clear, well-marked road and engage the LKA system. It should activate smoothly, follow the lane lines predictably, and apply gentle, consistent corrections. You shouldn’t feel any pulsing, jerking, or sudden disengagements. If it’s still acting up, double-check that camera alignment (again, especially if the windshield was recently replaced) and confirm that four-wheel alignment is perfectly within factory specifications. Misalignment is a common mimic of ADAS faults. Always refer to the factory service procedures for any specific ADAS calibration steps, but remember: mechanical soundness always comes first, then the electronic resets and calibrations.
The Bottom Line: Cost, Risk, and Making the Call
Understanding the full cost helps you make an informed decision. The part itself is usually pretty affordable, but remember, that required alignment is non-negotiable – and it’s often the part that DIY estimates conveniently forget to include.
| Repair Type | DIY Cost (Parts Only) | Shop Cost (Labor + Alignment) | Success Rate | Secondary Risk if Ignored |
|---|---|---|---|---|
| Replace one outer tie rod end & 4-wheel alignment | $80 – $150 | $250 – $400 | 99% (when alignment is done right) | Rapid, uneven tire wear; persistent LKA faults; and potential damage to other suspension components like control arms or struts from chronic misalignment. |
| Replace both outer tie rod ends & 4-wheel alignment | $150 – $300 | $400 – $600 | 99% | Same as above. I always recommend replacing them in pairs. It ensures symmetrical steering response and prevents uneven wear, which will just lead to the other side failing soon anyway. |
When you’re looking at the total repair bill, consider the vehicle’s overall value. My rule of thumb is this: if front-end repairs – including tie rods, alignment, and any related bushings – start to creep over 20% of the car’s private-party value, it’s worth asking if you’re throwing good money after bad. That doesn’t mean you skip the repair if the car is otherwise reliable; it’s still a safety item. But it’s a good checkpoint to consider the bigger picture. And seriously, don’t forget: delaying this fix risks more than just annoying ADAS issues. It risks your life.
Keep It Healthy: Prevention & What to Watch For
My Advice for Long-Term Prevention
-
Prevention really starts with regular, simple inspections. Every time your car is up on a lift – for an oil change, tire rotation, whatever – take literally 30 seconds to look at those tie rod end boots. Are they cracked? Bulging? Is grease oozing out? A damaged boot is a ticking time bomb. Catching it early, sometimes just replacing the boot for $15–$30, can save the entire joint. On some models, like certain older Mercedes or Japanese SUVs, boot replacement is pretty straightforward; on others, it’s part of the whole assembly. Either way, catch it early.
-
Also, pay attention to how your steering feels. Any new free play, a slight pull to one side, or a faint clunk when you’re turning at low speeds are all early mechanical warnings. These often show up long before that LKA light even thinks about coming on. The electronic system is your backup, not your primary indicator. And after any front-end work – tie rods, struts, control arms, whatever – always, always, always get a full wheel alignment and SAS recalibration. Use a qualified shop with OEM-level tools, like a Hunter alignment machine that supports ADAS calibration. Cutting corners here is just asking for recurring issues and more headaches down the road.
