You bring your car in because the rear defroster won’t clear the window, and you just had tint put on last week. Yeah, I’m already thinking about the grid. In my 25 years in the bay, I’ve seen this exact scenario more times than I can count—especially on Camrys, Accords, and F-150s where owners go for full rear tint. The real question isn’t whether the tint job could have caused it. It’s whether it did, and how bad the damage really is.
First: Read the Symptoms Like a Pro
When a defroster fails post-tint, most people assume the installer “must’ve done something.” Sometimes they’re right. But I’ve also pulled fuses that were blown from a short in the switch, or found corroded tabs that had nothing to do with the film. So don’t jump. Start with observation.
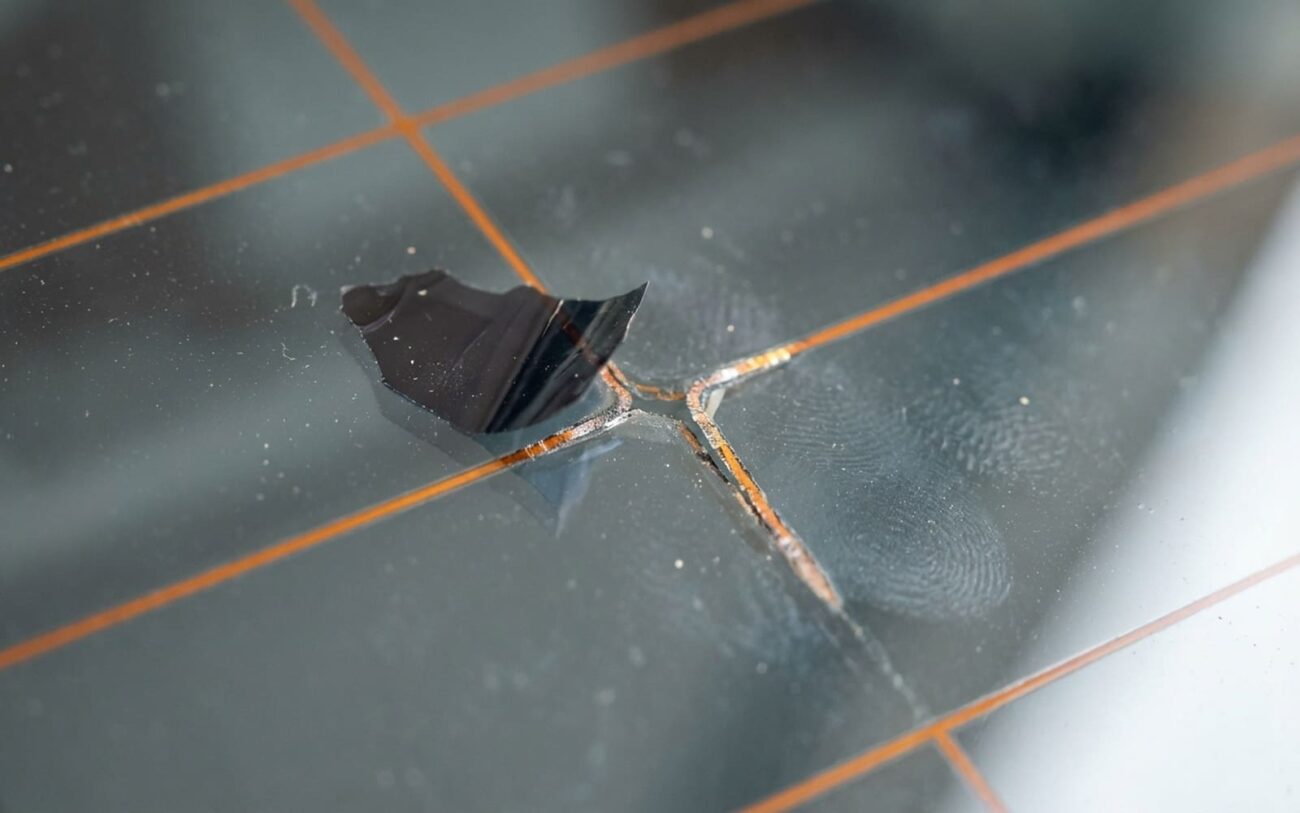
If only the center lines aren’t working—the ones buried under tint—but the top and bottom (often left clear) still heat up? That’s a red flag. That pattern screams localized damage. I’ve seen it a hundred times: the technician squeegeed too hard over the grid, or used a blade to trim the film, and scraped the conductive trace clean off.
Another tell? Bubbling or hazing in the tint—but only over the defroster lines. If the rest of the film looks smooth, and the bubbles follow the grid like a roadmap, that’s not moisture or cheap adhesive. That’s heat building up where the circuit is compromised. The current hits a gap, arcs, creates a hot spot, and cooks the film from underneath.
Test Before You Tear Into Anything
Before you even touch the tint, rule out the easy stuff. I’ve lost track of how many times I’ve seen guys rip off tint looking for damage, only to find out later the fuse was blown. Start at the source.
Check the fuse. Then test for voltage at the switch. If that’s good, move to the tabs on the edge of the glass. Use a multimeter—set it to DC volts. You should see 12V when the defroster’s on. No voltage? Problem’s in the wiring, switch, or relay. Stop. You don’t need to touch the glass.
But if you’ve got power at the tabs, now you test the grid itself. Switch your meter to ohms. Place one probe on a working line, the other just past the dead section. If you get “OL” (open loop), there’s a break. Now you’re in grid territory.
And here’s the kicker: remove a corner of the tint. Look for scratches. If you see a silver line missing—just glass underneath—you’ve got your answer. That grid wasn’t broken by age. It was scraped off by a blade.
How the Damage Really Happens
The defroster grid isn’t paint. It’s a thin layer of silver-ceramic material fused to the glass during manufacturing. It’s conductive, yes, but fragile under pressure or chemical exposure. And most tint installers don’t treat it like the delicate component it is.
Mechanical damage is the #1 cause. A metal squeegee, a utility knife, even a plastic scraper used too aggressively—it doesn’t take much to scrape that trace right off. I’ve seen guys “clean up” the edges of the film by running a blade over the grid. Bad move. One pass, and you’ve broken the circuit.
Chemical damage is sneakier. Ammonia-based cleaners? They eat that silver layer. I’ve had customers come in months after a tint job with failing lines, and once we pull the film, the grid’s corroded—powdery, dull, not shiny. That’s ammonia. Even if the installer didn’t use it on purpose, some DIY kits include it. And once it’s on the glass, it works slowly. You won’t see the damage until weeks later.
Thermal stress is the third player. Tint—especially ceramic or metallic film—traps heat. When the defroster runs, the heat can’t escape through the film. So it builds up along the grid. If there’s already a micro-scratch or weak spot? That’s where it fails. I’ve seen this on Subarus with factory tint—the added film layer pushed an already stressed line over the edge.
So What’s the Fix? It Depends.
One Clean Break DIY-FEASIBLE
If it’s a single, sharp break—no corrosion, no peeling—grab a conductive epoxy kit. Permatex makes a good one. Clean the area with isopropyl alcohol. Mask both sides of the gap. Apply a thin, continuous bead. Let it cure 24 hours. I’ve used this on older Hondas and it works—if the break is small. But the repair is visible. And fragile. Don’t go poking at it.
Multiple Lines or Widespread Damage Professional Only
If more than two lines are dead, or the damage is scattered across the glass, skip the epoxy. The odds of even heating drop fast. And if your car has a rear camera, rain sensor, or blind-spot radar built into the glass? Don’t risk it. Replace the window. I’ve seen shops try to “bridge” lines with conductive tape—looks like a science fair project and fails in six months.
Cloudy or Peeling Grid Professional Only
If the grid looks dull, patchy, or is flaking off the glass, that’s delamination. No epoxy fixes that. The bond between the layer and the glass is gone. This happens on older cars or after repeated thermal cycling. Only solution? New glass.
Verify the Repair—Don’t Just Assume
After any fix, test it for real. Don’t just turn it on and walk away.
First, recheck continuity with the multimeter. You want under 10 ohms across the repaired section. “OL”? It’s still broken.
Then, wait for a cool, humid morning. Turn the defroster on. After five minutes, the frost should clear evenly. If there’s a dark spot where the repair is, it’s not conducting properly.
For a pro-level check, use an infrared thermometer. After three minutes of operation, scan the repaired line and compare it to a working one nearby. More than a 10% temp difference? You’ve got a weak spot. Cold means poor conduction. Hot means high resistance—either way, it’s not fixed.
Cost vs. Value: Make the Smart Call
| Repair Type | DIY Cost | Shop Cost | Success Rate | Secondary Risk |
|---|---|---|---|---|
| Single line repair with epoxy kit | $20–$40 | $100–$200 | High (>80%) for clean breaks | Epoxy bridging lines, shorting out more grid |
| Rear window replacement | $300–$600 (glass only) | $800–$1,500 (labor, tint, calibration) | 100% | Water leaks, wind noise, ADAS calibration needed if equipped |
Prevention: Do This Once, Save Yourself Later
If you’re getting tint, ask the shop what they use. Ammonia-free cleaner? Soft squeegee? Do they avoid scrubbing over the grid? Reputable shops—3M, Llumar certified ones—know the drill. The shady guys? They’ll use Windex and a razor blade.
After installation, test the defroster before you leave. Watch it heat up. If one line doesn’t glow, speak up. Once you drive off, it’s your problem.
And if you ever need to remove old tint? No heat guns. No metal blades. Use soapy water and a plastic scraper. Work slow. That grid is only 0.001 inches thick. Treat it like glass—because it is.
