A leaking windshield washer reservoir doesn’t just leave streaks on your glass — it eats metal. I’ve pulled apart engine bays where a $3 cap seal turned into $600 in damage because no one caught the corrosion early. It’s not magic, it’s electrochemistry — and once it starts, it spreads fast. Let me walk you through what really happens under there, how to confirm it’s washer fluid doing the damage (not coolant or road grime), and what fixes actually last.
What Actually Fails — And Why
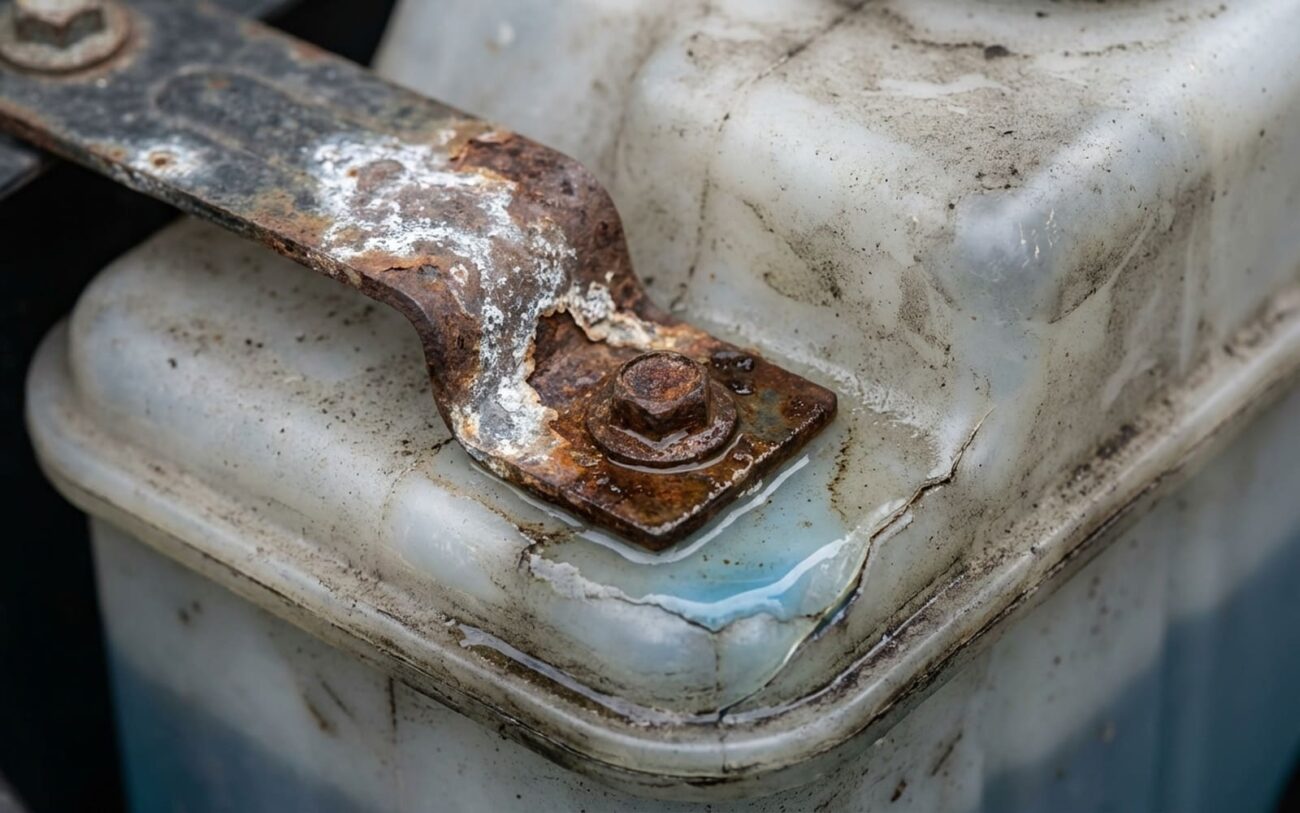
Most people think: leak = cracked tank. But in my shop, half the time it’s not the plastic reservoir — it’s the metal bracket holding it, or the ground connection built into that bracket. Washer fluid leaks out, wicks into the seam between a steel bracket and an aluminum housing (or fender support), and boom — you’ve got an electrolyte bridge. That’s all it takes for galvanic corrosion to start chewing through metal.
On the 2015–2018 Mazda CX-5s, I see this weekly. The bracket mounts to the aluminum core support, fluid seeps down from a degraded cap seal, and within two winters, the steel bracket is Swiss cheese. Same with certain F-150s — Ford even issued a TSB for revised brackets with isolating coatings.
And it’s not just structural. That bracket often doubles as the ground path for the washer pump. Corrosion breaks the circuit. Pump gets power, but no return — so it clicks or runs weakly. Customers think the pump’s dead. It’s not. The ground’s gone.
Is It Washer Fluid — Or Something Else?
White crust around the reservoir? Could be road salt, could be coolant, could be washer fluid. Don’t guess. Coolant leaves a greasy film and usually comes with an overheating history. Washer fluid evaporates clean — but it leaves behind a faint methanol smell and, more importantly, active corrosion at dissimilar metal junctions.
Here’s how I confirm the source:
| Symptom | Likely Cause | Rule-Outs | Definitive Test |
|---|---|---|---|
| White, chalky deposits at bracket | Electrolytic corrosion from washer fluid bridging steel bracket and aluminum core support | Winter road salt; dried coolant residue (ethylene glycol attracts moisture) |
Clean area with contact cleaner. Add UV dye to washer fluid, run pump, inspect with black light. Glowing = confirmed leak. |
| Loose or dangling reservoir | Corrosion eating bolt holes or mounting flanges in metal bracket | Cracked plastic tabs, missing fasteners, stripped threads |
Remove reservoir. Corrosion shows as pitting or flaking metal. Plastic failure shows clean stress cracks. |
| Fluid pooling near core support | Pinhole in metal reservoir or seam due to crevice corrosion | Cracked plastic tank, bad hose connection, failed pump O-ring |
Remove tank, plug outlets, submerge, apply 5–10 psi air to filler neck. Bubbles = leak location. |
| Washer pump not working | Corroded ground path in bracket or connector terminals | Dead pump, wiring fault, bad switch |
Run voltage drop test: measure resistance between pump housing and battery negative while activating. Over 0.1V = bad ground. |
How the Damage Actually Progresses
Galvanic corrosion isn’t random. It’s predictable. When two dissimilar metals touch — say, a steel bolt in an aluminum housing — and you add an electrolyte (washer fluid), the less noble metal (usually aluminum or zinc-coated steel) corrodes. The fluid doesn’t have to be leaking heavily. A slow seep that dries and re-wets cycles is actually worse — it concentrates ions and accelerates the reaction.
Crevice corrosion is the silent killer. It happens under bolt heads, behind brackets, anywhere moisture gets trapped. Oxygen levels drop in those pockets, pH drops, acid forms. Aluminum housings? They pit fast. Steel brackets? They develop hidden cracks that break under engine vibration.
And don’t assume plastic tanks are safe. Some cheap aftermarket reservoirs degrade with high-methanol fluids. I’ve seen tanks warp and crack from internal pressure after six months. OEM-spec tanks use UV-stabilized HDPE. Aftermarket? Not always.
Repair Options That Actually Work
Clean & Coat (If Corrosion Is Surface-Level) DIY-Feasible
Replace Reservoir & Bracket (Pinholes or Hidden Corrosion) Professional Only
Fractured Bracket or Missing Flange Professional Only
Epoxy Patch? Don’t Bother
Prove It’s Fixed — Or It’s Not Fixed
Looks clean? Doesn’t matter. Test it.
If you cleaned and coated: recheck in 30 days. Look for new white powder. Run the voltage drop test again — over 0.1V and you’ve still got resistance.
If you replaced: do a pressure test. Cap all outlets, apply 5–10 psi to the filler neck, hold for five minutes. No leaks. Then shake the reservoir — zero movement. If you used UV dye earlier, run the pump and scan with a black light. No glow, no seepage.
Tools you need: multimeter, air chuck with gauge, UV light. If your shop doesn’t have these, find another shop.
Cost vs. Value — When to Fix It, When to Let It Go
| Repair Type | DIY Cost | Shop Cost | Success Rate | Failure Risk |
|---|---|---|---|---|
| Clean & coat bracket | $20–$50 (primer, grease, sandpaper) | $100–$200 | 85% (if corrosion is shallow) | Bracket fails later, tank drops, wiring damaged |
| Replace reservoir & bracket | $50–$200 (OEM or quality part) | $200–$400 (1 hour labor) | 98% (with proper part) | Bad install causes new leak or ground issue |
My rule: if the repair costs more than 20% of the car’s value, and the rest of the underhood is rusty (fender liners gone, core support flaking), just live with it. Disable the pump if it’s shorting, or run without washer fluid. But if you’re keeping the car, fix it right. A dropped reservoir can take out a $900 alternator. Not worth the gamble.
Prevention Takes 10 Minutes a Year
Use washer fluid with corrosion inhibitors — not water, not cheap concentrate. Every time you replace the tank, smear silicone-based anti-corrosion grease on all metal joints, especially where steel meets aluminum. It’s cheap, it lasts, and it breaks the circuit.
Check the reservoir every oil change. Look for weeping, white powder, looseness. On cars with known issues (F-150s, CX-5s), treat it like a brake pad — inspect early, inspect often. A $30 fix at 80,000 miles beats a $400 surprise at 110,000.