Alright, let’s talk brakes. You know the feeling: you hop in the car, pedal’s firm, feels great. Then you hit some traffic, maybe a few hills, and suddenly that pedal starts getting soft, mushy even. You press it, and it just keeps sinking, taking more travel to get the car to stop. Let it cool down, and it’s back to normal. Sound familiar? I’ve seen this pattern countless times in the shop, and when it consistently correlates with heat, it’s almost always a problem with your brake hoses.
That Mushy Pedal When Things Heat Up: What It Means
That classic symptom – firm when cold, spongy when hot, then firm again after cooling – isn’t just “brake fade.” Brake fade is usually about the pads and rotors getting too hot and losing friction. What you’re feeling here is a hydraulic system breakdown, a mechanical issue happening internally under pressure and temperature. It’s a critical safety concern, plain and simple.
Now, could it be air in the lines? Sure, but air usually gives you a consistently spongy pedal, hot or cold. Could it be moisture in the brake fluid boiling? Absolutely, but that often feels more like the pedal going straight to the floor, and it’s less about the “spongy” feel. A failing master cylinder can also cause issues, but again, the heat-dependent recovery makes me look elsewhere first. When that pattern is so clear – firm cold, soft hot, firm again cool – my prime suspect is always the rubber brake hoses.
My Take
“These flexible lines are essential for steering and suspension movement. But they’re rubber, and like any rubber component constantly exposed to extreme heat and pressure, they break down from the inside out. It’s not a question of if, but when.”
How I Pinpoint a Failing Brake Hose
When a customer comes in with this complaint, my goal is to confirm it’s the hose and not something else. Many issues can feel similar, but the diagnostic evidence is different. Here’s how I approach it, looking for those telltale signs:
Symptom 1: Pedal Softens Only When Hot, Firms Up When Cold
This is the classic indicator. What’s happening internally is that the hose’s inner lining is degrading. When it gets hot, it absorbs fluid and swells, creating a sort of one-way valve or just expanding under pressure. That expansion eats up your pedal travel. This can mimic boiling brake fluid (due to excessive moisture) or an internal bypass in a failing master cylinder, but the consistent hot/cold cycle points to the hose.
My Definitive Test: I use an inline pressure gauge. I’ll connect it, apply about 300 psi to the system when it’s cold, and monitor the pressure for a minute. Then, I’ll carefully heat the suspect hose to around 200°F (a heat gun works, but be careful not to damage anything else). If the pressure rapidly drops more than 20% in 60 seconds after heating, that hose has an internal failure. It’s expanding under heat and pressure.
Symptom 2: Visible Bulge or Blister in the Hose When Hot
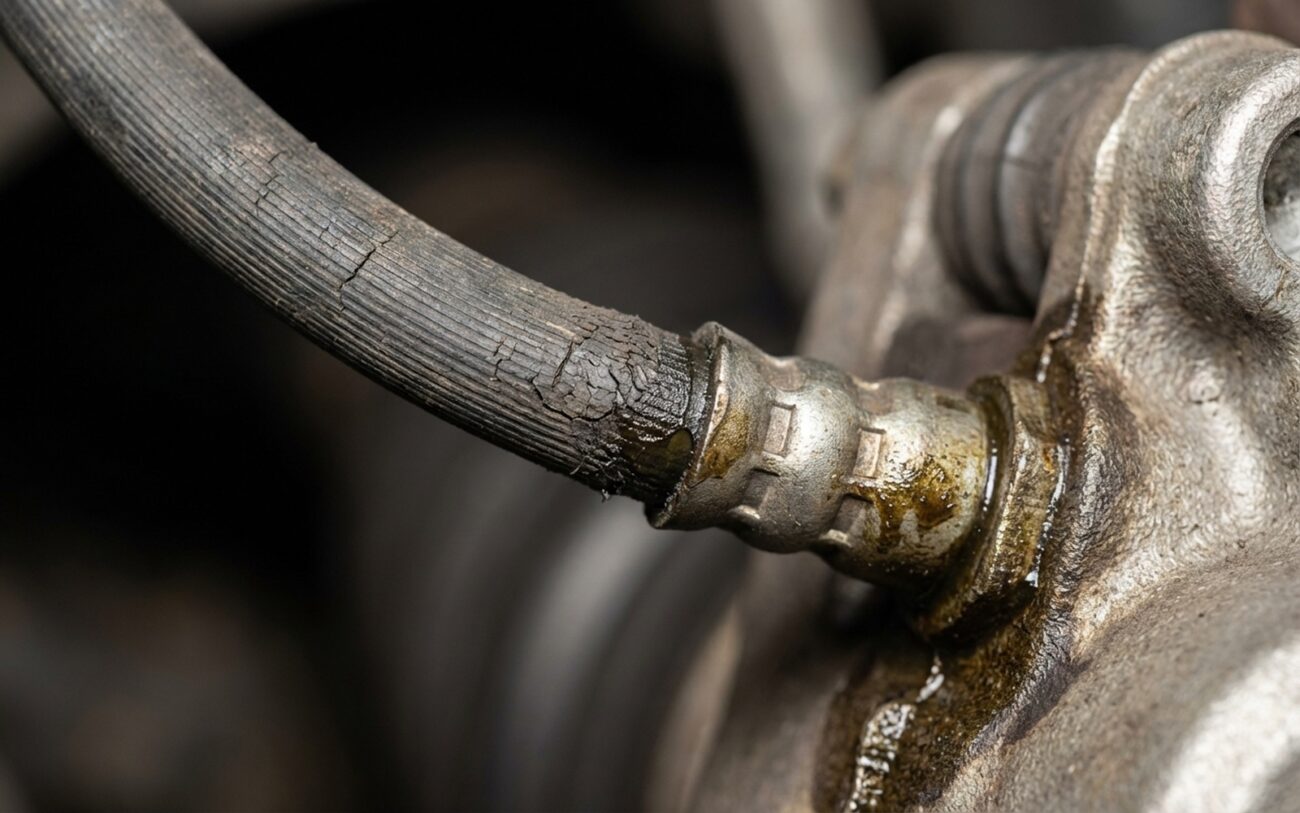
This is about as clear as it gets. If you see a localized bulge or blister on the hose when the system is hot and under pressure, you’ve found your problem. It means the inner liner and reinforcement layers have broken down, allowing the outer rubber to swell like a balloon. There’s really no other condition that causes this specific visual. It’s a dead giveaway.
My Definitive Test: Have an assistant firmly apply the brake pedal (or use a pedal depressor) while you visually inspect the hoses, especially near the calipers. If you can safely get the hose warm (again, carefully with a heat gun if needed), watch for any localized expansion. If you see it, replace that hose immediately.
Symptom 3: Wetness or Seepage at the Fittings Only When Hot
Sometimes, the rubber degrades right where it’s crimped to the metal fitting. When it gets hot, the rubber softens and loses its seal integrity, allowing fluid to seep out. This can look like a loose flare nut or a damaged steel line, but if it’s consistently at the crimp and only when hot, it’s the hose.
My Definitive Test: I’ll add some UV dye to the brake fluid, drive the car to get the system good and hot, then inspect the fittings with a UV light. If you see dye weeping from under the crimp ferrule, that hose is done. It’s a slow leak, but a leak nonetheless, and it’s only going to get worse.
Why These Hoses Give Out
Brake hoses aren’t just simple rubber tubes. They’re complex, engineered components. You’ve got an inner lining, usually EPDM rubber, designed to resist brake fluid. Around that, there’s a reinforcing layer of textile or steel braid to prevent expansion under pressure. And finally, an outer rubber jacket protects everything from the elements and road debris.
The failure typically starts with age and exposure to heat cycles. Over time, that inner liner loses its plasticizers, making it brittle. When the brake system heats up – from heavy braking, stop-and-go traffic, or even just sustained driving – this degraded inner liner starts to absorb brake fluid and swell. This swelling can cause it to pull away from the reinforcing layer, a process we call delamination. Once delamination happens, you’ve got a weak spot, a tiny balloon inside the hose. When you hit the pedal, instead of all that hydraulic pressure going straight to push the caliper piston, some of it gets wasted inflating this soft pocket. That’s your spongy pedal.
A Quick Distinction:
While things like sticking caliper guide pins can cause drag or uneven pad wear, they don’t lead to this specific heat-dependent hydraulic softness. That’s a mechanical issue with the caliper; what we’re talking about here is the integrity of the hydraulic line itself.
The Fix: No Shortcuts, Just Replacement
Replacement is the ONLY Solution
Let me be clear: there’s no repair, no magic additive, and no shortcut for a failing brake hose. Do NOT use sealants or “stop-leak” products in your brake system. These can clog up ABS valves, ruin your master cylinder, and make the problem far, far worse. Replace the hose.
Here’s how I approach a brake hose replacement in the shop:
Gather the Right Parts and Tools
Careful Installation and Torque
Thorough System Bleeding
Making Sure the Repair Actually Worked
Just replacing the hose isn’t the end of the job. You need to validate that the repair was successful and the system is back to full integrity. A proper repair means the pedal should feel consistent, firm, and resistant to heat.
-
Repeat the pressure hold test: Just like during diagnosis, apply 300 psi to the system and monitor it for 60 seconds. After the repair, a pressure drop under 10% is generally acceptable. If it’s still dropping significantly, you’ve either got another bad component, or you didn’t bleed it properly.
-
Road test under load: Take the vehicle out and perform several firm, controlled stops from 30–40 mph. Pay close attention to the pedal. It should remain high and solid throughout the stops, with no sinking or sponginess as the brakes heat up. This is the real-world test.
-
Check for drag: After your road test, carefully spin each wheel by hand. If a brake is binding or dragging, it could indicate a kinked hose, a caliper issue, or an installation error that’s not allowing the fluid to return properly.
What This Means for Your Wallet
Costs can vary quite a bit depending on whether you tackle this yourself or bring it to a shop. Here’s a general idea:
| Repair Type | DIY Cost (Parts) | Shop Cost (Parts & Labor) | Secondary Risk if Incomplete |
|---|---|---|---|
| Replace one failed hose | $25–$75 | $150–$300 | If one hose has failed, others are likely not far behind. You might be back in the shop soon. |
| Replace all rubber hoses | $100–$250 | $400–$700 | The main risk here is improper bleeding or installation errors introducing new issues, which is why a professional job is often worth it. |
Stopping It From Happening Again
Preventative maintenance is your best friend here. These hoses don’t just fail overnight; it’s a gradual process. You can extend their life and catch issues early.
Flush Your Brake Fluid Regularly
Brake fluid is hygroscopic – it absorbs moisture from the air. That moisture lowers the fluid’s boiling point, but more importantly for hoses, it creates corrosive acids that slowly attack the inner liner. This accelerates the degradation and delamination process. I recommend flushing your brake fluid every 2–3 years, or according to your manufacturer’s schedule, whichever is sooner.
Also, make a habit of visual inspections. Any time your wheels are off for a tire rotation or other service, take a good look at those hoses. Here’s what I look for:
-
Cracks, cuts, or deep weathering in the outer rubber jacket. If you can see the braiding underneath, it’s already compromised.
-
Abrasions from rubbing against suspension components, frame, or wheel. Make sure they’re properly clipped and routed.
-
Bulges, blisters, or soft spots. Give them a gentle squeeze when the system is cold. If a section feels noticeably softer than the rest, that’s a red flag.
-
Wetness or discoloration around the metal crimps or fittings. Even a slight sheen can indicate a slow leak.
