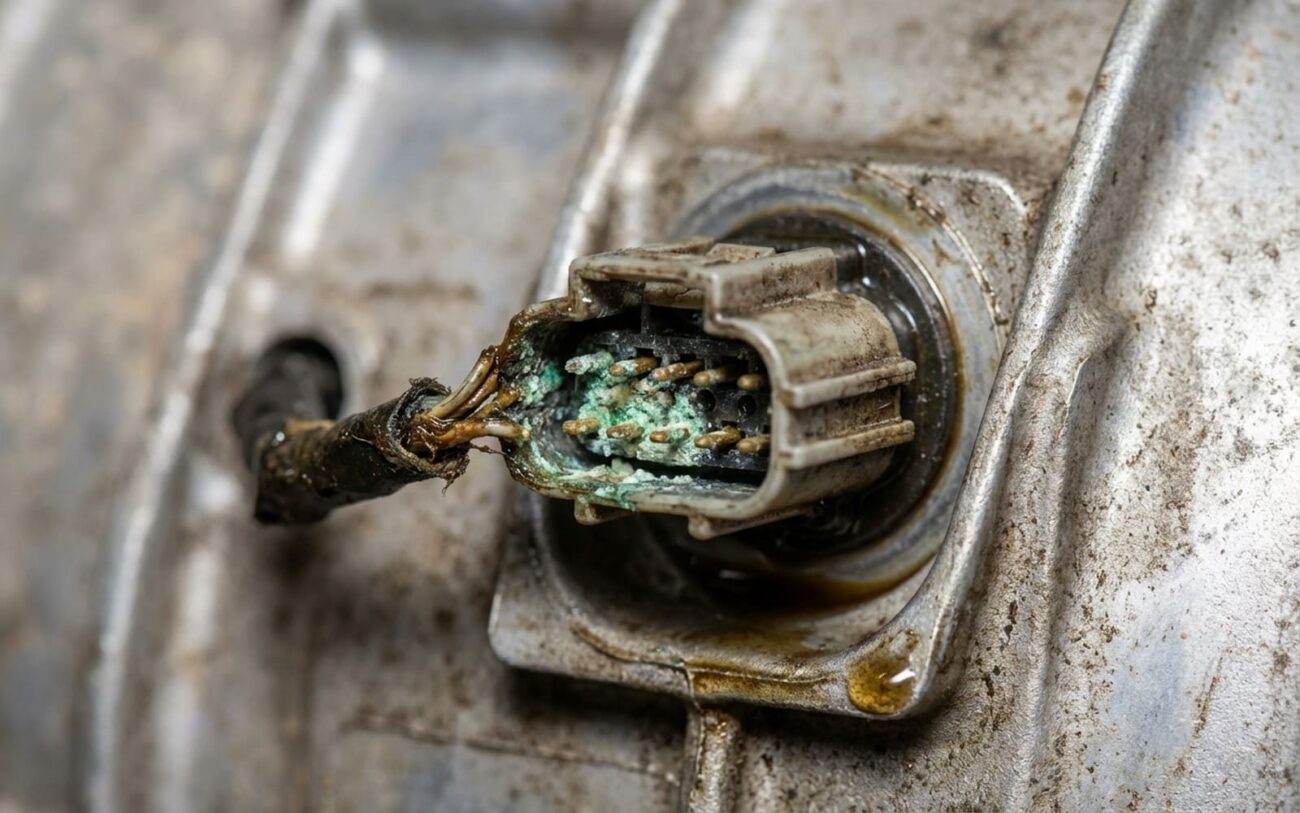
Alright, let’s talk about a real headache I’ve seen countless times in my shop: when your transmission loses its mind and forgets what gear it’s in. The core of the problem is usually that your car’s brain, the Transmission Control Unit (TCU), isn’t getting reliable information from the gear position sensor. And when that happens, things go sideways fast.
What You’ll See: Symptoms & Danger Signs
You’ll usually notice this problem right away. The gear indicator on your dash might be blank, show random letters, or just freeze on a previous gear. I’ve had customers swear their car was in Drive, but the dash still showed Park. You shift the lever, but the “D” light never illuminates. Sometimes, the car will still move, but it’s like it’s driving blind—the TCU is just guessing, and that’s not a recipe for long-term transmission health.
More commonly, the transmission throws itself into what we call “failsafe” or “limp-home” mode. It’ll lock into a single, mid-range gear, often third or fourth, to get you off the road. You’ll feel it immediately: sluggish acceleration, and the engine will be screaming on the highway because it can’t shift up. In the worst cases, you shift to Drive, hit the gas, and… nothing. Just engine revs with no movement. The check engine light? Oh yeah, that’ll be on, bright as day. And if you scan it, you’ll likely see codes like P0705 (Transmission Range Sensor Circuit Malfunction) or P0850 (Park/Neutral Switch Input Circuit). Both tell you the same thing: the TCU doesn’t know what gear you’re in.
How I Diagnose It: Ruling Out the Easy Stuff First
When you see these symptoms, it’s easy to jump to conclusions—”bad sensor!” or “blown TCU!” But hold on. In my 25+ years, I’ve learned that jumping straight to expensive parts is almost always a mistake. A lot of simpler, cheaper issues can mimic these exact problems. The trick is to be methodical. You need to rule out the easy stuff first, before you condemn a sensor or, God forbid, the TCU itself.
What you’ll need is a good digital multimeter (DMM), the wiring diagram for your specific vehicle, and a decent scan tool. We’re going to trace that signal from the sensor to the TCU. Here’s how I approach it:
| Symptom Pattern | What it Could Be (Internal) | What it Often Is (External Mimics) | How I Confirm the Source |
|---|---|---|---|
| No gear indicator, DTC for sensor circuit (e.g., P0705) | Internal sensor failure (worn wiper track), internal TCU power supply or input circuit failure | Open/short in wiring harness, poor connection at sensor or TCU connector, blown fuse for sensor supply, faulty Transmission Range (TR) switch |
I verify 5V reference, ground, and signal voltage changes at the sensor connector. If those are correct at the connector but incorrect at the TCU pin, the fault is in the wiring between them. |
| Limp-home mode active, DTC for sensor plausibility or range (e.g., P0706) | Internal sensor mechanical misalignment or faulty encoder, internal TCU processor fault | Incorrect manual shift linkage adjustment, damaged selector cable, faulty park/neutral position switch |
I use a scan tool to monitor the “Gear Selector Position” PID while an assistant moves the shifter. I compare what the scan tool says to the actual lever position on the transmission. |
The bottom line here is simple: test the sensor’s signal at both ends. If the signal is clean and correct at the sensor connector but it’s wrong at the TCU, then you’ve got a wiring problem or a bad connector. If the signal is already erratic or missing at the sensor itself, then you can confidently point to the sensor. Only when you’ve checked out the wiring, power, and signal integrity from end to end should you even think about replacing the TCU. Trust me, you’ll save yourself a lot of grief and money.
Why These Things Fail: Common Root Causes
So, you’ve done your diagnostics, and you’ve confirmed it’s either the gear position sensor or the TCU. Now, let’s talk about why these things fail. They don’t just randomly quit; there are patterns I’ve seen over the decades.
Gear Position Sensors: Wear, Contamination, and Water
Most failures here come down to wear, contamination, or moisture. You’ve got two main types: potentiometric and Hall-effect. The potentiometric ones use a little wiper that slides across a resistive track. After tens of thousands of shifts, that track wears out, or the wiper loses contact. That’s when you get intermittent signals or open circuits. I’ve also seen metal debris from normal transmission wear settle on that track, causing all sorts of weird readings.
Hall-effect sensors are fancier; they use a magnetic field and don’t have physical contact wear on the electrical side. But they’re not bulletproof. Mechanical wear in the internal shaft bushing can cause the magnet to misalign, which corrupts the signal.
A Note on Moisture Ingress:
Both types absolutely hate moisture. A failing internal seal lets in condensation or water, and then you get corrosion. I’ve seen this particularly on some 2019–2021 Ram trucks, where water gets into the transmission range sensor, corrodes it, and throws false P1D00 codes. Keep those seals good.
Transmission Control Units (TCUs): Electrical & Thermal Stress
TCU failures are almost always electronic. The number one killer I see? Voltage spikes. A bad jump-start, a loose battery cable, or a poor ground can send a jolt through the system and fry those sensitive input circuits. It doesn’t take much.
Then there’s heat. The TCU often lives in a pretty harsh thermal environment, sometimes even inside the transmission. Years of heating up and cooling down cause micro-fractures in solder joints. That’s when you get intermittent faults that come and go with engine temperature—the worst kind to diagnose.
Finally, internal power supplies. The TCU has its own voltage regulators and capacitors. If the 5V reference supply inside the TCU fails, your gear sensor won’t work, even if the sensor itself is perfectly fine. It’s like having a light bulb that works, but no power to the socket.
How We Fix It: Repair Pathways & Professional Territory
Okay, you’ve diagnosed it. Now, what’s the game plan? This isn’t always a DIY job, and I want to be clear about that. Many modern transmissions require specialized tools and software. Trying to tackle some of these without the right setup can “brick” a TCU or cause mechanical damage, turning a bad situation into a really expensive one.
Professional Territory Warning
While some sensors are external, many modern units require internal transmission access and specialized software programming. Attempting these without the right tools can lead to a “bricked” TCU or mechanical failure. When in doubt, call a specialist.
External, Separate Gear Position Sensor DIY Feasible
Integrated Sensor Replacement Professional Only
Internal TCU Failure Specialist Only
Post-Repair Validation: Don’t Skip This Step
You’ve done the work, but you’re not done yet. Verification is non-negotiable in my shop. You have to confirm the repair actually solved the original problem and didn’t introduce new ones.
For a sensor replacement, hook up that scan tool again. Go to the “Transmission Range” or “Gear Selector Position” PID (Parameter ID). Slowly move the shifter through Park, Reverse, Neutral, Drive, and any manual modes. The parameter on the screen should update instantly, smoothly, and accurately. No lag, no jumps, no weird readings. Clear any codes, and then take the vehicle for a full drive cycle—city, highway, stop-and-go—to make sure everything is happy.
For a TCU replacement or reprogramming, this is more involved. You need a comprehensive road test. Pay attention to every shift—are they smooth? Timely? Under light throttle? Under heavy throttle? Watch for “flaring” (where the RPMs spike during a shift), harsh engagements, or the transmission “hunting” for a gear. Finally, get back on the scan tool and confirm that all the adaptation routines—clutch learn, shift timing, etc.—show “Completed” or “OK.” If they don’t, you’ve got more work to do.
Cost, Risk & The “50% Rule”
Now, let’s talk money. This is where experience really comes in handy. You’ve got to weigh the cost of the repair against the value of the vehicle and its overall condition. Here’s a quick breakdown of what I typically see:
| Repair Type | DIY Cost | Shop Cost | Success Rate | Secondary Risk |
|---|---|---|---|---|
| External, separate sensor | $50 – $200 | $250 – $500 | High (95%+) | Improper install damaging new sensor |
| Internal/integrated sensor | Not recommended | $500 – $1,500 | High (90%+) | Internal contamination or fluid leaks |
| TCU replacement/programming | $300 – $1,000 | $800 – $2,000 | High (90%+) | Incorrect programming or bricked module |
The 50% Rule
Here’s a rule I’ve lived by for decades: if the total estimated repair cost starts creeping over 50% of what your vehicle is currently worth, especially if there are other known issues with the transmission or engine, you really need to think hard about it. Dropping $1,800 on a TCU for a car that’s only worth $3,000 might just be throwing good money after bad. Sometimes, it’s time to cut your losses.
Prevention & Monitoring: Keeping it Healthy
You can’t stop every electronic component from failing, but you can definitely prevent a lot of the common causes. In my experience, moisture and contamination are the biggest enemies of both the gear position sensor and the TCU. Always make sure your transmission vent tube is intact, clear, and routed upwards—never pointing down where it can suck in water when you hit a deep puddle. That’s a common killer.
My Maintenance Habits for Gear Position Systems
-
Every time you turn the key to “ON,” take a quick glance at your gear indicator. It should light up immediately and match exactly what your shifter is set to. It’s a quick check that can save you a lot of grief.
-
Watch for any growing delays between when you shift and when the transmission actually engages—especially when it’s cold. That’s often an early warning sign of a sensor starting to fail.
-
When you’re disconnecting electrical connectors, especially in the engine bay or under the vehicle, always apply a small amount of dielectric grease to the terminals before putting them back together. It helps seal out moisture and prevents corrosion.
-
If you’ve been working on anything related to the shifter or linkage—even just adjusting it—always, always verify the gear position with a scan tool afterward. Don’t just eyeball it.
