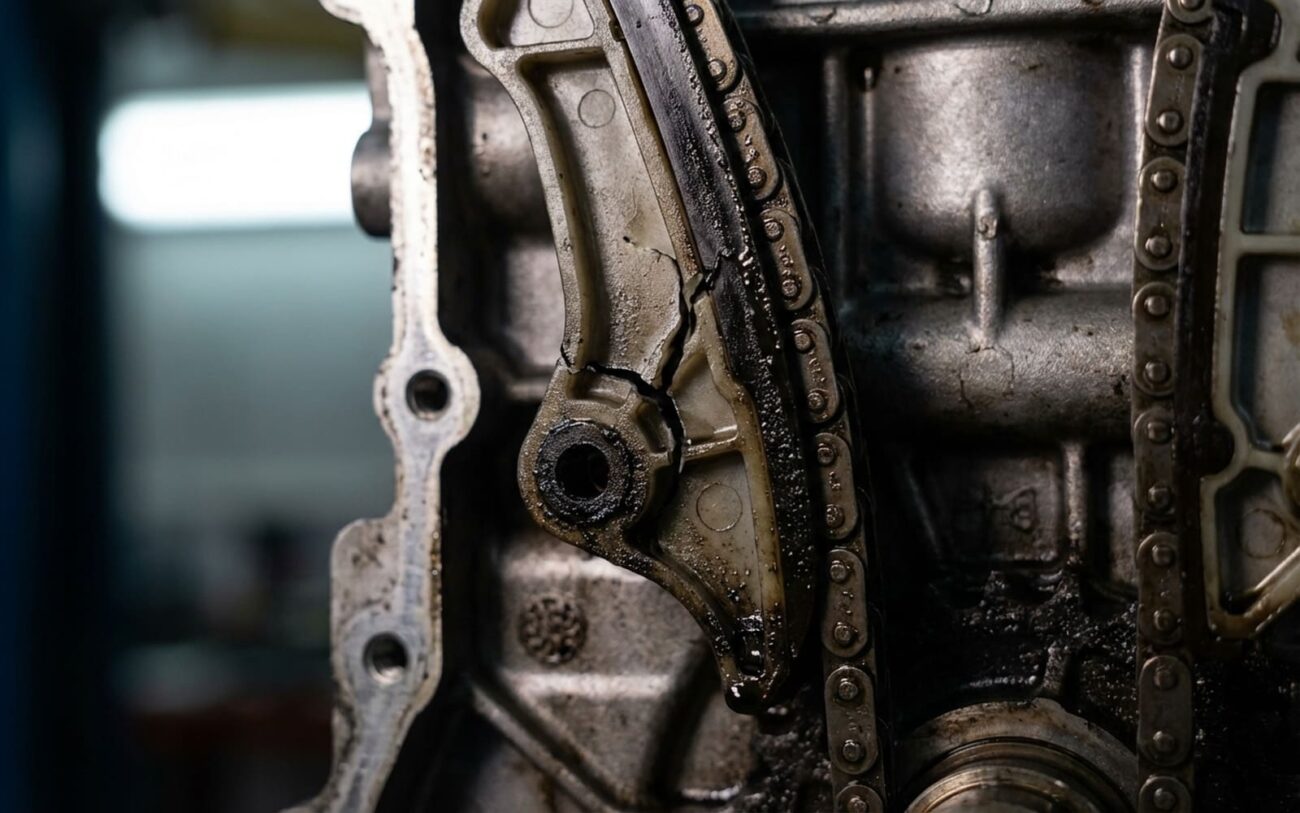
Let’s be clear: if you’re hearing a rattle from the front of your VW TSI engine, especially on startup, you’ve got a problem. And it’s probably the timing chain. I’ve been wrenching on these things for over 25 years, and the 2.0T TSI engines from the late 2000s through the early 2010s—the EA888 generation—have a well-known weak spot right there. This isn’t a ‘maybe’ issue; it’s a ‘when’ issue for many of them. So, let’s talk about what to listen for, what the computer sees, and what you need to do.
The Warning Signs: What Your Engine Is Telling You
The most classic symptom I see is a sharp, metallic rattle or slapping noise coming from the front of the engine. It almost always happens on a cold start, lasting just 1 to 3 seconds, then fading as oil pressure builds and the engine warms up. What you’re hearing there is the timing chain slapping against the cover because it’s got too much slack. In most cases, that’s due to a failing hydraulic tensioner that can’t hold proper tension until the oil gets flowing.
Beyond the noise, the engine’s computer will often pick up on the problem. You’ll get a check engine light, usually with codes like P0016 (Crankshaft/Camshaft Correlation), P0017, P000A, or P0340 (Camshaft Position Sensor). These codes mean the engine control unit (ECU) has detected that the crankshaft and camshaft aren’t spinning in sync. That mismatch almost always points to a stretched timing chain or one that’s skipped a tooth.
Sometimes, it’s sneaky. You might not hear a distinct rattle at all. Instead, you’ll feel a rough idle, misfires, or a noticeable reduction in power. The car just doesn’t feel right. But if those correlation codes are there, the computer doesn’t lie—the timing is off.
Beyond the Rattle: Ruling Out Other Issues
Look, not every front-end rattle means your timing chain is toast. Misdiagnosis is common, and it’s an expensive mistake. You need to rule out other components that can mimic these symptoms. Here’s how I approach it in my shop, along with some definitive tests.
| Symptom | Likely Timing Chain System | Common External Mimics | My Go-To Test to Confirm |
|---|---|---|---|
| Cold-start rattle (1–3 sec) | Worn chain guides or failing hydraulic tensioner | Variable valve timing (VVT) actuator rattle, high-pressure fuel pump (HPFP) cam follower wear |
Use a mechanic’s stethoscope. The timing chain noise will be loudest right at the upper timing cover. For definitive proof, you’ll need to pull that cover and inspect the guides. |
| Camshaft correlation codes (P0016, P0017, etc.) | Chain stretch or jump | Faulty camshaft sensor, oily sensor tip, failed camshaft adjuster solenoid, wiring fault |
With a capable scan tool (VCDS, ODIS, or a high-end Autel), monitor the “camshaft adaptation phase position” at idle. If that value deviates beyond ±5° from spec, you’ve got chain stretch. |
| General front-engine rattling | Failed tensioner or broken guides causing chain whip | Failed serpentine belt tensioner, worn idler pulley, water pump bearing |
Remove the accessory drive belt and run the engine briefly (no more than 30 seconds). If the noise persists, it’s internal to the engine. If it disappears, you’re looking at an accessory component. |
It’s also important not to get sidetracked by other performance issues. For example, a clogged EGR valve or a failing DPF can definitely cause power loss or a rough idle, but they won’t trigger cam/crank correlation codes or produce that metallic timing chain rattle. If drivability is your main concern and you don’t have those specific codes or sounds, look elsewhere first. I’ve seen customers waste money chasing the wrong problem.
Why These Chains Fail: The Design Flaws
These failures aren’t random. They’re typically the result of a combination of design vulnerabilities in the early EA888 2.0T engines and how they’re operated. If you own a pre-2015 model, you need to understand what you’re up against.
The biggest culprit, in my experience, is the hydraulic timing chain tensioner. Early versions, particularly on engines from 2008 to 2012, had a weak internal ratchet mechanism. What happens is, if oil pressure dips momentarily during startup (which is common in cold weather or with an aging oil pump), that tensioner piston can collapse and fail to re-extend fully. That leaves slack in the chain, allowing it to slap and stretch prematurely. Volkswagen knew this was an issue; they issued service guidance and a revised tensioner design. If your car still has the original part, it’s not a matter of if it will fail, but when.
Next up are the timing chain guide rails. These are made of a nylon-based composite. Over time, with heat cycles and chain friction, they wear down, get brittle, and eventually crack or shatter. Once they degrade, the chain loses its proper path, gaining lateral movement. This “chain whip” accelerates wear on the chain itself and the sprockets. I’ve pulled engines apart where the guides were completely shattered—no wonder the chain jumped.
Finally, the chain itself stretches. This isn’t a rubber band; it’s a precision roller chain under immense stress from the valvetrain, oil pump, and sometimes balance shafts. The microscopic wear on the pins and bushings adds up over 80,000 to 100,000 miles. A stretched chain throws off cam timing, leading to misfires, poor performance, and those telltale OBD2 codes.
A Note on Accelerants:
While the tensioner, guides, and chain are the primary failure points, how you maintain your car can definitely speed things up. Using the wrong oil—like a low-viscosity 0W-20 instead of the required 5W-40 (VW 502.00/504.00 spec)—can reduce oil film strength and hurt tensioner performance. Chronic low oil pressure, or even just running the engine low on oil, starves the tensioner. These aren’t the root cause, but they’re absolutely accelerants.
Repair Options: What You Can (and Can’t) Do
Professional Territory Only
Let me be blunt: there’s no quick fix, no magic additive, no workaround for a failing TSI timing chain. Once you’ve got symptoms, the only safe path is a proper repair. This is absolutely not a DIY job for most people. The margin for error is zero.
Complete Timing Chain System Overhaul Professional Only
DIY-Feasible Tensioner Swap Limited DIY
Upper Chain & Guide Replacement Professional Only
Verifying the Repair: Don’t Just Hope for the Best
You can’t just button everything up, start the engine, and assume you’re good. Validation is absolutely critical after a timing chain job. This is where you confirm you didn’t just spend a bunch of money to make things worse.
First step: remove the spark plugs. Then, using a socket on the crankshaft bolt, rotate the engine two full revolutions by hand. It should turn smoothly, with no binding or resistance. If it binds, stop immediately—you’ve got the timing wrong, and continuing will bend valves. Go back and recheck your timing marks.
Once it spins freely, reinstall the plugs and start the engine. Listen carefully. That cold-start rattle should be completely gone. Any lingering metallic noise means something’s still off—don’t ignore it. Shut it down and re-diagnose.
Now, grab your capable scan tool (VCDS, ODIS, or a high-end Autel is a must here). Clear all camshaft adaptation values and perform the basic setting procedure for the timing chain. Then, monitor the “camshaft adaptation phase position” at idle. For a successful repair, this value should stabilize within ±4.0 degrees of specification and remain steady. If it’s bouncing all over the place or outside that range, you’ve still got an issue.
Finally, take the car for a good test drive—I recommend around 50 miles of mixed city and highway driving. This gives the ECU time to relearn and adapt. After the drive, recheck with the scan tool. Look for any stored or pending codes and recheck those adaptation values. If they’ve held steady and no new codes have popped up, then you’re truly good to go. This final step confirms everything has seated properly and the ECU is happy with the new timing.
Cost, Risk, and When to Walk Away
Alright, let’s talk brass tacks. This repair isn’t cheap, and you need to be honest about whether it makes financial sense for your specific situation. Here’s a realistic breakdown of costs and outcomes based on what I see in my shop.
| Repair Type | DIY Parts Cost | Professional Shop Cost | Success Rate | Secondary Risk |
|---|---|---|---|---|
| Revised Tensioner Only | $150 – $300 | $500 – $900 | 95% | High. If chain stretch is undiagnosed, it can still jump timing. This is a calculated risk, not a guaranteed fix. |
| Complete Timing Chain Kit | $400 – $800 | $1,800 – $3,500 | 98% | Catastrophic. Incorrect installation causes immediate engine destruction. This is why you pay for professional expertise. |
Be honest about your car’s value. My rule of thumb: if the professional repair cost exceeds 40% of your car’s private-party value (check KBB or NADA for a realistic number), and the vehicle has over 100,000 miles, you need to consider the long-term picture. Investing $3,500 into a car worth $4,000 often doesn’t pencil out, especially when other age-related issues are likely to pop up soon. At that point, a used engine swap (which can be $4,000-$6,000 installed) or selling the car “as-is” to a mechanic or hobbyist may be the smarter move. Don’t throw good money after bad.
Prevention and Early Detection: Keep it Running
Maintenance Best Practices
-
Oil changes are absolutely critical. Use only oil that meets VW 502.00 or 504.00 specifications—typically a full synthetic 5W-40 or 0W-40. And don’t push it: change it every 10,000 miles or 12 months, max. I prefer closer to 5,000-7,500 miles on these engines, especially if you do a lot of city driving.
-
Avoid constant short trips. If your engine never fully warms up, moisture and fuel dilute the oil, reducing its film strength and accelerating wear on those guides and the chain. If you mostly do short trips, consider even more frequent oil changes.
-
Listen for early signs. Make it a habit. Once a month, listen carefully to that first cold start. Record it on your phone if you think you hear something. Any new metallic slap is a red flag you can’t afford to ignore.
-
Check for pending codes. If you own an OBD2 scanner, periodically check for pending P0016 or P0011 codes before the check engine light even comes on. This can give you a heads-up before things get critical.
