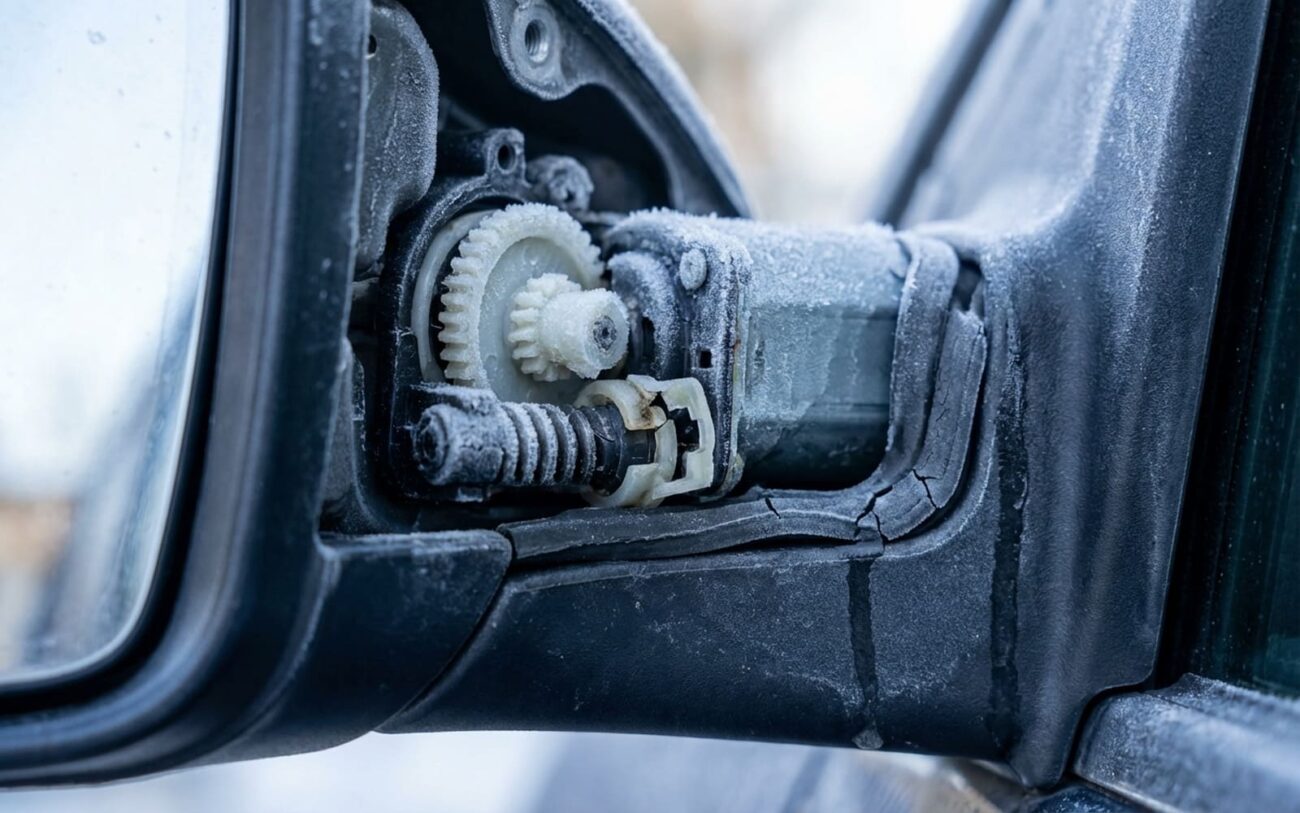
You ever walk out to your car on a freezing morning, try to adjust your side mirror, and nothing happens? No movement, no sound, just dead silence. It’s a common winter headache, but as someone who’s seen this hundreds of times in the shop, I can tell you: the specifics of what’s not happening are your first and best clues. Knowing the difference between a simple freeze-up and a real electrical problem is going to save you a lot of time and money.
What Your Mirror is Telling You (or Not Telling You)
When a customer brings in a frozen mirror, I start by listening. The symptoms are usually pretty clear, and they point me straight to the most likely problem area. Don’t just guess; pay attention.
Symptom 1: Dead Silence in the Cold, Fine When Warm
If you hit the switch and get absolutely nothing—no noise, no movement, no resistance—but then it works perfectly once the car warms up in the garage, that’s a strong indicator the issue is inside the mirror assembly itself. Something mechanical is binding up due to the low temperature. Now, I’ll admit, cold-sensitive electronics like a failing switch or a body control module (BCM) can act up too, but those usually come with other symptoms. We’re talking intermittent operation on both sides, or maybe some stored fault codes. For now, we’ll keep our focus inside the mirror housing.
Symptom 2: Grinding, Whirring, or Straining Noise
Listen closely here. If you hear a whirring, straining, or grinding noise from the mirror housing when you press the switch, and then it just cuts out, that’s the motor fighting against a physical obstruction. Nine times out of ten, ice has formed in the gear train or along the slide track. That noise is the small DC motor stalling out. And here’s where you need to be careful: keep forcing it, and you risk burning out that motor or stripping the plastic gears. What could have been a fixable issue quickly turns into a full replacement job.
Symptom 3: Sluggish Movement Only When Cold
The mirror adjusts, but it crawls instead of moving smoothly. Once it warms up, it works fine. This often points to the factory-installed grease thickening up in low temperatures—think honey in the fridge, it just doesn’t flow. But don’t assume it’s just the grease. Corrosion in the wiring harness can also cause voltage drop, making the motor underperform. That’s why testing isn’t optional; it’s critical.
I tell every customer this: don’t keep pressing that switch when the mirror is frozen. You’re not “jogging it loose”—you’re risking a blown fuse, a damaged motor, or broken internal components. A blown fuse might knock out both mirror adjustment and the defroster on that side, and if you don’t fix the root cause, that new fuse will blow too. Diagnose first. Act second.
How I Pinpoint the Problem: Definitive Tests
So, the mirror isn’t working in the cold. Is it the mirror itself, or is the problem upstream in the electrical system? The answer lies in systematic testing. Jumping straight to replacement is expensive and, frankly, often unnecessary. Here’s how I confirm what’s going on:
| Symptom | Most Likely Internal Mirror Problem | Common External Mimics | The Test I Use to Confirm |
|---|---|---|---|
| No movement in cold, works when warm. | Moisture freezing the gear mechanism; low-temp grease hardening. | Faulty mirror switch; failing BCM output; corroded door-to-body wiring harness (especially at the boot). |
I perform a voltage drop test right at the mirror motor connector during actuation. With the switch pressed for, say, left adjustment, I measure across the two motor terminals using my digital multimeter. If I see a drop over 0.5V with no movement, that tells me there’s high resistance inside the mirror—a mechanical bind. But if the drop is under 0.1V, that means power isn’t even reaching the mirror properly, pointing me to the switch, BCM, or wiring issues. |
| Grinding noise followed by failure. | Ice jamming gear teeth or slide rails; cracked or stripped plastic drive gear from prior cold-weather strain. | Debris trapped behind mirror glass (e.g., a small pebble, ice chunk). |
This one requires a visual. I carefully remove the mirror glass using a trim tool and a low-heat setting on a heat gun—you don’t want to crack it. Then, I inspect the gear train and tracks. Can I move the mechanism by hand? If it’s stiff or frozen, the fault is internal. If I see broken plastic, well, then it’s replacement time. |
| Sluggish operation only in cold. | Factory grease too thick at low temps; minor ice buildup increasing resistance. | Corroded electrical connector causing voltage drop; failing motor with internal resistance. |
I measure the motor’s current draw. I’ll use a DC clamp meter, or put my multimeter in series. Then I compare the current draw when it’s cold to when it’s at room temperature. A significant increase (say, from 0.8A to 2A or more) tells me there’s internal mechanical drag. If the current is normal but the speed is still slow, I start looking for low voltage from external wiring issues. |
Deep Dive: What’s Actually Breaking Inside?
Once I’ve ruled out switches, fuses, and wiring, and my tests confirm the fault is inside the mirror housing, it’s time to dig into the actual failure. There are three main mechanical root causes I see—each tied to design, environment, or material limitations.
1. The Wrong Grease for the Weather
Many automakers use standard lithium-based grease in the mirror’s gearbox. It’s cheap, and it works fine in moderate climates. But in sub-freezing temperatures, that grease turns into a semi-solid paste. The tiny DC motor just can’t generate enough torque to overcome that resistance. It’s not a motor failure; it’s a lubrication mismatch. This is especially common in older models or vehicles that were never really designed for harsh winters.
2. Water Gets In, Then Freezes
The mirror housing isn’t completely sealed. It has weep holes to let moisture escape, but if those clog up, or if the seal around the mirror glass or housing degrades, water gets in. And when it gets cold, that water freezes. Ice can lock the pivot ball, jam the slide track, or wedge itself between gear teeth. This isn’t just speculation—I’ve pulled apart dozens of mirrors with visible ice buildup after a cold snap. Some manufacturers have even put out service bulletins for certain model years, acknowledging power mirror failures due to moisture intrusion in cold climates.
3. Brittle Plastic Components
The gears and actuators inside these mirrors are usually made of nylon or acetal. They’re strong when new, but in extreme cold, they become brittle. If the mechanism is already bound by ice or thick grease and you keep pressing that switch, the stress can easily crack or strip those gears. Once that happens, no amount of cleaning or greasing will bring it back to life.
My Approach to Fixes: From Simple to Swapping Parts
The fix really depends on what I find—and how much risk you’re willing to take. Here’s how I break it down in the shop, based on severity and repairability.
External Seal / Weep Hole Repair DIY-FEASIBLE
Cleaning & Regreasing Mechanism Professional Only
Full Assembly Replacement (Non-Repairable)
Temporary De-icer Fix (Last Resort)
Testing Your Work: Don’t Skip Validation
Never assume it’s fixed until you’ve tested it under real-world conditions. A mirror that works fine in my warm shop might fail the first cold morning you hit. Here’s how I validate each repair type.
If I’ve replaced a seal or the entire mirror, I do two checks. First, a water test: I spray the mirror with a hose or pressure sprayer for five minutes, simulating heavy rain. Then I check inside the housing for any leaks. Second, a cold test: I’ll leave the car outside overnight in freezing temps, or if I’m in a hurry, I’ll put the mirror in a freezer for an hour. Afterward, I test its full-range movement in all directions. It needs to respond immediately and smoothly.
If I’ve cleaned and regreased the mechanism, validation is a bit more technical. I use a DC clamp meter to measure current draw after chilling the mirror below 20°F (-7°C). The draw should stay within 10% of factory spec—typically 0.7 to 1.2 amps. A spike indicates residual drag, meaning old grease wasn’t fully removed, or the wrong lubricant was used. Skipping validation is how comebacks happen, and nobody wants those.
The Bottom Line: Cost, Risk & When to Walk Away
Let’s talk real numbers and long-term value. Here’s a breakdown of repair costs and outcomes based on what I’ve seen over years of customer interactions.
| Repair Type | DIY Cost (Parts & Tools) | Shop Cost (Parts & Labor) | Success Rate (If Done Right) | Secondary Risk if Failed |
|---|---|---|---|---|
| Clean/Regrease Mechanism | $15–$25 (grease, isopropyl, basic tools) | $150–$300 (1–2 hours labor) | 80% if gears and motor are intact | Cracking the mirror glass, improper reassembly, or reintroducing contaminants that degrade the new grease—leading to repeat failure or a full replacement. |
| Full Assembly Replacement | $150–$400 (OEM or quality aftermarket) | $400–$700 (part + 1 hour labor) | 95%+ | Pinched wiring, incomplete seal installation, or a damaged connector during reassembly—resulting in new leaks or electrical faults. |
Here’s a rule I follow: if the repair cost exceeds 40% of the private-party value of a base-model version of your car, it’s time to reconsider. For an older vehicle, especially one with other aging systems, spending $600+ on a power mirror may not make sense. In some cases, a manual mirror conversion is a legal and practical alternative—especially on fleet vehicles or work trucks. Or, it might just be a sign that broader maintenance costs are stacking up. Be honest about the car’s remaining lifespan.
Prevention & Monitoring: Keep It From Happening Again
Once it’s fixed, protect your investment.
-
These failures are often preventable with a little attention. Every few months—especially before winter—apply a silicone-based protectant to the mirror housing seals. It keeps the rubber from drying out, cracking, and letting in moisture. Just avoid petroleum-based dressings; they degrade rubber over time.
-
Always ensure the weep holes at the bottom of the mirror housing are clear. I’ve seen them clogged with mud, ice, or even spider nests. A small wire or compressed air can clear them out. If water can’t drain, it stays in the mechanism and freezes—it’s that simple.
-
The best prevention is early detection. At the start of each cold season, test both mirrors’ full range of motion. Don’t wait until you need them. And after a heavy rain or a car wash, take a close look. If you see fogging or water droplets inside the housing, that’s a red flag. Just like hidden coolant leaks, small signs of intrusion can prevent major failures later. Catch it early, and you can often replace a seal before ice does the real damage.
