Alright, let’s talk about the Tesla Thermal Management System (TMS). If you’ve got a “Thermal Management System Fault” message popping up, don’t just clear it and hope it goes away. This isn’t a minor annoyance like a burnt-out headlight. This is your car telling you that its critical cooling system – the one protecting your battery, motors, and power electronics – isn’t doing its job. Ignoring it is a surefire way to turn a manageable repair into a complete catastrophe. I’ve seen it happen too many times in the shop.
What You’re Seeing and Hearing: The Early Warnings
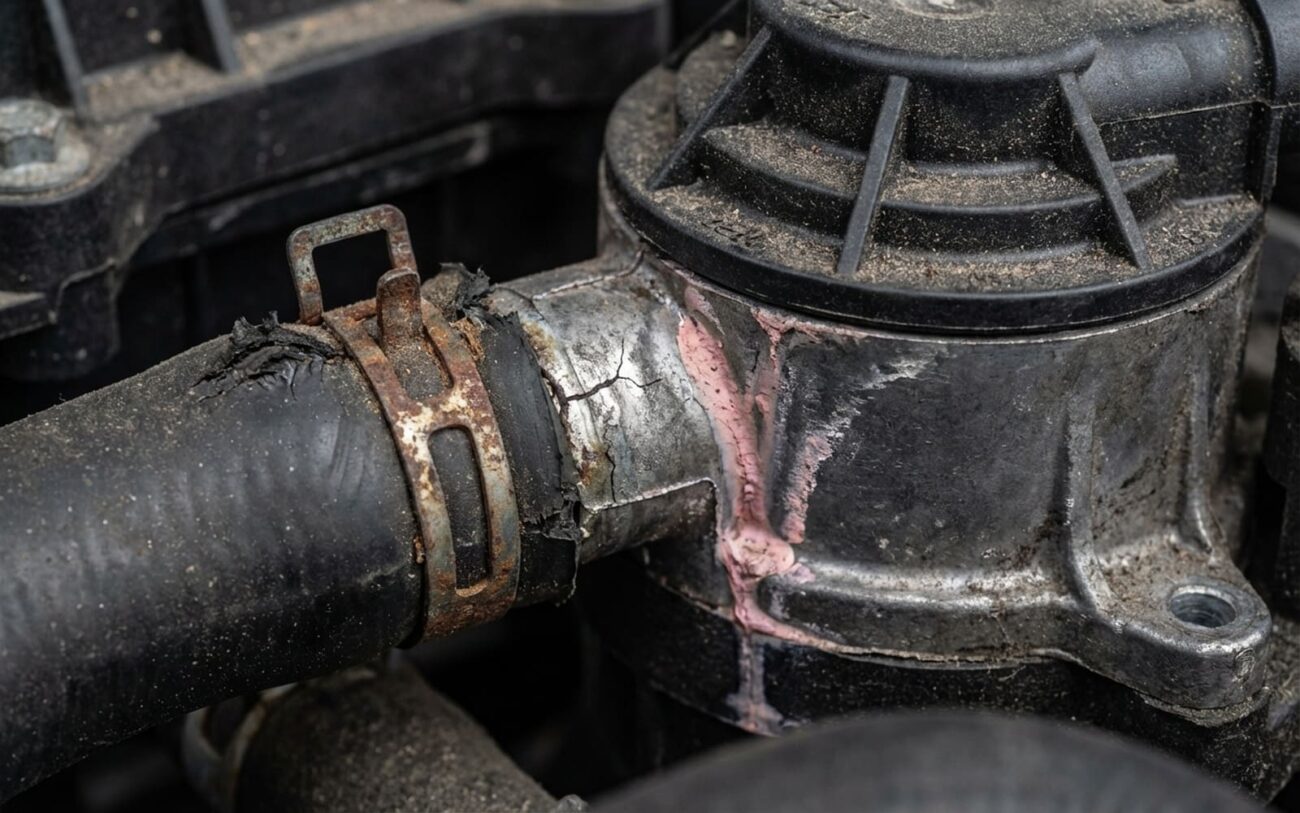
When a TMS fault shows up, it’s usually pretty clear. You’ll get a direct message like “Thermal Management System Fault” or “Coolant Level Low.” Sometimes it’s a bit more cryptic, like a general “PCS (Powertrain Control System) error,” but the underlying issue is often still thermal. That “Coolant Level Low” one? That’s your biggest clue. In my experience, it almost always means you’ve got a leak somewhere in the closed-loop glycol system. Don’t just top it off and call it a day; that fluid went somewhere, and it’s rarely just evaporation.
Beyond the dashboard warnings, your car will start acting funny. You might see “Acceleration and top speed reduced.” This isn’t a bug; it’s the car’s self-preservation mode kicking in. If the battery or drive unit can’t shed heat, the software cuts power to prevent overheating and permanent damage. It’s trying to save itself. You’ll also notice problems with preconditioning – the car might refuse to fast charge at a Supercharger because the battery isn’t at the right temperature, or the cabin won’t heat or cool properly. Again, the TMS can’t regulate things, so it locks out functions to prevent further stress.
And then there are the noises. Listen carefully, especially after you’ve parked the car. A failing coolant pump often gets noisy. It might whine, or you’ll hear it running at full blast constantly, even when it shouldn’t be. Gurgling or sloshing sounds, usually from under the floor or near the frunk, are big red flags. That’s air in the system, which typically means you’ve either got a leak that’s letting air in, or someone didn’t bleed the system properly after a repair (which, believe me, happens a lot). These aren’t normal operating sounds; they’re clues, and you need to pay attention to them.
Diagnosing the Real Problem: Symptoms, Causes, and Tests
The warning message is just the symptom; it doesn’t tell you what broke. The Tesla TMS is a complex, integrated system. Multiple components share coolant loops and control logic, so one failure can easily look like another. You need a systematic approach to figure out what’s actually going on.
For instance, that “Coolant Level Low” alert could be something simple, like a loose hose clamp. But it could also be a leak from the Super Manifold (what Tesla calls the octovalve), or even a tiny pinhole leak from a manufacturing defect in a cast aluminum pump housing. I’ve seen plenty of Model 3s with microscopic porosity in these parts, weeping coolant slowly over time. And a power reduction? That could be poor coolant flow, sure, but it could also be an internal battery fault that has nothing to do with the thermal system directly. That’s why you can’t just guess; you need to test.
| Symptom | Common TMS Component Issues | External Issues That Mimic It | How I Confirm It in the Shop |
|---|---|---|---|
| “Coolant Level Low” alert | Leak from Super Manifold (octovalve), porosity in a coolant pump housing, internal heater core leak. | Loose hose clamp, degraded rubber hose, cracked plastic reservoir, failed O-ring at a quick-connect fitting. |
I use a static pressure tester with the correct adapter. Pump it to 15 psi and let it sit for 20-30 minutes. If it drops, I add UV dye and use a black light to find the exact seepage point. |
| Reduced performance alert | Failed coolant pump, stuck flow control valve in the Super Manifold, blocked coolant passage in the drive unit. | Internal battery fault (e.g., cell imbalance), inverter thermal sensor failure, drive unit hardware issue. |
I monitor actual vs. target coolant temperatures using a good scan tool. If the actual temperature is more than 10°C (18°F) higher than the target, that tells me there’s poor flow. |
| Inability to precondition or fast charge | Failed solenoid valve in the chiller circuit or a clogged refrigerant-to-coolant heat exchanger (chiller assembly). | HVAC refrigerant system fault (e.g., low refrigerant, failed compressor), or a high-voltage contactor issue in the battery pack. |
I command the battery chiller on via the scan tool. Then I watch the refrigerant pressures and the coolant outlet temperature from the chiller. If the numbers don’t move right, the chiller or its controls are the problem. |
A note from my bench: Not every fault means a component is dead. I see this misdiagnosed a lot. If you just had service done and now you’re getting a “Coolant Level Low” warning, it’s often just an air pocket trapped in the system, not a new leak. Tesla has specific bleed procedures that need a scan tool. Skip it, and you’ll get false warnings and potentially damage new parts. Also, loose hose clamps or O-rings at quick-connect fittings are often installation errors, not part failures. Always rule out poor workmanship before blaming the hardware.
Why These Parts Fail: The Root Causes
Once you’ve nailed down the faulty component, it helps to understand why it failed. This isn’t usually about neglect on your part; it’s about the inherent stresses these systems deal with.
First off, manufacturing defects happen. Like I mentioned, I’ve diagnosed plenty of Model 3s with microscopic porosity in die-cast aluminum parts – things like coolant pump housings or the main octovalve body. These aren’t cracks you can see; they’re tiny voids in the metal from the casting process that slowly weep coolant. No amount of tightening a bolt will fix that; it’s a material flaw, and it means replacement.
Then there’s thermal cycling. This system is constantly shifting from freezing temperatures to over 90°C (194°F), especially during preconditioning or fast charging. Plastic components, like the coolant reservoir or pump housings, expand and contract. Over time, that leads to stress cracks. The same goes for internal seals and O-rings inside the Super Manifold; they degrade with age and heat, eventually losing their ability to seal.
Corrosion is a silent killer. Tesla uses a specific glycol-based coolant (G-48) with special anti-corrosion additives. If someone uses the wrong coolant, or if the service intervals (typically every 4 years or 50,000 miles) are ignored, those additives break down. Then, corrosion starts eating away at the thin-walled coolant channels in the battery pack or drive unit. That can lead to internal leaks or blockages. In the worst cases, I’ve seen it cause cross-contamination between the coolant and high-voltage systems – that’s a catastrophic scenario you absolutely want to avoid.
Finally, electrical failures are pretty common. The brushless DC motors in those electronic coolant pumps can fail from bearing wear or coil burnout. The small stepper motors that control the valves in the octovalve can seize up or lose their calibration. These aren’t repairable; you replace the whole assembly.
The Fix: Your Repair Options and What I Recommend
This is Professional Territory. Seriously.
The repair path depends entirely on what’s broken and where it is. Some jobs are straightforward for a qualified EV technician; others require major disassembly, specialized tools, and come with significant risk. This isn’t your average radiator hose replacement.
Pump Housing Porosity Leak PROFESSIONAL-ONLY – HIGH RISK
Sensor Replacement PROFESSIONAL-ONLY
Internal Component Failures NON-REPAIRABLE → REPLACE ASSEMBLY
Electrical Pump Failure PROFESSIONAL-ONLY
Proof It’s Fixed: Validating the Repair
You’re not done just because the coolant reservoir is full. Validation is where a lot of shops cut corners, but not if you want reliability. This is how I make sure the job is truly done.
For any external leak repair, the test is simple: no visible leaks, no UV dye glow. I re-pressurize the system to 15 psi and hold it for at least 30 minutes. If that pressure drops, I missed something, and I go back to square one. Then, I use service mode to cycle the system: heat the coolant to operating temperature (around 90°C or 194°F), let it cool, and repeat this two or three times. This expands and contracts the system, revealing any hidden seepage. Only after passing all these steps do I consider the repair complete. You’ll need a pressure tester with the correct adapter, UV dye, a black light, and, of course, safety glasses.
If I’ve replaced an internal component – a pump or a valve, for example – the validation is all data-driven. With a scan tool connected, I command each pump and valve through its full range of motion. I monitor live data: battery inlet/outlet temps, drive unit temps, and cabin loop performance. Everything needs to respond within the expected timeframes. Then, I take the car for a 10-mile drive under varied loads and scan it again for any new Diagnostic Trouble Codes (DTCs). If temperatures stabilize, pumps respond correctly, and no new codes appear, then I know the repair is solid.
Cost, Risk, and Making the Tough Decisions
Let’s be realistic: TMS repairs aren’t cheap, and the risk of getting them wrong is high. You’re working with high-voltage systems, precise tolerances, and expensive, integrated components. This isn’t a job for the faint of heart or the inexperienced.
| Repair Type | DIY Cost (Parts/Tools) | Shop Cost (Estimate) | Success Rate (if done right) | Secondary Risk if Repair Fails |
|---|---|---|---|---|
| Replace one electronic coolant pump | $300 (part) + $100 (coolant/tools) | $800 – $1,200 | High | An air lock causes cavitation, leading to rapid pump failure and potential drive unit overheating. |
| Replace Super Manifold assembly | $600 (part) + $150 (coolant/tools) | $1,500 – $2,500 | High | Improper installation can cause multiple leaks at new connections; incorrect calibration affects the entire thermal loop. |
| Battery coolant plate replacement | Not applicable (specialized tools/environment) | $2,000 – $5,000+ | Moderate | High risk of coolant ingress into high-voltage modules, potentially causing total battery pack failure. |
That last entry, the battery coolant plate, is the real concern. There’s a practical financial limit here: if the repair cost starts hitting 40% or more of your car’s current market value, you need to evaluate things seriously. A $5,000 repair on a $12,000 Model 3 is a tough pill to swallow. At that point, a warranty-covered battery replacement (if applicable) or even considering a different vehicle might be more economical. I’ve had customers face this decision, and it’s never easy, but it’s better than sinking good money after bad.
Keeping It From Happening Again: My Best Advice
Prevention for these issues really boils down to three things: using the right coolant, sticking to the service intervals, and paying attention to those early warning signs.
Maintenance Best Practices from the Shop Floor
-
Always, and I mean always, use Tesla’s specified G-48 coolant. It’s an ethylene glycol-based formula with very specific inhibitors designed for the aluminum and copper components in the TMS. Using off-brand or incompatible coolant can cause gelling, accelerated corrosion, or deposits that will clog up your system.
-
Stick to the service schedule. That means coolant changes every 4 years or 50,000 miles, whichever comes first. This isn’t just a suggestion; it refreshes those crucial anti-corrosion additives and flushes out any contaminants before they become a problem.
-
Build a few simple habits. Every few months, check the coolant reservoir in the frunk when the car is cold and on level ground. Just a quick visual. Also, listen after you park: if those coolant pumps are running loudly for extended periods, it could mean a sensor is drifting or you’ve got an air pocket forming.
And never, ever ignore those early warnings. That “Coolant Level Low” alert or an intermittent thermal fault isn’t just a nuisance; it’s your chance to catch a small issue – like a loose clamp or a minor leak – before it escalates into a costly, system-wide failure. Trust me, a little vigilance goes a long way with these cars.