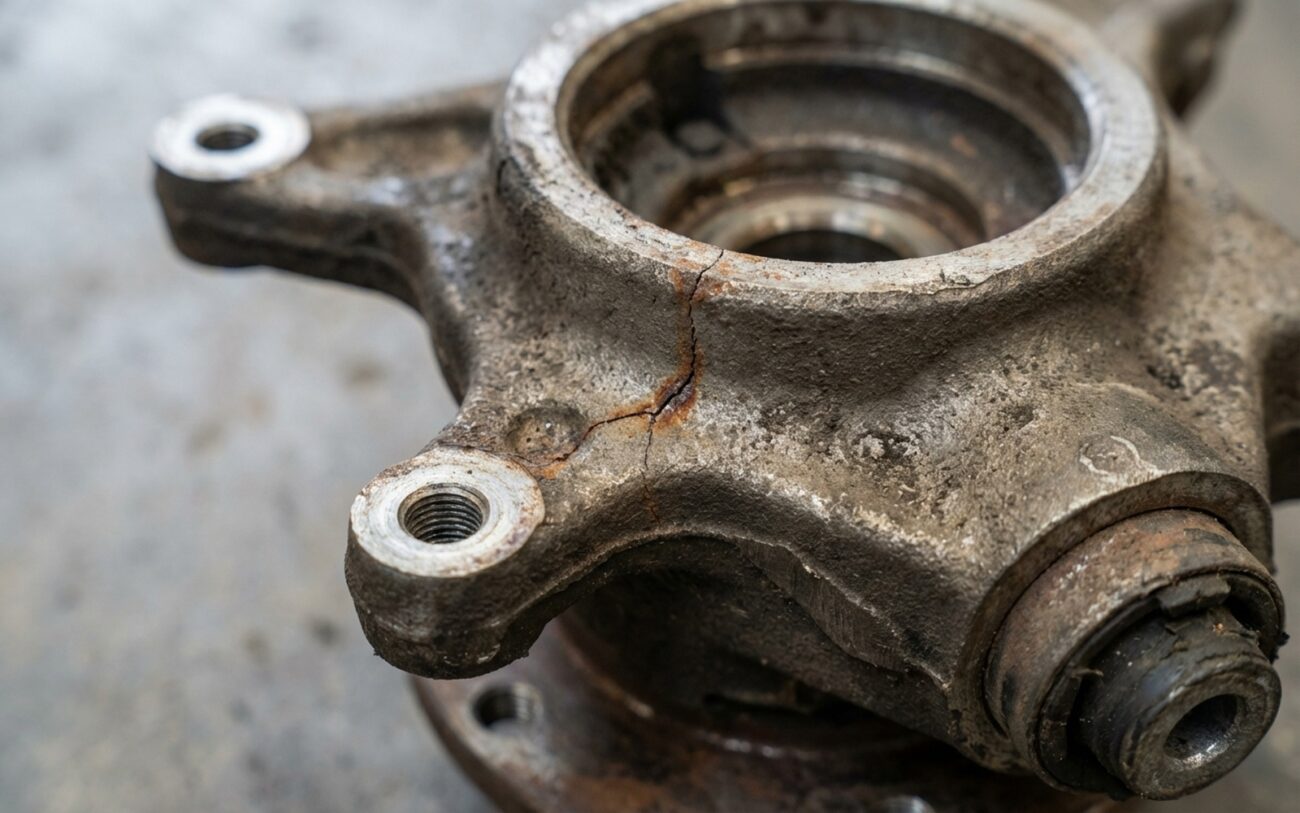
Alright, let’s talk steering knuckles. I’ve been turning wrenches for over 25 years, and I’ve seen my share of bent metal. When a customer rolls in after a nasty curb strike, a run-in with a monster pothole, or even a minor fender-bender, my first thought often goes to the knuckle. Why? Because this isn’t just some bracket; it’s the central anchor point for your wheel, your suspension, your steering, and your brakes. It takes the brunt of the force, and when it bends, everything else goes sideways – literally.
A damaged knuckle usually means one thing: you hit something hard. And when that happens, the precision geometry of your front end gets thrown out of whack. It’s a critical safety component, so we don’t mess around with it.
What I Look For: Symptoms of a Bent Knuckle
The most common complaint I hear, and the biggest red flag for a bent knuckle, is a sudden, severe steering pull. The steering wheel will be noticeably off-center, and no amount of alignment adjustment will fix it. If an alignment tech tells you they can’t get the camber or caster into spec – especially if they say it’s “not adjustable” – that’s a dead giveaway. Something structural is bent, and the knuckle is high on my suspect list.
I’ve seen plenty of vehicles where the alignment report shows something like -2.4 degrees of camber on one side when it should be close to zero. That kind of deviation, particularly with caster also being out, screams “bent metal.” It means the wheel isn’t sitting straight in the wheel well, and no amount of tie rod adjustment will correct that fundamental angle. It often points to a bent knuckle flange where the strut mounts.
Beyond the obvious steering issues, you might also notice some other problems. Uneven tire wear, especially on one edge, is a common secondary symptom. You might feel a vibration when you hit the brakes, or even a rough, gritty feeling when you spin the wheel by hand. That last one often points to a wheel bearing problem, but if you’ve already replaced the bearing and it still feels rough or binds up, then the knuckle’s bearing bore is likely distorted, pinching the new bearing.
My Diagnostic Process: Ruling Out Other Suspects
Now, just because you have alignment issues or a rough-spinning wheel doesn’t automatically mean it’s the knuckle. Plenty of other components can mimic these symptoms. A bent lower control arm, a warped wheel, a damaged strut, or even a tweaked subframe can all throw off your alignment. That’s why a methodical inspection is crucial.
When a knuckle gets damaged from an impact, it usually falls into one of three categories:
- Plastic Deformation: This is where the metal bends and stays bent. It’s common at the strut mounting ears or the steering arm, especially with aluminum knuckles. They’re stiff, but less forgiving than cast iron.
- Cracking or Fracture: These usually start at stress points – sharp corners, casting transitions, or bolt holes. That’s the one that gives me nightmares, as I mentioned with the safety warning.
- Bore Distortion: A hard side impact can ovalize the precision-machined bore where the wheel bearing sits. This pinches the bearing’s outer race, causing binding and premature failure, even with a brand new bearing.
Important Distinction:
Listen, worn ball joints, loose tie rod ends, or a failing wheel bearing are not knuckle failures. Those are serviceable parts that attach to the knuckle. When I talk about knuckle damage, I’m talking about the structural integrity of the casting itself. Don’t confuse the two.
So, how do I pinpoint the knuckle? Here’s the table I use to sort things out:
| Symptom | Likely Knuckle Cause | Common Mimics | Definitive Test I Use |
|---|---|---|---|
| Severe Camber/Caster Misalignment | Bent strut mounting flange or ball joint bore on the knuckle. | Bent strut, bent lower control arm, damaged subframe. |
I use a surface plate and a precision straightedge on the strut mounting face. Look for any gaps or twist. You can also use a digital angle finder on the ball joint taper relative to the hub face. |
| Binding or Rough Hub Rotation (even with new bearing) | Distorted knuckle bore pinching the wheel bearing outer race. | Failed wheel bearing, contaminated hub, damaged axle splines. |
Take a known-good hub-bearing assembly and try to install it into the suspect knuckle. If it binds, or if the bearing feels rough, then the knuckle’s bore is ovalized. |
| Visible Crack Near Mounting Point | Stress fracture from impact at a high-stress zone. | Corrosion fatigue, casting defect, pre-existing flaw. |
Clean the area thoroughly. For iron, I’ll use magnetic particle inspection (MPI). For aluminum, dye penetrant inspection (DPI) works best. Even a tiny crack means replacement. |
Repair or Replace? My Stance on Fixing a Knuckle
Professional Territory Only
Can you fix a structurally damaged knuckle? Let me be blunt: almost never. Straightening or welding a knuckle is strictly prohibited by most manufacturers for a good reason – it compromises the metallurgy, weakens the part, and creates a massive safety risk. Don’t even think about it.
Minor, Non-Structural Repair Specialized Tools Required
Structural Damage NON-REPAIRABLE
Finishing the Job Right: Post-Replacement Validation
Alright, so you’ve got a shiny new knuckle installed. You’d think you’re done, right? Not so fast. Installing a new knuckle isn’t the finish line; it’s the start of the validation process. You absolutely have to confirm that the repair restored proper geometry and function. Skipping this step is asking for trouble down the road.
My Post-Repair Checklist
-
Full 4-Wheel Alignment: This is non-negotiable. After any major suspension work, especially a knuckle replacement, you need a full alignment. I always pay close attention to camber and caster. If they’re still out of spec, you’ve got undiagnosed damage to the subframe or even the unibody. I’ve seen it happen – the knuckle was bent, but so was the mounting point on the frame.
-
Mechanical Function Check: With everything torqued down, spin that wheel hub by hand. It should rotate smoothly, no binding, no roughness. I also use a dial indicator to check for axial play – typically, you want less than 0.05 mm. If it’s not smooth, something is still wrong, maybe the new bearing is bad, or the bore is still off (unlikely with a new knuckle, but I check everything).
-
Fastener Integrity: Every single nut and bolt that was touched needs to be torqued to manufacturer specifications. And this is important: if your vehicle uses torque-to-yield (TTY) fasteners – which many suspension components do – you absolutely cannot reuse them. They’re designed to stretch once and then they’re done. Always replace TTY bolts.
The Bottom Line: Cost, Risk, and My Recommendation
Look, I know parts aren’t cheap, and shop labor adds up. But when it comes to a steering knuckle, this isn’t the place to cut corners. The cost of a proper repair pales in comparison to the cost of a catastrophic failure on the highway.
| Repair Type | DIY Cost (Parts Only) | Shop Cost (Parts & Labor) | Success Rate (in my experience) | Secondary Risk |
|---|---|---|---|---|
| Knuckle Replacement (OEM or Quality Aftermarket) | $200–$600 | $500–$1,200 | 99% (if done correctly) | Low (assuming proper installation and alignment) |
| Attempted Straightening or Welding | N/A (Don’t even try this at home) | $200–$400 (for a bad attempt) | <5% (for structural damage) | EXTREMELY HIGH: Sudden fracture, loss of control, wheel separation. |
My Pro Tip: Prevention and Quick Checks
Proactive Inspection Tip
Here’s a little trick I’ve picked up over the years: every time your wheels are off – like during a tire rotation or a brake job – take an extra 60 seconds to really look at that knuckle. Look for fresh scratches, shiny spots where paint’s been scraped off (a sign of impact), or any hairline cracks, especially around the mounting points for the strut or ball joint. Catching knuckle damage early, before it causes major tire wear or a dangerous vibration, can save you a lot of headache and money down the road. It’s cheap insurance.
