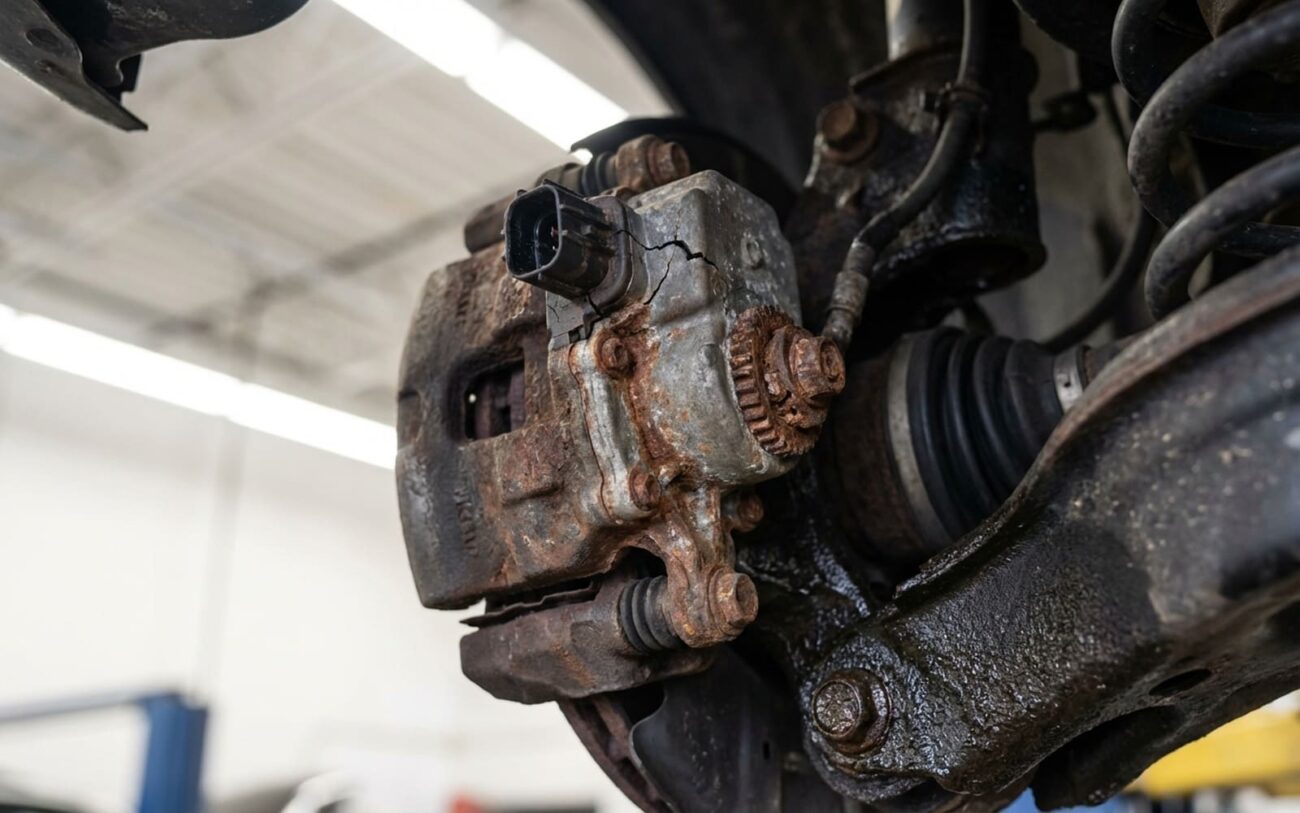
Alright, let’s talk about electronic parking brakes. I’ve seen more than my share of cars rolled into the shop, stuck solid, because the EPB decided to call it quits. You hit the button, nothing happens, maybe a warning light flashes on the dash, and your car isn’t going anywhere. Sound familiar? It’s a common headache these days. Now, most folks jump straight to “it’s the actuator,” and yeah, that’s often the case. But guessing is a surefire way to waste money and time. In my 25+ years, I’ve learned the first step is always to listen. What you hear – or don’t hear – tells you a heck of a lot about what’s actually going on.
We’re usually looking at two main culprits here: the actuator itself – that’s the electric motor that physically clamps or releases the brake – or the control module, which is the brains of the whole operation. Sometimes it’s a wiring issue, a fuse, or even a sticky caliper. But before you start throwing parts at it, let’s get down to some real diagnosis.
Status: NO COMM
The Diagnostic Rule
“If you hear a single ‘click’ but no whir, the brain is talking but the muscles aren’t moving.”
Listen Up: What Your EPB is Telling You
The first thing I do is listen. Seriously. Roll down your windows, have someone press the EPB button, and get your ear near the rear wheels. The sounds – or lack thereof – are your first big clue.
Scenario 1: The Single Click, No Whir
You hit the button, hear a single, solid “click” from the rear, but then… nothing. No motor whir, no movement, just silence. This is the classic “brain is talking, but the muscles aren’t moving” scenario. What it means is the control module sent the signal, but the actuator motor isn’t responding or can’t physically move the brake. In my shop, this usually points straight to a seized or mechanically failed actuator. We’ll often see diagnostic trouble codes (DTCs) like “motor stall” or “over-current” backing this up. The motor is trying, but it’s stuck.
Scenario 2: Loud Clunking or Ratcheting Sounds
If you hear a loud, repetitive clunking, grinding, or ratcheting noise when you try to apply or release the brake, that’s almost always the sound of stripped plastic gears inside the actuator. The electric motor is spinning away, but the gear train can’t transmit that force, so it just skips and grinds. It’s like trying to pedal a bike with a broken chain – lots of effort, no forward motion. Now, a word of caution: a really seized parking brake cable or a caliper that’s completely frozen can sometimes mimic these symptoms. So, don’t stop at just listening; you’ll need to dig a little deeper.
Scenario 3: Total Silence and Dashboard Warnings
You press the button, and you get absolutely nothing. No clicks, no whirs, just dead silence from the rear, usually accompanied by a flurry of warning lights on your dash. This often means an electrical problem or a control module issue. We’re talking blown fuses, damaged wiring, a faulty switch, or a communication breakdown on the CAN bus. A failed control module is a common culprit here. And here’s a weird one: if the EPB applies or releases itself without you touching the button, that’s almost always a sign of a malfunctioning control module, usually with some internal memory faults or corrupted software. It’s lost its mind, basically.
Real Diagnosis: Tools and Techniques I Use
Look, throwing parts at an EPB problem is a rookie move and a quick way to empty your wallet. You need a professional-grade scan tool – not just a cheap code reader. This tool needs to talk to the EPB system, read manufacturer-specific codes, and, critically, perform bi-directional tests. That’s how you really confirm what’s going on. Here’s how I typically approach it, based on the symptoms we just talked about.
When the Motor Whirrs, But the Brake Stays On (or Clunks)
If you hear the actuator motor trying to work – that whirring or clunking noise – but the brake isn’t releasing, your primary suspect is a mechanical failure within the actuator itself. We’re talking stripped gears or a seized lead screw. To confirm this, I’ll usually:
- Disconnect the electrical connector from the actuator.
- Command a release with the scan tool (if possible, or manually try to turn the shaft).
- If the motor runs but the shaft doesn’t turn, or it turns with excessive play, you’ve got a bad actuator. It’s internal.
- Also, don’t forget to manually check the brake caliper and cable. Sometimes a truly seized caliper piston or a frozen parking brake cable can put so much strain on the actuator that it either strips its gears or simply can’t overcome the resistance. You’ll need to remove the wheel and rotor to inspect the internal parking brake hardware, especially on “drum-in-hat” style systems.
When There’s Total Silence: No Response, No Motor Sound
This is where you start thinking electrical or control module. If the system isn’t even trying to move the actuator, the command isn’t getting through, or there’s no power to execute it. My first steps are always:
- Check Fuses: Always, always check the EPB fuse first. It’s a simple thing, but it’s caught me more than once.
- Scan for Codes: Look for communication codes (U-codes) or power supply codes (B-codes).
- Power and Ground Test: With the scan tool, command the EPB to apply or release. While it’s trying, use a multimeter to check for power and ground at the actuator’s electrical connector. If you’re not seeing voltage or a good ground when the command is sent, you know the problem is upstream – either the wiring, the switch, or the control module itself.
- Switch Test: Many scan tools can read the EPB switch input. Confirm the module is actually seeing your command. If it’s not, the switch or its wiring is bad.
Why These Things Break: My Observations
After years of tearing these systems apart, I’ve got a pretty good handle on why EPB actuators and modules give up the ghost. It’s usually a combination of design, environment, and how they’re used.
Actuator Failures: Mechanical and Environmental Stress
Most actuator failures come down to mechanical wear or environmental damage. Those plastic gears inside the reduction assembly? They’re just not built for constant high-load cycles, especially if the system is fighting against a stiff cable or a caliper that’s starting to bind. Over time, that leads to stripped gears, which is where you get those clunking noises. Moisture is another huge culprit. Water intrusion into the actuator housing corrodes the lead screw, motor windings, and electrical connections, eventually causing it to seize up completely. I’ve seen plenty of actuators that look fine on the outside, but once you open them up, they’re a rusty mess.
Heads Up: Check for TSBs (Technical Service Bulletins)
I always check for TSBs. For example, some Chrysler/FCA models from the mid-2010s had well-documented issues with broken actuator gears leading to stuck brakes. Those bulletins often have specific diagnostic steps or updated part numbers. Don’t assume it’s a random failure until you’ve done your homework.
Control Module Failures: Electronic Gremlins
Control modules usually fail electronically. The power transistors (MOSFETs) that drive the motor can burn out from heat, voltage spikes, or – you guessed it – water damage. This is especially true for modules mounted externally under the vehicle, where they’re exposed to road spray and salt. Software glitches or corruption are also common. That’s when you get those weird, erratic behaviors, like the brake applying itself or refusing to release for no apparent reason. It’s like the computer just forgot what it was supposed to do.
Fixing It Right: Repair Options and What to Expect
Don’t Skip Initialization!
This isn’t a simple bolt-on job. After replacing any EPB component – especially an actuator – you absolutely must perform an actuator reset or calibration procedure using a manufacturer-specific scan tool. Without it, the system won’t know the motor’s travel limits, and you’ll just end up with more problems or a system that doesn’t work at all.
Standalone Actuator Replacement
Integrated Caliper Service Professional Only
Control Module Programming Specialized Tooling
Emergency Manual Release (Use With Caution!)
If you’re really stuck and absolutely have to move the car, many systems have a manual release option. You’ll usually find a small access cover on the actuator housing. Inside, there’s often a Torx or Allen fitting. Turning this fitting slowly can mechanically retract the piston and release the brake. But be warned: this is for emergency situations only. Forcing it or turning it too fast can cause internal damage, so proceed with extreme caution and only if absolutely necessary.
Verifying the Repair: Don’t Just Trust the Light
Just because that EPB warning light is off doesn’t mean the job’s done. I’ve seen too many comebacks because techs skipped this step. My routine is always to validate the repair thoroughly. First, I run at least five full apply-and-release cycles with the scan tool. Each cycle should complete smoothly, usually within 2–3 seconds, and without any unusual noises. Then comes the real-world test: on a level surface, apply the EPB, shift into drive, and gently apply a little throttle. The car should hold firmly without moving. This functional check is just as important as any diagnostic scan, much like verifying stability after repairing steering or suspension issues. If it passes that, then I’m confident.
What a Repair Will Cost You
Alright, let’s talk numbers. EPB repairs aren’t usually cheap, mainly because of the specialized parts and the diagnostic time involved. Here’s a general idea of what you can expect, but remember, prices vary wildly by vehicle make, model, and region.
| Repair Type | DIY Cost (Parts Only) | Shop Cost (Total) | Success Rate (If Diagnosed Correctly) | Secondary Risk (If Done Incorrectly) |
|---|---|---|---|---|
| Standalone EPB Actuator | $250 – $400 | $450 – $700 | Very High (>95%) | Brake won’t release, or unintended application if calibration fails. |
| Integrated Caliper/Actuator | $350 – $600 | $600 – $1,000 | Very High | Fluid leaks, spongy pedal, or uneven braking if not bled correctly. |
| EPB Control Module | $300 – $600 | $500 – $900 | High | Module remains inoperative or causes new faults if programming fails. |
Keep Your EPB Happy: Prevention Tips
My Maintenance Advice
You can’t prevent every failure, but you can definitely extend the life of your EPB system with a few simple habits. I always tell my customers:
-
Use it regularly. Even if you’re on flat ground, engage that EPB every single time you park. Regular movement helps keep the cables and internal mechanisms free of corrosion and prevents them from seizing up. It’s like exercising a muscle – use it or lose it.
-
Listen for changes in pitch. A healthy EPB makes a quick, smooth whirr when it engages and disengages. If it starts sounding strained, slow, or makes any new grinding noises, get it checked out immediately. Don’t wait until it locks up solid.
-
Inspect for corrosion. Whenever you’re rotating your tires or doing any work around the rear wheels, take a quick look at the actuator housing. If you see rust or signs of water intrusion, a light application of a good corrosion inhibitor to the metal body can really extend its life.
