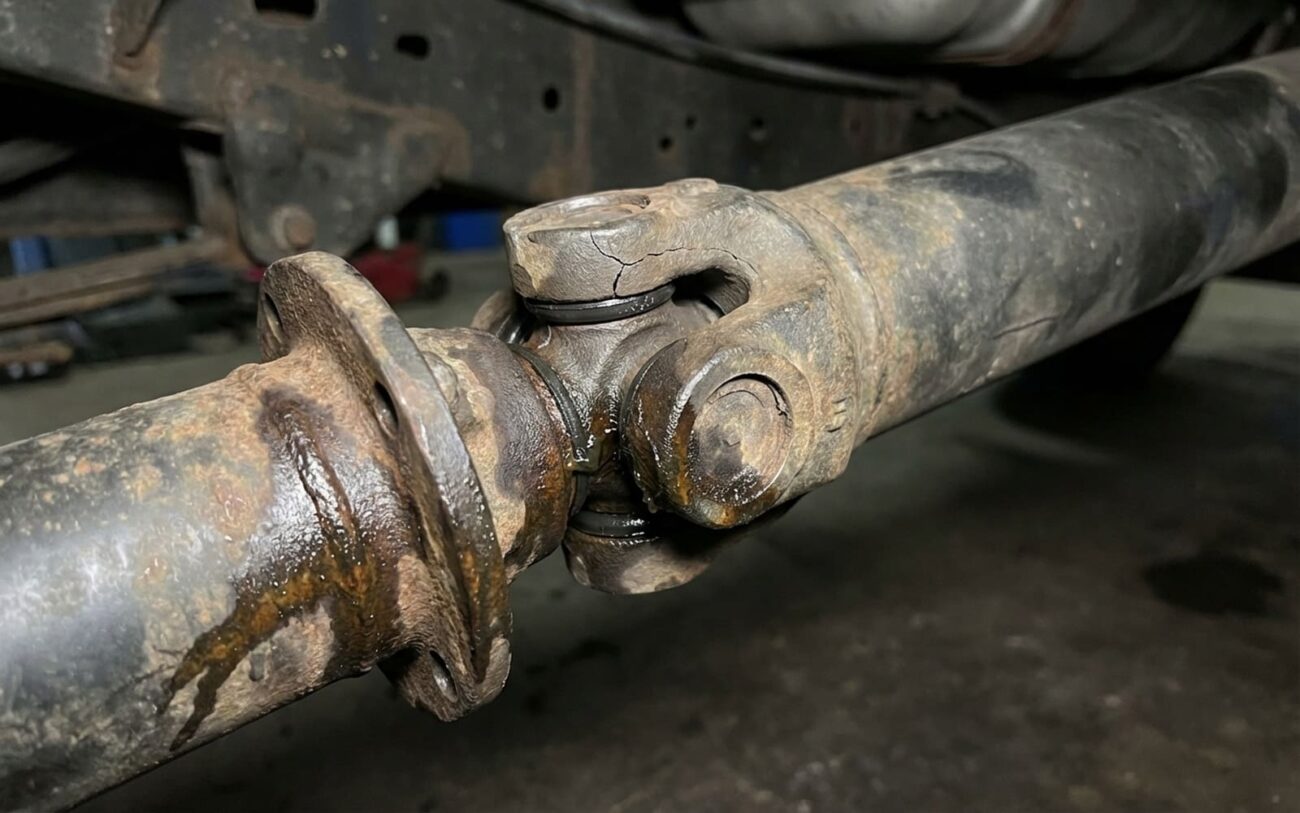
Alright, let’s talk about that shake. You just had a clutch done, maybe a transmission service, or some other driveline work, and now your car’s got a vibration it never had before. You’re not imagining things, believe me. I’ve seen this play out countless times in my 25+ years in the shop. Customers come back, frustrated, saying the car was smooth as glass until we touched it. And often, they’re right. That vibration, usually felt in the seat, floor, or center console, building steadily with speed, is almost always tied to the driveshaft after a repair like that.
That Post-Repair Shake: Pinpointing the Culprit
The first thing I look for is timing. If that vibration shows up or gets worse at a specific road speed—say, between 55 and 70 mph—and doesn’t change when you shift gears, it’s almost certainly not engine-related. An engine misfire will usually change with RPM, regardless of road speed, and often smooth out or worsen with gear changes.
Here’s a quick test I use: Get the car up to the speed where the vibration is at its worst. Then, carefully shift into neutral and let it coast. If the shake stays exactly the same, you’re dealing with something rotating at wheel speed. That points directly to the wheels, tires, or the driveshaft. If the vibration disappears or significantly lessens in neutral, it’s still driveline-related, but it tells you the problem is downstream of the engine and transmission’s input shaft, narrowing it down to the driveshaft or differential.
My Diagnostic Approach: Ruling Out the Mimics
Driveline vibrations are tricky because so many things can feel similar. A bad wheel bearing, an unbalanced tire, or even a failing CV joint can all feel like a driveshaft issue. That’s why I always use a systematic approach. You have to rule out the most common, easiest-to-check culprits first—especially tires and wheels—before you start tearing into the driveline. Otherwise, you’re just guessing, and that gets expensive fast.
Here’s how I break down the symptoms and what I do to isolate the problem:
-
Vibration peaks at 55–70 mph: This is classic driveshaft imbalance, a missing balance weight, a bent tube, or incorrect clocking after reinstallation. But it can also be a tire/wheel imbalance or radial force variation.
What I do: I always start with a road force balance on all wheels. This isn’t just a regular spin balance; it measures how much force the tire puts on the road as it rotates. I’m looking for less than 20 lbs of variation. If it’s higher, you’ve found a tire problem, not a driveshaft one. -
Low-frequency hum or drone at cruising speed: This often points to driveshaft imbalance or a failing center support bearing, especially on two-piece shafts. However, it could be a wheel bearing, differential whine, or even tire tread resonance.
What I do: Get the vehicle on a hoist, safely secure it, and run it up to speed. Use chassis ears or a mechanic’s stethoscope on the transmission tailshaft, center bearing, and differential. This helps pinpoint the exact location of the noise. -
Vibration present in all gears at the same speed: Again, this screams driveshaft imbalance or runout (wobble). It also strongly suggests an imbalanced tire/wheel, which will vibrate even if you shift to neutral.
What I do: The neutral coast test is key here. If the shake stays, it’s either wheels/tires (which you should have already checked with road force) or the driveshaft itself. -
Clunk or shudder on acceleration or deceleration: This is usually a worn U-joint, a failed center bearing, or excessive play in the slip yoke. But don’t forget worn engine/transmission mounts, damaged differential mounts, or a worn CV joint.
What I do: With the vehicle on a hoist, manually rotate the driveshaft back and forth. Look and feel for any play in the U-joints. If you see red rust powder around the U-joint caps, that’s a dead giveaway for a failing joint. Check the center bearing for excessive movement or torn rubber.
Proper diagnosis requires tools that, frankly, many shops skip. You need a road force balancer, a dial indicator to measure driveshaft runout, and ideally, a way to monitor driveline behavior under load. For runout, I’m looking for less than 0.030 inches of lateral runout. Anything more than that, and you can’t reliably balance the shaft. Without these tools, you’re not diagnosing; you’re just swapping parts and hoping for the best.
The Usual Suspects: Why Driveshafts Vibrate After Service
When I’ve confirmed the driveshaft is the problem, especially after other work, human error is almost always the leading cause. Most driveshafts are balanced as a complete assembly from the factory. They usually have alignment marks—paint dots, scribed lines—on the yoke and the differential flange. If those marks aren’t lined up perfectly during reinstallation, you’ve compromised the shaft’s dynamic balance. It might look fine, but it’s now out of phase, and that’s enough to cause a noticeable shake.
Beyond incorrect installation, here are other common issues I run into:
-
Knocked-off balance weights: Those small welded tabs are surprisingly fragile. If the shaft gets mishandled during removal, transport, or even just set down wrong, they can break off. That instantly throws the balance.
-
Binding slip yoke: If the splines aren’t properly lubricated or they’ve corroded, the yoke can’t slide freely in and out of the transmission. This causes a cyclic shudder, especially when the suspension travels up and down. I always use a good moly grease here.
-
U-joint failure: Lack of lubrication, or sometimes just improper installation (like pressing it in crooked), can lead to seized or worn joints. Again, look for that tell-tale red grease residue around the joint caps—that’s rust from the needle bearings.
-
Physical damage: A dent from road debris, or even a poor repair weld if someone tried to fix something on the cheap, can permanently unbalance the shaft.
I’ve also seen cases where factory welds on the yoke were slightly misaligned from the get-go. This can lead to a chronic vibration that only becomes obvious after the shaft is removed and then reinstalled incorrectly. Some manufacturers have even issued service bulletins for specific model years addressing this, especially in certain SUVs and trucks with two-piece driveshafts. It pays to check for those.
It’s crucial to distinguish between a true driveshaft problem and an installation-related issue, or even something else entirely. A worn transmission mount or an incorrect pinion angle (which I often see after lift kit installations) can force the driveshaft to operate at an unnatural angle. This creates vibration even if the shaft itself is perfectly balanced. In those cases, replacing the driveshaft won’t fix a thing—the root cause is geometry, not balance.
Fixing the Shake: Your Repair Options
This is Professional Territory. Seriously.
The repair path depends entirely on what’s actually wrong. But let me be clear: this is almost always a Professional-Only job. Driveshaft balancing requires specialized, precision equipment and a lot of experience. There are no safe shortcuts when you’re dealing with components spinning at thousands of RPMs under your car.
Re-balancing the Shaft Professional Only
U-Joint or Center Bearing Replacement Professional Only
Full Shaft Replacement / Tube Repair
A word on temporary fixes: In a very rare case, if a balance weight simply fell off and the shaft is otherwise perfect, a shop might be able to rebalance it quickly. But if the root cause is a dent, a failing U-joint, or a bent tube, any “fix” won’t last. You’re just gambling on secondary damage. I’ve seen customers try to “live with it” for weeks, only to come back with a shredded center bearing, a leaking transmission seal, or worse. It’s just not worth the risk, financially or safety-wise.
Post-Repair Validation: My Final Checks
A repair isn’t done until it’s verified. After any driveshaft work, I always perform these checks:
-
Manually rotate the shaft by hand. It should turn smoothly, with no binding, gritty feel, or excessive play.
-
Check for proper U-joint movement—they should articulate freely without any resistance or tight spots.
-
Conduct a thorough road test. I drive at the original problem speed and then beyond, usually up to 80 mph. The vibration should be completely gone under all conditions: acceleration, coasting, and neutral.
-
If the shop has one, use a vibration analyzer. This tool can confirm that there are no abnormal frequencies. OEM specs typically require residual imbalance to be below 1.0 gram-inch.
For re-balanced or replaced shafts, I always double-check those clocking marks. Even a few degrees of misalignment can reintroduce a vibration. The final test, though, is always the driver’s feel. If you can’t detect the shake, and the analyzer confirms it’s within spec, then I consider the repair solid.
Cost & Common Sense: Making the Economic Decision
Repair costs will vary a lot depending on your vehicle and local labor rates. But based on what I see in my shop, here are some realistic estimates:
Driveshaft Re-balance
DIY Parts: $50–$100 (if you’re just replacing weights yourself, which I don’t recommend). Success Rate: High (>90%) if the shaft is otherwise sound. Risk: Continued vibration and accelerated seal/bearing wear if not done right.
U-Joint Replacement
DIY Parts: $40–$80. Success Rate: Very High (>95%) if the issue is solely the U-joint. Risk: Catastrophic separation if the joint fails completely while driving.
Full Shaft Replacement
DIY Parts: $400–$1,200. Success Rate: Very High (>98%). This is your best bet for bent or severely damaged tubes, or if multiple components are failing.
Economic Reality Check
Here’s a rule of thumb I tell my customers: If the repair cost is going to exceed 50% of your car’s current market value (you can check KBB or NADA), especially if the vehicle has over 150,000 miles, you need to weigh your options carefully. Dropping $1,500 into a car worth $2,500 might not be the smartest investment—unless you absolutely rely on it daily and it’s otherwise in fantastic shape.
Prevention & Monitoring: Keep it Healthy
Preventing driveshaft issues starts with proper maintenance and just being aware. If your vehicle has grease fittings on the U-joints or slip yoke, use them! Follow the severe service schedule in your owner’s manual—especially if you tow, drive on rough roads, or operate in dusty or wet conditions. Lubricating those points every 3,000–5,000 miles can prevent dry joints and early failure. It’s cheap insurance.
And stay alert while driving. A new vibration, hum, or clunk that changes with speed is your first warning. Don’t just assume it’s a tire issue; get it checked out. During routine oil changes or tire rotations, when the car is already on a lift, take an extra 30 seconds to visually inspect the driveshaft:
-
Look for any dents, rust, or shiny spots on the driveshaft tube.
-
Check the U-joints for that red rust powder or any visible play when you try to wiggle them.
-
If you have a two-piece shaft, ensure the center support bearing isn’t cracked, sagging, or showing signs of excessive movement.
-
Verify that any clocking marks are still intact and aligned.
Catching a problem early—a loose joint, a missing weight, or dry splines—can save you hundreds in repairs and prevent a much more dangerous and expensive failure down the road.
