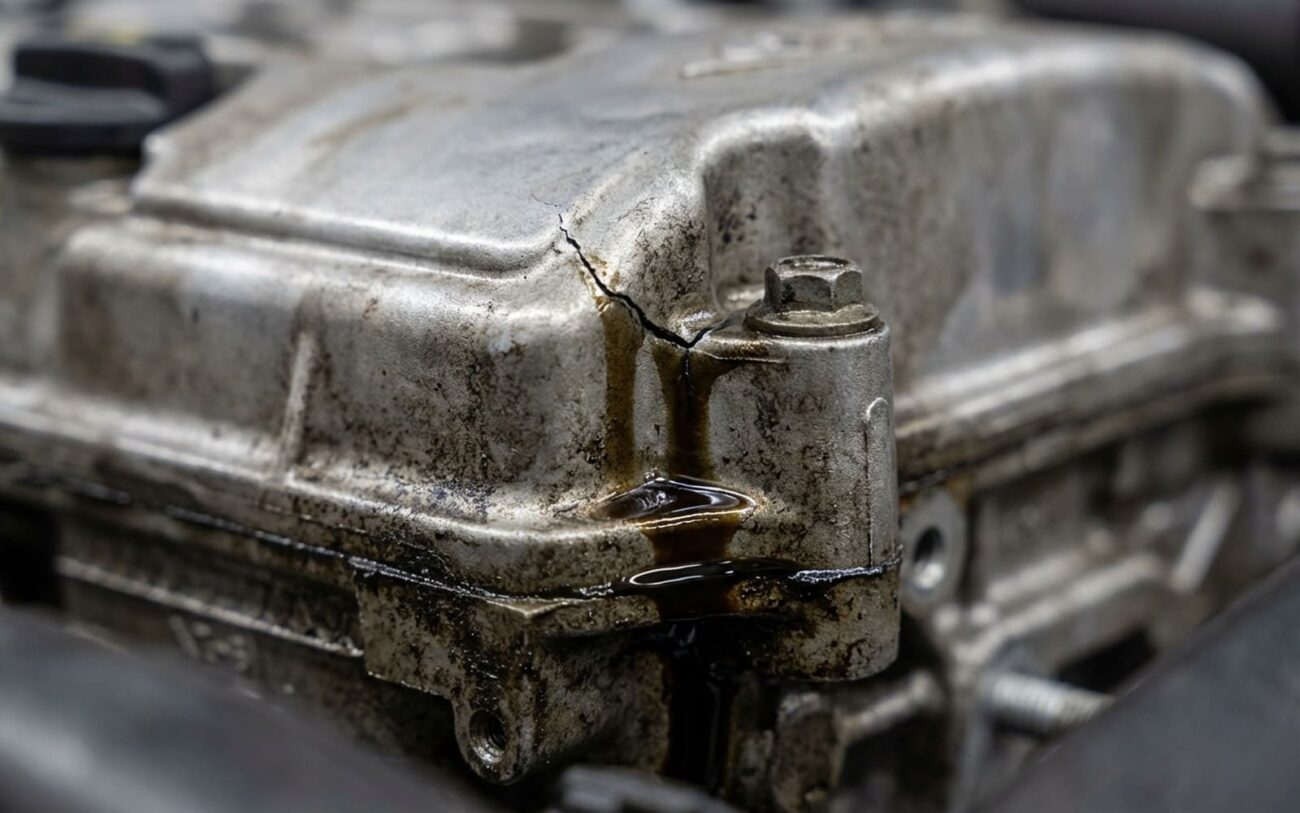
Engine Block Leaks on Your Mini Cooper (N14/N18): What I Look For
Alright, let’s cut to the chase. If you’re seeing oil or coolant disappearing from your Mini Cooper R56, especially with the N14 or N18 engine, a cracked engine block is probably the last thing I’d suspect. I’ve been wrenching on these cars for decades, and in my experience, a true block leak is rare. Most of the time, what folks think is a catastrophic block failure turns out to be something far more common, and thankfully, a lot cheaper to fix. We’re talking about things like a leaky oil filter housing gasket, a failed valve cover, or even just a worn-out oil pan gasket.
But when you do have a genuine block leak, it’s serious. It’s not something you can just ignore or try to patch up with a quick fix. You need to know the difference, and you need to know it fast, because ignoring a real block issue can quickly turn your Mini into a very expensive paperweight.
Spotting the Real Deal: External vs. Internal Leaks
A true engine block leak isn’t coming from a gasket seam or a bolt flange. That’s the first thing I look for. You’re talking about seepage directly from the middle of a smooth aluminum surface. Think near a freeze plug boss, or maybe along a casting seam where the metal itself seems to be weeping. If I clean an area thoroughly, run the engine, and then see fresh oil or a milky oil/coolant mix bubbling up right from the metal, not from a joint, that’s a huge red flag.
Now, if you’re seeing chocolate-brown sludge on your dipstick, but your head gasket checks out clean on both a block tester (for combustion gases in the coolant) and a leak-down test (to confirm cylinder sealing), then you’ve likely got an internal crack. That means coolant is getting into the oil, or vice-versa, somewhere inside the block itself.
First Things First: Rule Out the Usual Suspects
Before you even think “cracked block,” you’ve got to eliminate the common stuff. I can’t tell you how many cars roll into my bay with a repair order screaming “catastrophic block failure,” only for me to find a $15 oil pan gasket soaked in oil. The rear of these Mini engines is a classic leak zone, and those leaks can easily fool you into thinking the block itself is cracked. The only way to be sure is a clean, methodical inspection. Here’s a quick rundown of what I typically see:
| Symptom | Likely Block Issue (Rare) | Common External Mimics (Check First!) | My Definitive Test |
|---|---|---|---|
| Oil leak at lower side/rear of engine | Cracked block at rear coolant passage or porous core plug boss. (This is rare, but it happens.) | Oil pan gasket leak (super common), rear main crankshaft seal leak (also common), oil filter housing gasket (can drip down the back). |
First, clean the block, oil pan, and bellhousing thoroughly. I mean spotless. Then, add UV dye to the oil. Run the engine for a good 15-20 minutes, let it cool, and inspect with a UV light. A true block leak will show the dye weeping directly from the metal, and it’ll be above the oil pan flange. If it’s below, it’s probably the pan. |
If you’re losing coolant and seeing milky oil but there’s no external leak, that’s when things get more involved. You absolutely cannot skip steps here; guessing will cost you big time.
| Symptom | Likely Block Issue (Even Rarer) | Common Internal Mimics (Very Common on N14/N18) | My Definitive Test |
|---|---|---|---|
| Milky oil on dipstick, coolant loss, no external leak | Internal crack in cylinder block connecting oil and coolant galleries. (This is the nightmare scenario, thankfully quite rare.) | Failed head gasket (very common on these engines), cracked cylinder head, failed oil filter housing gasket (can cause internal mixing on N14/N18). |
First, pressure test the cooling system. If the pressure drops, you’ve got a leak. Next, perform a block test (combustion leak detector fluid in the coolant overflow). If it changes color, you’ve got combustion gases in the coolant, pointing to a head gasket or head crack. If that’s negative, and a leak-down test confirms all cylinders hold pressure, then an internal block crack becomes a real possibility. |
Let me be absolutely clear here:
True block leaks are genuinely rare. Most of what I see are easily fixed issues like a Mini Cooper oil filter housing leak, a valve cover gasket failure, or even PCV valve issues causing oil consumption. A timing chain rattle or a VANOS solenoid fault might cause stalling, but that’s not a block crack. Misdiagnosing one of these common problems as a block issue will cost you thousands of dollars and a ton of wasted time. Test first. Guess later. That’s my motto.
Why a Block Gives Up the Ghost
Aluminum blocks don’t just crack for no reason. When they do, it’s almost always one of three things. First, you might have a casting defect. This means porosity or a thin wall somewhere in a coolant or oil gallery from the factory. These can take years to show up, often around core plug bosses where the casting might naturally be a bit thinner. Second, thermal shock. I’ve seen this happen too many times after a driver ignores a stuck thermostat or a clogged radiator. The heat spikes, especially between cylinders 2 and 3—that’s the hottest spot in the N14/N18—and the block just can’t handle the stress. It cracks. This isn’t a head gasket failure; it’s the block itself giving way. Third, physical damage. Think hitting a curb hard enough to crack the oil pan or the block itself, or improper jacking that bends or fractures the casting. That’s usually pretty obvious, though.
Your Repair Options: From a Plug to a Whole New Engine
What you can actually do to fix a block leak depends entirely on where it is and how bad it is. Let’s walk through the options, from my perspective.
Porous Freeze Plug Boss Repair Professional Only
Rear Block or Internal Crack Non-Repairable → Replace Engine
External Porosity Epoxy Repair Professional Only / High-Risk Repair
Making Sure the Fix Actually Worked
After any repair—especially an epoxy job or a plug replacement—you absolutely must validate it. There’s no “close enough” when you’re dealing with oil or coolant. A small leak can quickly become a big problem.
For an external fix, clean the area completely again. Then, drive the car through three full heat cycles: start it cold, let it warm up to operating temperature, shut it off, and let it cool completely. Inspect the repair area each time. You should see zero seepage, and if you used UV dye, zero glow under a UV light. Also, check your oil level every 50 miles for the first 500 miles. If it’s holding steady, you’re probably good. If it drops without a visible leak, something’s still wrong, and you need to re-evaluate.
If you attempted an epoxy repair on a suspected internal crack (which, again, I don’t recommend as a permanent solution), the validation is even more involved. After about 100 miles of driving, perform another combustion leak test using a block tester fluid in the coolant overflow. It should show no color change—meaning less than 0.1% hydrocarbons. The coolant level must stay steady, and your oil should remain clean and amber-brown. If you see milky oil again or rising coolant pressure, that crack is still active. At that point, the only real solution left is engine replacement. Don’t waste more time or money trying to patch it.
The Hard Numbers and Making the Call
Here’s where you need to be realistic about your Mini. These repairs aren’t cheap, and on an R56 or R57, you have to weigh the cost against the car’s actual value. I tell my customers this all the time:
| Repair Type | DIY Cost (Parts) | Shop Cost (Parts & Labor) | My Success Rate Expectation | Worst Case if It Fails |
|---|---|---|---|---|
| Replace single external core plug | $20 | $400–$600 | 95% if the defect is truly isolated and done right. | Coolant loss, leading to severe overheating and potentially a seized engine. |
| Epoxy repair on external oil gallery | $50 | $500–$700 | 40% (This is a high-risk gamble, in my opinion, a temporary fix at best). | Sudden, catastrophic oil loss, leading to engine seizure. |
| Replace engine assembly (used long block) | $2,500–$4,000 | $5,000–$8,000 | 98% with proper installation and a good donor engine. | Installation errors (like incorrect timing or new leaks), or issues with the used engine itself. |
The bottom line for me is this: if the repair estimate—especially for an engine replacement—exceeds 60% of your Mini’s private-party value (check KBB or NADA), it’s hard to justify financially. The exception, of course, is sentimental value. If it’s your daily driver and you absolutely love it, then go for it. But don’t expect to recoup that cost when you eventually sell it.
How to Prevent This (And Catch Problems Early)
Maintenance is Your Best Defense
Prevention starts with strict maintenance discipline. Always use BMW-approved full synthetic oil—that’s LL-01 or LL-04 spec, typically a good quality 5W-30 or 5W-40. Sludge from extended oil changes can increase oil pressure and really stress weak casting points in the block. For coolant, stick strictly to the G48 formula. Mixing coolants is a huge no-no; it can create electrolytic corrosion that literally eats aluminum from the inside out, and that’s a recipe for block failure.
My Monthly Under-Hood Check Routine
-
Make a habit of monthly under-hood checks. Pop that hood, grab a good flashlight, and really inspect the engine block—especially near the freeze plugs and directly under the oil filter housing.
-
Look for any fresh weeping, crusty residue, or dampness. Even a tiny bit can be an early sign.
-
If your coolant reservoir is consistently dropping, or your oil level is falling without a visible puddle under the car, don’t wait.
-
That’s when you pull out the UV dye and the pressure tester. Early detection saves you from a stalled engine on the highway—or worse, a completely seized block. Trust me on this.
