Alright, let’s talk about one of the most frustrating things we see in the shop: those electrical gremlins that pop up, disappear, and make you question if you’re losing your mind. I’m talking about the check engine light that flickers on and off, random diagnostic trouble codes (DTCs) that vanish after you clear ’em, or those weird drivability issues that just resolve themselves. When I see these “ghost faults,” especially after a car wash, in damp weather, or on a cold, humid morning, my spider-sense immediately screams one thing: moisture inside the Engine Control Unit (ECU).
This ain’t your typical failed sensor, folks. Moisture in the ECU is sneaky. It’s not a hard failure; it’s a transient one. The car runs fine, then it hiccups, maybe throws a P0340 (camshaft position sensor) or a P0753 (transmission solenoid), and then everything’s back to normal. That’s the hallmark – inconsistent, sporadic codes, often across completely unrelated systems. I’ve seen vehicles come in with a transmission code, an O2 sensor fault, and a throttle body code, all logged during the same ignition cycle. That’s a huge red flag for me.
Recognizing the Ghost in the Machine
A truly bad sensor usually throws the same code under consistent conditions. But when you’re getting random, sporadic faults, especially across different systems, that’s when you need to start looking beyond a simple wiring issue. Think about it: the ECU talks to everything. If its internal circuits are corrupted by moisture, it can disrupt multiple data streams at once. I’ve seen the 5V reference rail fluctuate wildly on my scan tool, which is a dead giveaway that the ECU’s internal power supply is struggling.
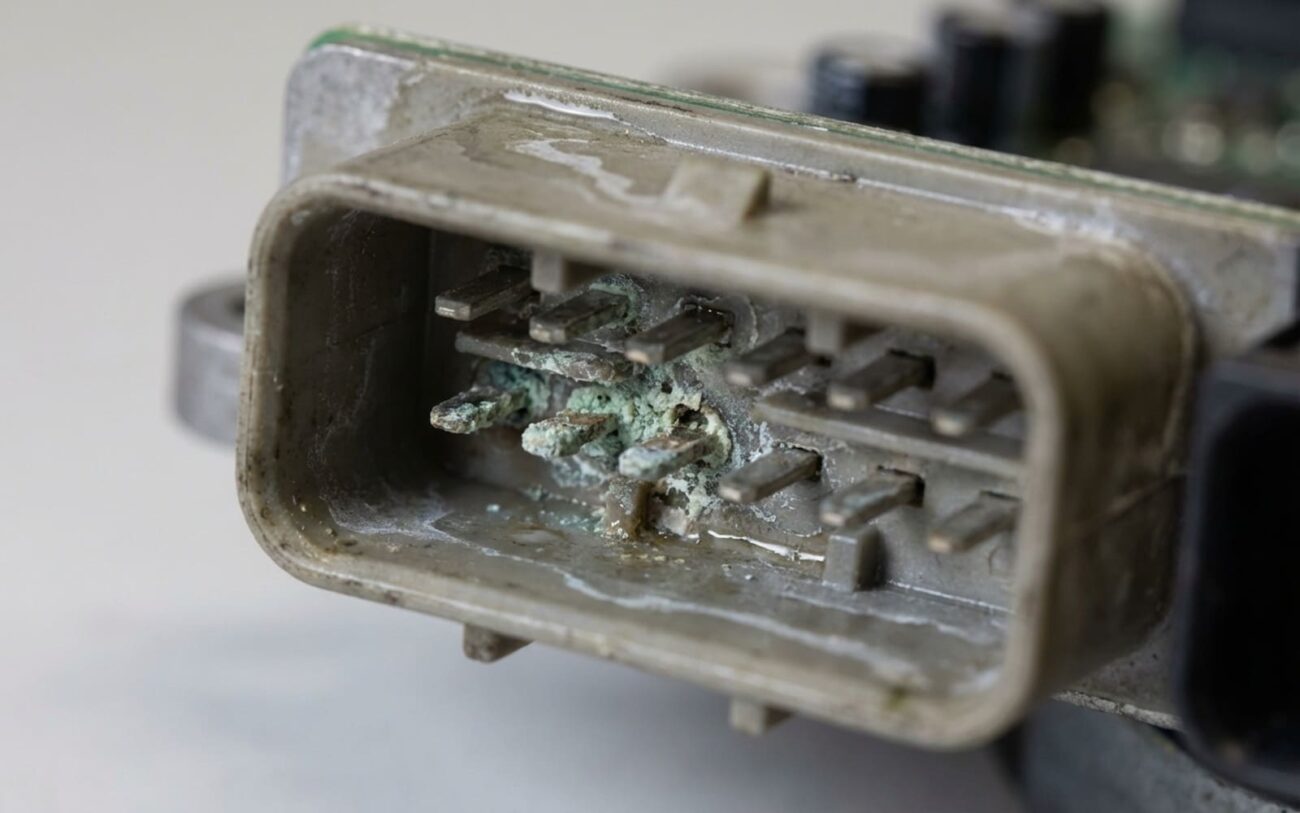
Another big indicator is those unexplained drivability hiccups that leave no trace – a momentary power drop, a harsh transmission shift, or even a brief stall that never stores a code. These are often transient electrical faults within the ECU itself. And if you ever get the chance to inspect the unit, visible corrosion on the connector pins – that white powdery stuff or greenish-blue fuzz – is a strong clue.
The Concept
“Think of the ECU like a damp basement: the structure is solid, but the moisture is causing the wiring to short out in random places, making things act screwy.”
My Diagnostic Approach: Ruling Out the Usual Suspects
Here’s the deal: none of the symptoms I just mentioned confirm a wet ECU on their own. Intermittent codes can come from a loose ground, a chafed harness, or even a failing body control module (BCM). Multiple system faults might point to a CAN bus communication issue. A momentary power loss could be fuel delivery or transmission-related. Corrosion on the connector might originate from water intrusion on the harness side, not inside the ECU. That’s why diagnosis has to go deeper than just surface-level observations.
My first step is always to rule out external causes and network-level issues. Many electrical gremlins mimic ECU failure, so proper diagnostic discipline is key. Here’s how I break it down:
-
Intermittent, Random DTCs Across Systems:
What it looks like: You get a P0340, then a P0753, then a P0135, all seemingly unrelated, and they come and go.
Why it might be the ECU: Internal condensation bridging PCB traces, corroded solder joints, or failing conformal coating inside the ECU housing.
Common external mimics: An intermittent open or short in the wiring harness, a failing gateway module, or a poor ground connection somewhere else in the system.
My definitive test: I use a lab scope to monitor ECU power (especially the 5V reference and 12V supply) and critical input signals during a fault event. If those voltages are fluctuating or dropping when the fault occurs, it strongly points to the ECU’s internal workings.
-
Visible Corrosion on ECU Connector Pins:
What it looks like: You unplug the ECU and see white, powdery, or greenish-blue crud on the pins.
Why it might be the ECU: Moisture ingress via a failed housing seal, a compromised pressure-equalization vent, or internal condensation wicking out to the pins.
Common external mimics: Water intrusion from a damaged harness conduit, a leaking grommet, or the connector itself being submerged due to poor drainage in the vehicle.
My definitive test: I inspect both sides of the connector carefully. I’ll use a borescope to trace any moisture paths. If the corrosion is only on the harness side, the problem is environmental. If it’s on the ECU side and extends into the housing, that’s a different ballgame.
-
Unexplained Temporary Drivability Issues with No Stored DTC:
What it looks like: The car stumbles, loses power momentarily, or shifts hard, but no code ever sets.
Why it might be the ECU: A high-resistance path or a marginal short due to moisture, which clears up as the ECU heats up during operation.
Common external mimics: A loose battery terminal, a failing crankshaft sensor (which can cause momentary signal loss without a hard fault), or an intermittent fuel pump relay.
My definitive test: I data log ECU outputs (like fuel trims, timing advance, and transmission solenoid commands) during the event. I’ll cross-reference that with physical results. If the ECU is commanding something weird or its internal parameters are jumping around, but all external inputs look good, the ECU is the suspect.
If multiple symptoms from this list align – especially visible pin corrosion and random codes – the likelihood of internal ECU moisture increases dramatically. Vehicle history matters a lot here too: a recent heater core replacement, a sunroof leak, or even a water pump failure could have routed coolant or condensation directly to the ECU location. And don’t overlook network issues. A failing BCM or gateway module can flood the CAN bus with errors, mimicking an ECU malfunction. Remember, a complete ECU failure usually presents as a no-start or no-communication issue, not intermittent faults. If the car starts and runs, even intermittently, the processor is likely still functional but compromised.
The Root Cause: How Moisture Gets In
Internal vs. External: A Critical Distinction
A chafed wire, a failing coil pack, or a dirty throttle body are not ECU failures. The ECU isn’t “lying” when it sets a code for a bad sensor; it’s doing its job by reporting what it sees. True ECU moisture damage is internal: the fault originates within the housing, not from a signal the ECU is receiving from an external component.
Once I’ve confirmed moisture inside the ECU housing, the next question is always: how did it get in? I’m focusing here on failures that start within the ECU’s enclosure itself, not just external water sources. The most common cause is the degradation of the housing seal. Over time, those rubber gaskets or factory-applied silicone sealants can crack, shrink, or detach, creating a pathway for water. Some ECUs also have a pressure-equalization vent with a hydrophobic membrane; if that fails, moisture can get sucked in during rain or even a car wash. I’ve seen specific Chrysler and Mercedes models with documented issues with ECU seal integrity, especially when they’re mounted in high-moisture areas like under the cowl or near the A/C evaporator.
Even without an obvious leak, internal condensation can form. In humid climates with big temperature swings between day and night, moisture trapped inside that “sealed” housing can condense on cold circuit traces. That thin film of water can create conductive paths between components, leading to signal corruption. Another critical factor is the breakdown of the conformal coating – that protective lacquer applied over the printed circuit board (PCB). If this coating is missing, cracked, or was compromised during a prior repair, the copper traces become vulnerable to oxidation and corrosion. And when you have dissimilar metals present, like tin-plated connectors and an aluminum housing, moisture acts as an electrolyte, accelerating galvanic corrosion. It’s a real mess.
Resolution: Fixing a Wet ECU
⚠ ESD Safety Warning
Look, if you’re not experienced with sensitive electronics, do NOT open that housing. Static discharge – even from touching the bench – can destroy the board in an instant. Always use an ESD-safe workstation, a wrist strap, and an anti-static mat. This isn’t a job for the faint of heart or the unprepared.
ECU Housing Reseal
Internal PCB Trace Repair
Full ECU Replacement
Temporary Displacement
Post-Repair Validation: Is It Really Fixed?
Reassembly isn’t the finish line – validation is. For a simple housing reseal, the success criteria are pretty clear: no DTCs after a full drive cycle, including a cold start, highway load, and ideally, a simulated wet environment (like a car wash or a humid overnight soak). I always use an OBD2 scanner to monitor live data for stability, especially reference voltages and sensor inputs. If those look solid, I’m usually confident.
If you (or an advanced tech) performed internal PCB repairs, the validation bar is much, much higher. First, you need to verify continuity on every repaired trace with a multimeter. If possible, I’d recommend a full bench test using an ECU functional tester – some specialty shops have these, and they’re invaluable. Then, once installed, road-test the vehicle over at least 50 drive cycles, covering varied conditions. Use a scan tool with long-term data logging to capture any transient glitches. The goal is zero intermittent faults and stable communication across all modules. My essential tools for this stage are a quality scan tool, a good multimeter, and ideally, access to a lab scope for signal verification. You need to be sure before you hand the keys back.
Cost, Risk & When to Walk Away
Repair cost versus vehicle value is a big one. My general rule of thumb: if the total cost of ECU replacement and programming approaches 40% or more of your car’s current market value, you need to seriously reconsider the investment. Sometimes, it’s just not worth it.
Housing Reseal
High success rate (over 85%) if there’s no internal corrosion. DIY materials are $50–$150, but remember the torque specs!
PCB Trace Repair
Moderate success (60–75%). There’s always a risk of intermittent faults persisting if the damage runs deep.
ECU Replacement
Very high success rate (98%). This includes the part cost and specialized programming/VIN matching. It’s the most reliable fix, but also the most expensive.
Prevention: Keep Your ECU Dry
My Maintenance Checklist
-
Clear drain tubes: Make sure your sunroof and A/C drains aren’t clogged and channeling water directly toward the ECU location. This is a common one.
-
Avoid pressure washing: Never spray high-pressure water directly near ECU housings or main electrical connectors. It’s just asking for trouble.
-
Visual inspections: During routine oil changes or other services, quickly check for any signs of moisture or corrosion on visible connectors, especially those near the firewall or under the dash.
-
Scan for “Ghost” codes: I tell my customers to use an OBD2 scanner every few months, just to check for pending codes. Catching these early can save you a lot of headache and money down the road.
Proactive Protection
In high-humidity or coastal regions, I always recommend applying dielectric grease to the ECU connector pins during service. It’s a small step, but it can extend ECU life significantly by resisting moisture ingress and preventing corrosion.
