The Mystery of the Empty Fuel Gauge (When the Tank’s Full)
Alright, let’s talk about that fuel gauge that’s acting up. You know the drill: you just filled the tank, but the needle’s still glued to ‘E,’ or maybe it’s bouncing around like a pinball. In my 25+ years turning wrenches, this is one of those issues that rolls into the shop constantly. It seems simple, but it can throw you for a loop if you don’t approach it right. Most of the time, we’re looking at a problem with the fuel level sensor – sometimes called the fuel sending unit. It lives right inside your fuel tank, usually part of the whole fuel pump assembly.
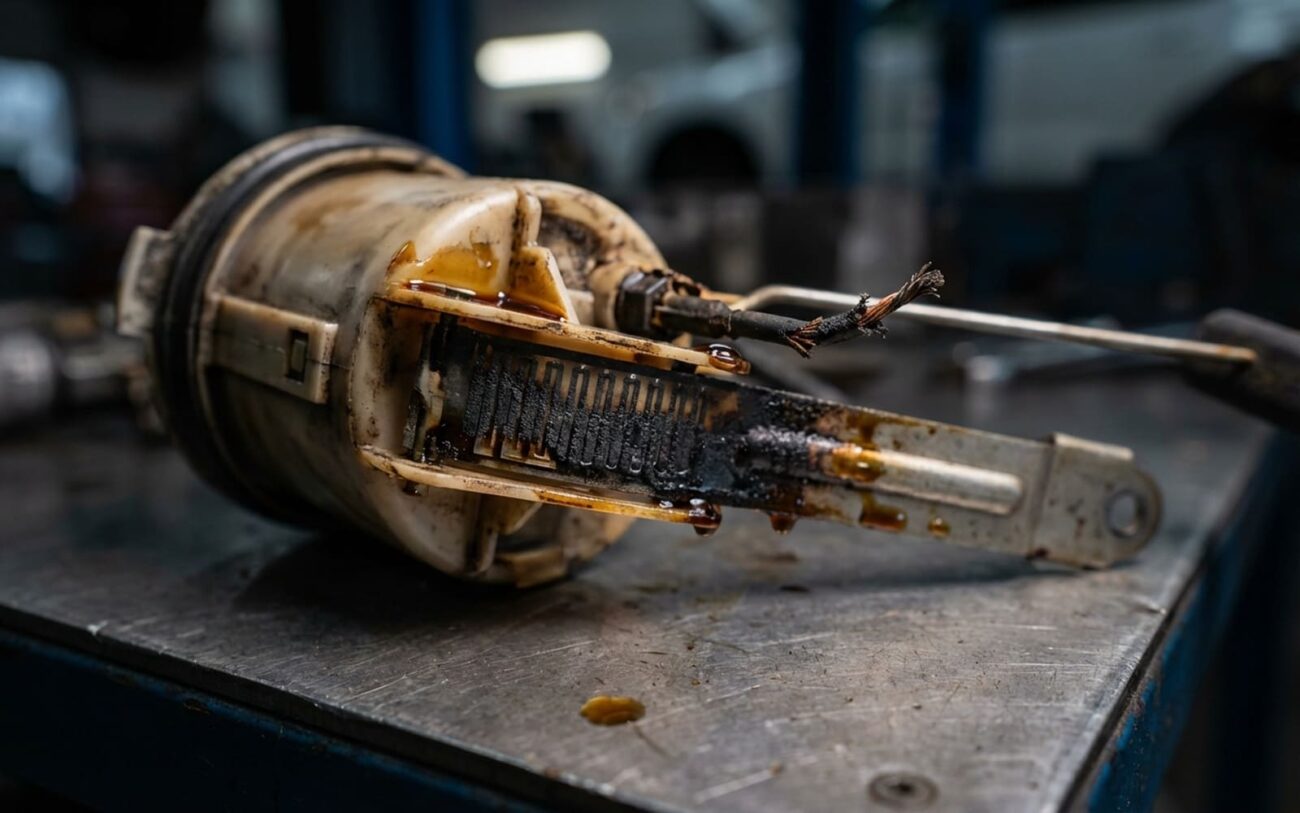
Think of it like a toilet float. There’s a float arm that bobs on the fuel surface. As the fuel level changes, this arm moves a wiper across a resistive strip – much like an old volume knob. This changes the electrical resistance, and that signal tells your dashboard gauge where the fuel level is. When that resistive strip wears out, the wiper loses contact, or the float arm gets stuck, the signal goes haywire. An ‘open circuit’ means no signal, and the car’s computer interprets ‘no signal’ as ‘no fuel.’ That’s why you see ’empty’ even with a full tank.
On the flip side, if your gauge is stuck on ‘Full,’ that’s usually a short circuit in the sender, not some magic everlasting fuel supply. And if it’s dancing around or really slow to react, we might be looking at an intermittent connection, a failing gauge motor in the cluster, or even a bad ground. But we’ll get to how I pinpoint those.
The Diagnostic Process: Pinpointing the Problem
Before you even think about dropping that fuel tank – and believe me, you don’t want to do that unless you absolutely have to – you’ve got to confirm the problem is actually in the sending unit. I’ve seen too many guys (and DIYers) rip out a perfectly good fuel pump assembly, only to find the issue was a simple fuse or a corroded ground wire. This is where your scan tool, one that can read live data (PIDs) from the powertrain control module (PCM), becomes your best friend. This step is non-negotiable; it saves you time, money, and a lot of unnecessary sweat.
My Approach to Diagnosis:
The goal here is simple: compare what the car’s computer “sees” (the fuel level PID) with what you’re seeing on the dashboard gauge. If the PID matches the float’s position but the gauge doesn’t move, the fault lies downstream—in the wiring, cluster, or instrument motor. If the PID is dead or erratic, the problem is likely in the tank. Don’t skip this.
| Symptom | Points to Fuel Level Sensor | Common External Mimics | How I Confirm It (Definitive Test) |
|---|---|---|---|
| Gauge reads empty (or erratic) with known fuel in tank | Open circuit in the resistive track, worn wiper, broken or stuck float arm. | Blown fuse for the instrument cluster, damaged wiring harness, poor ground, a bad instrument cluster itself. |
With the key on (engine off), monitor the “Fuel Level Sensor” PID on your scan tool. If you can access the sender (e.g., through an access panel), manually move the float arm through its full range. If the PID does not change or is erratic, the sensor or its connector is faulty. |
| Gauge reads permanently full | Shorted resistive track or wiper contact within the sender. | Short-to-power in the wiring harness, failed instrument cluster. |
Disconnect the fuel sender connector at the top of the fuel pump module. If the gauge drops to empty, the sensor itself is shorted internally. If it remains full, the short is somewhere in the harness or the instrument cluster. |
What Actually Breaks Inside the Tank
Okay, so your scan tool points to the tank. Now we know we’re going in. The good news? The failures inside these units are usually pretty predictable. The bad news? It’s almost always buried under a full tank of fuel. (Yeah, I know, Murphy’s Law of auto repair.)
The most common culprit I see is simply wear on that resistive strip. After 150,000 miles or so, that little wiper contact has rubbed the carbon track raw, creating dead spots or a complete open circuit. I particularly notice this on high-mileage vehicles that might not always get the best quality fuel – cheaper gas can leave more varnish and conductive gunk on the strip, accelerating wear.
Mechanical issues are next up. The float arm can get gummed up and bind, especially with sediment or ethanol-related deposits. I’ve pulled units where the plastic arm warped from heat, getting stuck halfway. In colder climates, I’ve even seen moisture in the tank freeze and jam the float solid. And yes, sometimes the arm just breaks off – especially if someone before you installed the pump module at a weird angle, causing it to bind against the tank wall.
Internal electrical faults are also pretty common. Corrosion on the sensor’s connector pins or the internal circuit board can interrupt the signal. This often happens if the fuel cap seal is bad and lets in moisture, or if the tank itself gets damaged. Certain Ford and GM platforms, for example, have known issues with solder joints cracking on the sensor’s circuit card due to constant heating and cooling. I’ve had cars where just wiggling the connector temporarily brought the gauge back to life – classic intermittent failure.
And sure, sometimes there are documented service concerns. Manufacturers have issued bulletins about premature sender wear, especially in trucks used for short trips where condensation builds up. But remember, a flaky instrument cluster or even a software glitch in the ECU can mimic these symptoms. That’s why proper testing is absolutely critical before you start replacing parts.
Resolution Pathways: How I Fix It
So, you’ve diagnosed it. Now, how do we fix it? Your repair path depends on where the fault is and how comfortable you are working with fuel systems. Let me be clear: safety is paramount here. Fuel vapors are highly flammable, and a botched reassembly can lead to leaks or, worse, a fire. Don’t take shortcuts.
External Electrical Fault DIY-FEASIBLE
Failed In-Tank Sending Unit Professional Only
Temporary Workaround Last Resort
Post-Repair Validation: Don’t Skip This
Replacing the unit isn’t the finish line – verification is absolutely critical. You want to be sure you actually fixed the problem and didn’t create new ones.
First, with the key on and engine off, manually move the float arm through its full range (if you can access it, or if you’re testing the new unit before installation). The dashboard gauge should respond smoothly from empty to full, with no hesitation or jumping. Any stutter or dead spots suggest a bad connection or, unfortunately, a defective new unit.
Next, use your scan tool to monitor the “Fuel Level Sensor” PID in real time. It should track the float’s movement precisely. A flatline or erratic jump here confirms a wiring issue or a problem with the vehicle’s module, not the sender.
Finally, perform a leak check. This is huge. Run the engine for a bit, shut it off, and let the vehicle sit for at least 24 hours – especially through a temperature cycle. Then, get under there and inspect around the tank seal and all connections. Any fuel odor, wetness, or visible seepage means the installation failed. Re-seal it immediately. A fuel leak isn’t just a repair comeback; it’s a serious fire risk that you absolutely cannot ignore.
Cost, Risk, and Making the Call
The financial reality of this repair can vary wildly, depending on what’s actually broken and who’s doing the work. Here’s a breakdown of what I typically see:
| Repair Type | DIY Parts Cost | Shop Cost (Parts & Labor) | My Success Rate | Worst Case if It Fails |
|---|---|---|---|---|
| Clean external connector | Under $20 | $80–$120 | High | No real secondary risk. |
| Replace in-tank fuel pump/sender assembly | $150–$400 | $500–$1,000+ | Very High (if done right) | Fuel leak from improper seal or loose lock ring – a definite fire hazard. |
When you’re looking at a shop quote, you really need to consider your vehicle’s overall value and condition. If the repair cost starts creeping up towards 40% of what the car is actually worth, especially if it’s got high mileage or other major repairs looming, it might not make financial sense to fix. In those situations, many of my customers opt to just rely on their trip odometer and known fuel economy. It’s inconvenient, sure, but it’s perfectly safe if you manage it carefully. Just keep that tank topped up and avoid long trips without a solid plan for refueling.
Keeping Your Gauge Honest: Prevention & Monitoring
You can’t stop wear and tear completely – that’s just part of owning a vehicle. But you can definitely extend the life of your fuel sending unit. The two biggest enemies of this component are heat and contamination.
My Top Tips for Longevity
-
Keep your tank above a quarter full whenever you can. This does two things: it keeps the fuel pump submerged for better cooling, and it reduces the amount of empty space in the tank where condensation can form. Condensation means water, and water means corrosion and gunk.
-
Use Top Tier certified gasoline. These fuels have higher levels of detergent additives. They really do make a difference in reducing varnish and carbon buildup, especially with all the ethanol in modern gas.
-
Pay attention to your gauge’s behavior. Does it hesitate when you fill up? Does it drop suddenly after a bump? These are often early warning signs that the sender is starting to wear out. Catch it early, save headaches later.
-
Reset your trip odometer every time you fill up. Seriously, make it a habit. If you consistently get, say, 350 miles per tank, that number becomes your reliable backup fuel gauge if the primary one fails.
And if you ever see a P0460 code (Fuel Level Sensor Performance), don’t just clear it and hope it goes away. That’s the computer telling you it’s seeing an inconsistent signal – often the very first digital clue that your sender is on its way out.
