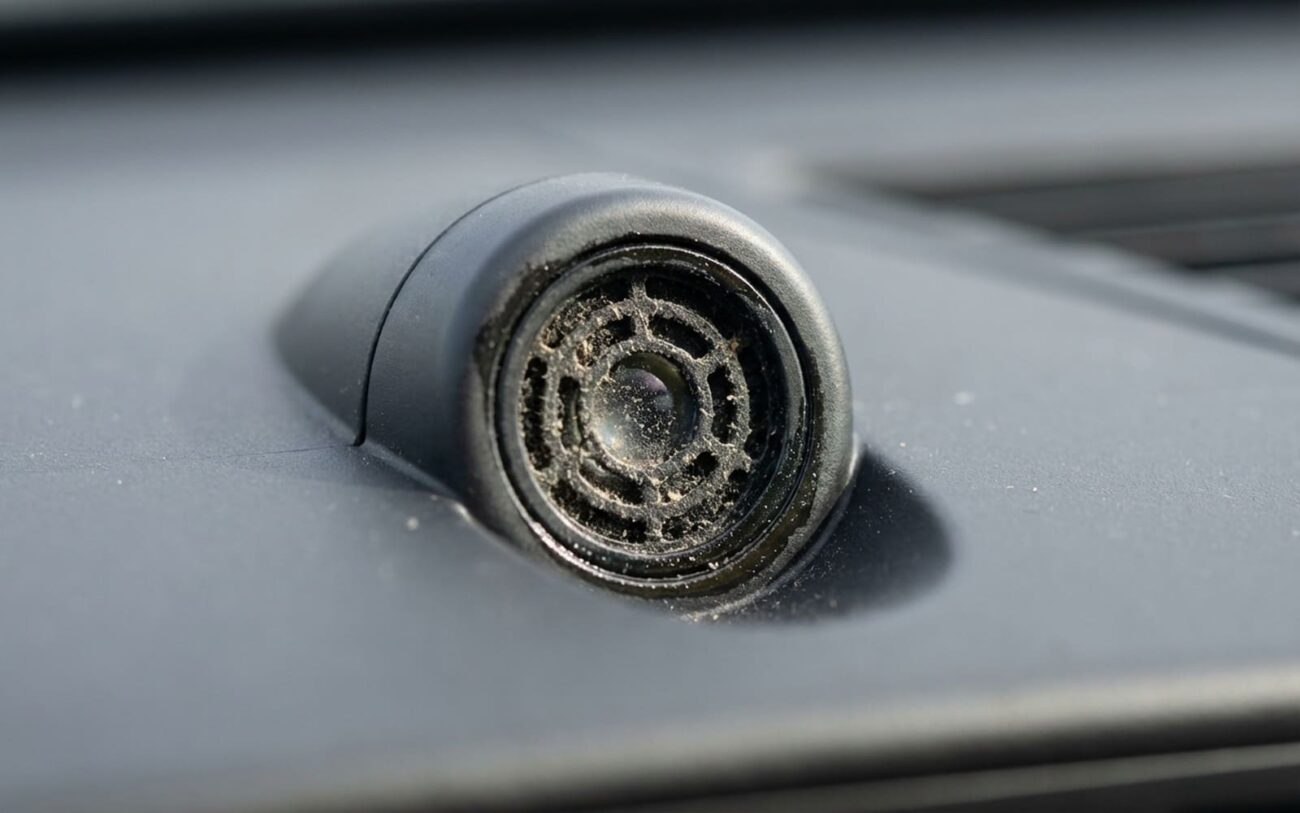
When Your AC Acts Up: The Sunlight Sensor Story
Ever had your car’s automatic climate control (ACC) system blast hot air at you on a scorching sunny day, even though you’ve got it set to “LO” and you’re sweating bullets? Or maybe it just won’t cool down the cabin like it should, despite the sun beating down? Yeah, I see this all the time in the shop. Most folks immediately think their A/C is shot, or the engine’s overheating. But usually, it’s not the compressor, not a leak, and not a bad blend door.
More often than not, you’re dealing with a faulty or obstructed sunlight sensor. This little guy, sometimes called a solar load or infrared sensor, is basically the “eyes” of your climate control system. Its job is to tell the ACC module how much sun is hitting the cabin, so the system can crank up the cooling to compensate. If it’s not working right, your whole climate system goes haywire.
Signal: FIXED 85%
When this sensor goes bad or gets blocked, it can send out a fixed signal. It might tell the ACC module, “Hey, it’s always full sun!” (even at night), which makes the system blast cold air non-stop. Or, it might say, “No sun here!” all the time, leading to undercooling and a cabin that feels much hotter than it should. Either way, your climate control becomes unpredictable, especially when the sun’s out.
How I Diagnose It: Don’t Guess, Test.
Before you start replacing anything, you’ve got to confirm it’s actually the sunlight sensor. There are other things that can mess with cabin temperature and make you think it’s the solar sensor. My approach always starts with the easiest checks and moves to the definitive tests.
Step 1: The Quick Visual Check (DIY Feasible)
First things first, find the sensor. It’s usually a small, clear dome or a little black rectangle on the upper dashboard, often near the windshield defroster vents or sometimes integrated into the rearview mirror housing. Take a good look at it. Is it covered in dirt, tree sap, or bird droppings? Is there any window tint film slapped right over it? I’ve seen more than a few cases where a cheap tint job completely blocked the sensor. This is the simplest fix, and it costs you nothing but a few minutes.
Step 2: The Definitive Scan Tool Test (Professional Recommended)
This is where your bidirectional scan tool earns its keep. It’s the most reliable way to know for sure what that sensor is “seeing.”
- Connect your scan tool to the vehicle’s OBD-II port.
- Navigate to the ACC module’s live data parameters.
- Look for a PID (Parameter ID) related to “Sunlight Sensor Input,” “Solar Load,” or “IR Sensor Value.” This reading will usually be expressed as a percentage (0-100%) or a voltage.
- With the car in direct sunlight, observe the reading. It should be high (e.g., 70-100%).
- Now, cover the sensor completely with your hand or a thick cloth. The reading on the scan tool should drop significantly, ideally to 0% or close to it.
- Uncover it. The reading should smoothly rise back up.
If the reading stays static (e.g., always 85% no matter what you do) or gives an illogical value (like 0% in bright sun), you’ve found your problem. That sensor is either bad or completely blocked.
Step 3: Ruling Out the Mimics
While you’re doing your diagnosis, keep these other potential culprits in mind. They can cause similar symptoms but won’t react to sunlight like a solar sensor:
- Faulty In-Car Temperature Sensor: This sensor measures the cabin air temperature. If it’s reading incorrectly, the ACC module will get bad info and adjust the climate wrong. A scan tool can also read this PID.
- Bad Ambient Air Temperature Sensor: This one tells the car the outside temperature. If it’s way off, the ACC might not know how much cooling is truly needed. You’ll often see an incorrect outside temp reading on your dash display if this is the case.
- Stuck Blend Door Actuator: This is a common one. Blend doors control the mix of hot and cold air. If an actuator fails, a door can get stuck, often giving you full heat or full cold regardless of settings. You might hear clicking or grinding noises from behind the dash if an actuator is struggling.
- ACC Module Software Glitch: Less common, but sometimes a module just needs a reset or a software update from the dealer.
The key here is pattern recognition. None of these other components will respond dynamically to shading and illuminating the sensor like a true solar sensor will. That scan tool test is your best friend for isolating the issue.
Why These Sensors Fail: From My Bench
Sunlight sensors are pretty simple, solid-state devices. No moving parts, so failures usually fall into three main buckets:
The most common issue I see in the shop:
Physical blockage. Dirt, grime, tree sap, or even wax from a car wash can accumulate on that small lens. But the biggest offender? Aftermarket window tint. I’ve seen countless cars where the tint installer just covered the sensor right up. If it can’t “see” the sun, it can’t do its job, and it’ll usually default to a fail-safe signal, often a high load.
Next up is internal electronic failure. These sensors use photodiodes to measure light. Over years of sitting on a hot dashboard, constantly heating up and cooling down, those semiconductors can degrade. I’ve also seen them get fried after voltage spikes, like from a failing alternator or a jump start gone wrong.
Lastly, connector corrosion. If you’ve got a water leak in your dash – maybe from a bad windshield seal or a clogged sunroof drain – that water can find its way to the sensor’s electrical connector. Corrosion on the pins means bad signals, leading to erratic readings or no signal at all.
Fixing It: What to Do (and When to Call Me)
Know Your Limits
While cleaning is a simple DIY task, replacing sensors buried deep in the dashboard or integrated into mirror assemblies requires specialized trim tools and patience. You don’t want to damage delicate plastic, or worse, accidentally mess with safety systems like airbags.
Cleaning & Obstruction Removal DIY FEASIBLE
Sensor Replacement Professional Recommended
Connector & Wiring Repair Professional Only
Post-Repair Validation: Did You Actually Fix It?
Don’t just button everything up and assume it’s fixed. You need to verify your repair. The goal is to get that consistent, comfortable cabin temperature back, no matter the light conditions.
Here’s what I do:
- Set the ACC to AUTO mode and let the cabin temperature stabilize.
- Drive the car from a shaded area into direct sunlight. The system should respond by gradually increasing cooling effort as needed. You shouldn’t get sudden blasts of heat or extreme overcooling.
- For the most accurate check, reconnect your scan tool. Monitor the sunlight sensor’s data PID in real time. Cover the sensor with your hand – the reading should drop. Shine a bright flashlight on it – the reading should rise. The response needs to be smooth and repeatable, not jumpy or static.
Cost, Risk & What It Means For Your Wallet
Let’s talk brass tacks. What’s this going to cost you, and what are the risks involved?
| Repair Type | DIY Cost | Shop Cost | Success Rate | DIY Risk |
|---|---|---|---|---|
| Clean sensor lens | <$5 (cleaner) | $0 (with diag) | High | None |
| Replace sensor | $50–$150 (part) | $200–$400 | Very High | Damaging trim/clips, wiring |
Keep in mind, shop costs include labor. A simple sensor replacement might be an hour or two of labor, plus the part. If it requires extensive dash removal, that labor cost can climb quickly.
Prevention & My Expert Tips
Expert Prevention Tip
If you’re getting window tint installed, make sure you explicitly tell the installer about the sunlight sensor. A good tint shop will know to cut a small, clear zone over the sensor. This is absolutely critical. And for early detection, pay attention to how your climate system behaves when you enter a tunnel or go under an overpass; a healthy sensor should respond instantly to that drop in light by reducing cooling effort.
