You’ve got a brake light out on your Tesla. The car’s telling you it’s “lamp out,” maybe even flashing a warning on the screen. First thing—take a breath. This isn’t a blown bulb like in your dad’s old Camry. I’ve torn down hundreds of these units across Model 3s, Ys, Ss, and Xs over the last decade, and here’s what you’re really dealing with: integrated LED arrays, sealed housings, and a system that doesn’t forgive half-measures. Fix it right, or don’t bother.
It’s Not a Bulb—It’s a System
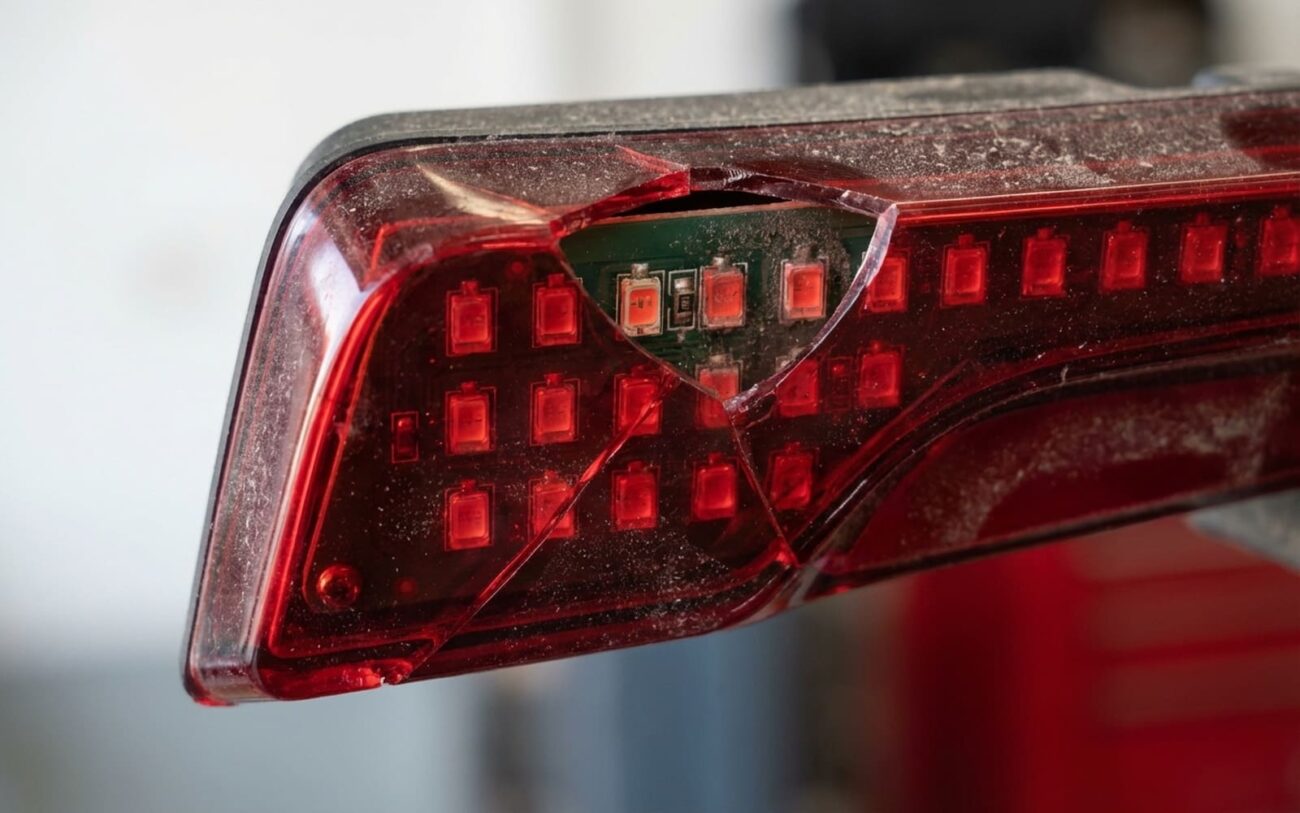
I can’t say this enough: Teslas don’t have brake “bulbs.” They use multi-segment LED arrays built into the tail lamp assembly. Each segment has its own constant-current driver circuit, and the whole thing is sealed. When one fails, you’re not replacing a $5 bulb—you’re either fixing a circuit board or swapping the entire housing.
And no, you can’t just “wiggle the wire” and make it work. These are solid-state electronics. If it’s dark, flickering, or only partially lit, something’s broken. The question is—where?
What You’re Seeing—and What It Means
I break down brake light failures into three real-world categories. The symptoms tell you exactly where to look.
1. Total Blackout
No light at all? That’s almost always a dead driver circuit or a complete open in the LED chain. I’ve seen this most on early Model 3 CHMSL units—Tesla even had a known field action for it, though they never published a TSB. The driver IC overheats, cracks the solder joints, and poof—no power to any segment. If the center high-mount stop lamp is out, that’s a safety-critical failure. NHTSA doesn’t mess around with that one.
2. Partial Failure (One Bar Out)
Only one segment dark? Classic series-chain LED failure. These are wired in series—like old Christmas lights. One LED dies open, and the whole segment goes dark. I’ve pulled apart dozens of Model Y rear lamps and found the failed LED under magnification. The PCB trace looks fine, but the tiny chip is cracked or delaminated. No way to bypass it. You either replace the board or the whole unit.
3. Intermittent Flickering
This one tricks people. They think it’s a loose wire or bad ground. But 8 out of 10 times, it’s a cracked solder joint on the driver board. Heat cycles from braking expand and contract the joint until it breaks contact. Tap the housing while the brake is pressed—if it flickers, you’ve found your smoking gun. I’ve seen this on Model S taillights where the driver is mounted near the heat sink and gets roasted over time.
Don’t Replace Anything Until You Test
I’ve seen too many guys swap a $500 lamp only to find out the problem was a $5 fuse. Before you open a single trim panel, do this:
Check for 12V at the lamp connector with the brake pedal pressed. Use a multimeter. If you’ve got voltage and the light’s still dark—the lamp is dead. No voltage? Now you’ve got a wiring or control issue upstream.
Start with the fuses. On Model 3/Y, check the front trunk fuse box—look for F31 (left rear lamp) and F32 (right rear lamp). If those are good, test the brake pedal position switch. It’s a simple plunger switch on the pedal arm. If it’s not closing when you press the pedal, no signal gets sent to the BCM.
And don’t forget the scan tool. Pull DTCs from the body control module. I’ve cleared “lamp out” codes on cars with perfect bulbs—just because the 12V system dipped during regen braking. Clear the code, retest, and see if it comes back.
| Symptom | Likely in the Lamp | Common External Mimics | Definitive Test |
|---|---|---|---|
| No brake light function at all | Complete LED/Driver failure | Blown fuse, bad brake switch, BCM fault, wiring issue |
Check for ~12V at the lamp connector power pin with brake applied. If power’s present, the lamp is faulty. |
| One segment or bar is dark | Single LED chain failure | Rare externally; if multiple lamps are affected, suspect BCM or CAN bus issue |
Inspect internal PCB visually or with magnification. Use diode test mode on multimeter to check continuity of individual LED segments off-board. |
| Intermittent flickering | Failing solder joint or driver component | Loose connector, corroded terminal, bad ground |
Gently tap the housing and wiggle the harness while brake is applied. If flickering persists with stable wiring, the fault is internal. |
Why These Lights Fail
It’s not magic. It’s physics. I’ve dissected failed units from cars with under 30,000 miles—no accidents, no abuse. Here’s what kills them:
Thermal cycling is public enemy number one. Every time you hit the brake, the driver heats up. Over a few years, that expansion and contraction cracks solder joints. CHMSL units are especially prone—no airflow, packed tight with electronics.
Moisture ingress is next. The seal degrades over time. UV, temperature swings, minor bumps—all contribute. I’ve seen condensation form inside a lamp that looked perfect from the outside. Then corrosion eats the PCB traces. One Model 3 I worked on had green oxidation under the driver IC—killed the whole board.
Component defects happen too. A weak capacitor, a poorly bonded LED die—these can pass factory QA but fail in the field. And yes, physical damage counts. A parking bump that doesn’t crack the lens can still snap a trace on the internal PCB.
And let’s be clear: this isn’t a software issue. No OTA update is going to fix a dead LED. This is hardware failure, plain and simple.
How to Fix It—Without Wasting Money
Here are your real options, ranked by reliability and cost.
Replace the Entire Assembly (OEM) DIY-FEASIBLE
PCB Microsolder Repair PROFESSIONAL-ONLY – MICROSOLDERING REQUIRED
Clean Connector & Ground DIY-FEASIBLE
And no—don’t tape over a dark segment. That’s not a repair. It’s a liability. FMVSS 108 requires full brake light functionality. If it’s not 100%, it’s illegal.
Test It Like a Pro
Don’t just turn it on and walk away. Verify every function: brake, tail, turn, reverse. Have someone cycle the pedal while you watch from behind.
If you did a microsolder repair, stress-test it. Run the brake light continuously for 30 minutes (use a pedal depressor), let it cool, then do it again. Any flicker? It’s not fixed.
Also check voltage drop across the connector under load. More than 0.2V? You’ve got resistance—clean the terminals again.
And align the lamp. A misaimed beam scatters light upward and blinds drivers behind you. It should be level and focused downward.
What It’s Going to Cost
Let’s be real. This isn’t cheap.
| Repair Type | DIY Cost (Parts Only) | Shop Cost (Parts & Labor) | Success Rate | Secondary Risk if Failed |
|---|---|---|---|---|
| Complete OEM Assembly | $150 – $600+ | $300 – $1,000+ | 99% |
Poor install causing water ingress or DTCs |
| PCB Microsolder Repair | $5 – $20 (parts) | $100 – $300 | ~70% (skill-dependent) |
Compromised seal leads to rapid re-failure |
| Aftermarket Assembly | $80 – $300 | $250 – $700 | 90% |
Fitment, color temperature mismatch; may trigger BCM errors |
For older Teslas, weigh the cost against the car’s value. But never ignore safety. A failed brake light isn’t just a repair—it’s a hazard that could cost you in a rear-end collision.
Prevention: It’s Not Magic
You can’t stop aging, but you can slow it down.
Wash the car—but keep high-pressure sprayers away from lamp seams. I’ve seen water forced past seals on perfectly good units. Clean the lens regularly—dirt traps heat and cooks the driver.
Do a light check every month. Look for dimming, flickering, or condensation. If the inside of the lens is fogged more than 10 minutes after rain, the seal’s compromised. Get it resealed before corrosion sets in.
And remember: LED arrays aren’t maintenance-free. They’re critical safety components. Treat them like brakes or tires—because that’s what they are.