You Just Replaced Your Shocks, and Now Your Comfort Mode Does Nothing
Alright, let’s talk about adaptive shocks. I’ve seen this exact headache play out more times than I can count: a customer rolls in, they’ve just dropped a chunk of change on new adaptive shocks—sometimes all four—and now the car feels all wrong. They flip from Comfort to Sport, the dash lights up like it’s doing something, but the ride? Stays exactly the same. Usually, it’s stuck in a bone-jarring firm setting, making every pothole feel like a personal attack. Other times, it’s stuck soft, and the car just floats. Either way, something’s definitely not right.
Here’s the deal: adaptive dampers aren’t just fancy springs. They’re complex, electronically controlled systems. Inside, there are solenoid valves that precisely modulate oil flow, all based on real-time input from a bunch of sensors and the suspension control module. When that system stops responding, it’s not some random act of automotive god. There’s a specific reason, and if the problem popped up right after you put in new parts, it’s almost always one of three things: a botched installation, a bad part right out of the box, or someone skipped a critical calibration step.
Now, if the issue crept up slowly over time, that usually points to an aging shock or a failing internal valve. But a sudden failure after a replacement? That’s human error or a procedural miss, plain and simple. And this isn’t just about comfort. If your car’s stuck in Sport, you’re chewing through tires and suspension bushings faster. If it’s stuck in Comfort, your handling takes a dive, which can be downright dangerous in an emergency maneuver or even just taking a corner too fast. It affects ride quality, tire life, and your safety. So, yeah, we need to fix this.
Figuring Out Where the Problem Really Is
Before you even think about throwing parts at this, you’ve got to isolate the fault. Is the damper itself dead, or is the car’s brain just confused? A cheap OBD2 scanner won’t cut it here. You need a professional-grade scan tool—something that can talk directly to the suspension control module. Think ISTA for BMWs, INPA, or ODIS for Audi/VW. These tools let you read specific fault codes, look at live data, and, most importantly, perform bi-directional tests. That’s how you tell the system to do something and see if it actually does it.
I’ve put together a table below. Use this as your diagnostic roadmap. It breaks down the common symptoms, what’s usually causing them, and how I test for it in the shop.
| Symptom | Likely in Adaptive Shock | Common External Mimics | Definitive Test to Confirm |
|---|---|---|---|
| No mode change after part replacement | Unplugged or damaged electrical connector, incorrect adaptive shock installed (e.g., a non-adaptive shock that looks identical) | Suspension Control Module (SCM) not recalibrated after battery disconnect or part replacement |
Use your bi-directional scan tool to command each shock’s solenoid. You should hear a distinct “click” right at the shock body. If you hear the click but feel no change in damping, the internal valve is probably shot. No click? That’s an electrical fault—check the connector, wiring, or the solenoid’s integrity. |
| Fault code for “Shock Absorber Valve” (e.g., generic C1113 or manufacturer-specific like BMW 480A87) | Solenoid coil is electrically open or shorted | Wiring harness damage between SCM and shock, poor grounding, or a faulty control module itself |
Disconnect the shock connector and measure the solenoid’s resistance with a good multimeter. Most adaptive solenoids will read between 2–10 ohms. An infinite reading (open circuit) or zero ohms (shorted) tells you the solenoid coil has failed. If the resistance is normal, you’re probably looking at a wiring harness issue or a problem with the control module. |
| Inconsistent damping corner-to-corner | A single shock has a mechanically stuck or degraded internal valve | Faulty ride height sensor, wheel speed sensor, or steering angle sensor sending bad data to the SCM |
With the car on a lift and the wheels hanging free, have an assistant cycle through the drive modes while you manually compress and extend each corner. A working adaptive shock will have a noticeable difference in resistance between Comfort and Sport. A faulty one will feel the same in both. Also, check live data for solenoid current draw—uneven values across the corners are a big red flag. |
It’s crucial to rule out other components that can trick you into thinking the shock is bad. For instance, a failing air suspension compressor might cause the car to sag, but that’s a separate issue from the adaptive damping itself. Similarly, an air leak in an air spring won’t directly disable adaptive damping unless the car goes into a safe mode due to extreme height changes. However, a bad wheel speed sensor can trigger stability control, which then messes with suspension behavior. Always, always verify sensor data before you condemn a shock. Otherwise, you’re just guessing.
Why the Shock Itself Fails
When you’ve confirmed the adaptive shock is truly the problem, the failure usually boils down to one of three categories: electrical, mechanical, or impact damage.
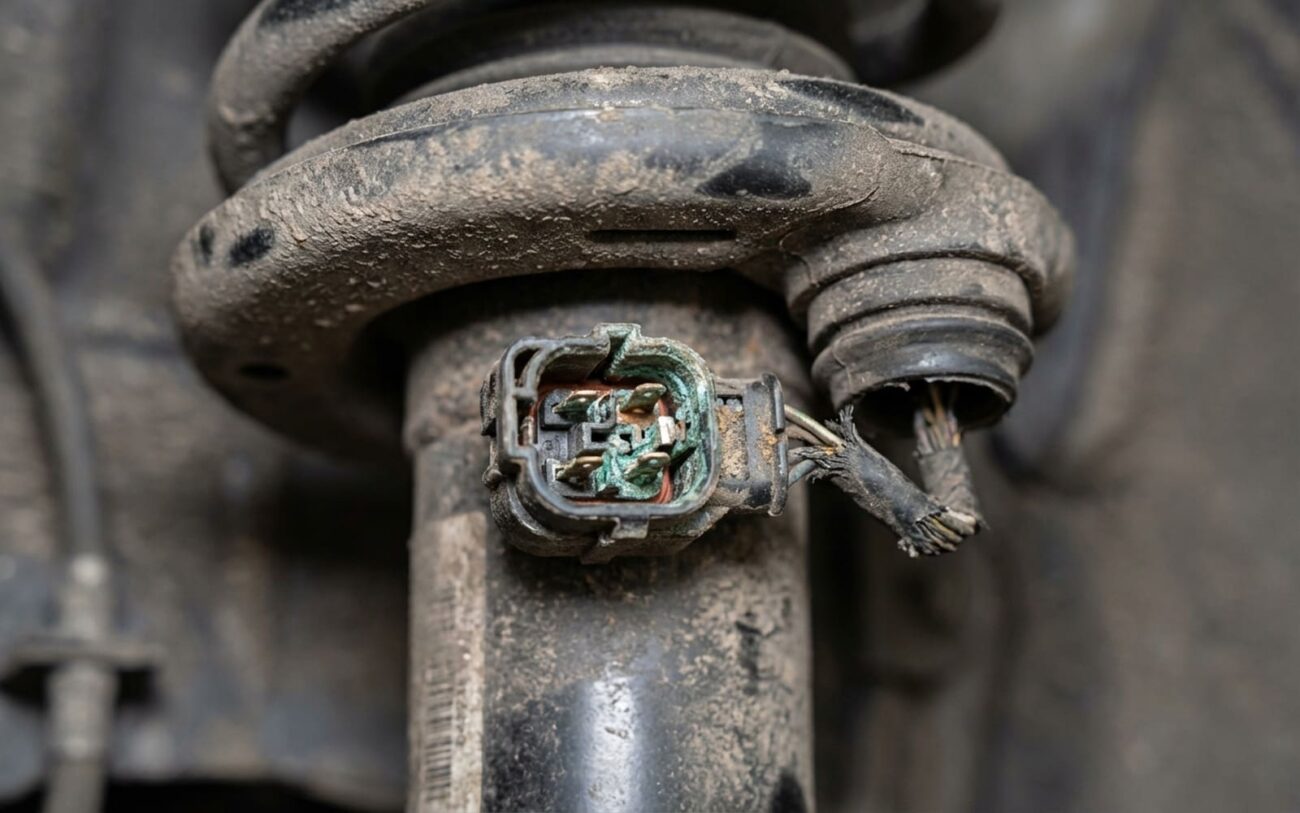
Electrical failure is incredibly common. The solenoid valve, which is basically an electromagnet, controls the oil flow. Road grime, water, and just plain old moisture can creep in and corrode the coil windings, leading to an open or shorted circuit. I’ve torn these things apart and found green crud inside the connector housing on shocks with only 50,000 miles. Once that coil fails, the valve can’t respond to any commands from the car’s computer.
Mechanical failure typically involves the internal spool valve. These components are manufactured to extremely tight tolerances—we’re talking microns here. Any tiny bit of debris from manufacturing, wear particles from the shock itself, or even degraded fluid can score the bore or jam that valve solid in one position. Over time, the internal seals wear out too, allowing fluid to bypass the valve entirely. When that happens, the damping adjustment becomes useless, no matter what the solenoid tries to do.
Impact damage is another frequent culprit. The solenoid and its wiring harness are usually mounted pretty low on the shock body. Road debris, hitting a curb, or even just improper handling during installation can crack the housing or snap the connector right off. I’ve seen techs accidentally damage the solenoid by using the piston rod as a lifting point—don’t ever do that. It’s not designed for it, and you’ll ruin a brand new part.
And a critical point:
Sometimes, it’s not a failure at all. Certain BMW and Audi models have a known behavior where the adaptive damping system goes inactive after a battery disconnect. This isn’t a broken part; it’s a system that needs recalibration. There are documented service bulletins for these cases, requiring a module reset and sensor adaptation using factory-level software. Confusing this with a hardware failure is a quick way to replace good parts unnecessarily.
Your Repair Options, From Simple to Major
Once you’ve properly diagnosed the issue, your repair path becomes clear. Don’t skip the diagnostics—this isn’t a job for guesswork. You’ll just end up replacing parts you didn’t need.
Path A: The Connector or Wiring Is the Problem DIY-FEASIBLE with Proper Tools
Path B: Replacing Just the Solenoid Unit Professional Only
Path C: Replacing the Entire Shock Assembly Professional Only
Is there a temporary fix for these? Not really. If a shock is stuck in Sport, you’re just going to have a harsh ride. If it’s stuck in Comfort, you need to drive cautiously; the car won’t respond as expected in emergency maneuvers. There’s no safe way to bypass or jumper these systems. You fix it, or you live with the consequences.
Making Sure It’s Actually Fixed
Verification is just as important as the repair itself. Don’t assume it’s working just because the dash warning lights are off. That’s a rookie mistake.
-
For connector/wiring repairs (Path A): Confirm all fault codes are cleared. Use your scan tool to command each solenoid and listen for audible clicks at every corner. Then, check live data to ensure you see equal current draw across all shocks. Any imbalance means there’s still a problem.
-
For solenoid replacement (Path B): The system must accept and hold new adaptation values without throwing codes. Drive it for a few cycles and check for any fluid leaks. Most importantly, you need to feel a consistent, noticeable change in damping when you switch between modes. If you don’t feel it, it’s not fixed.
-
For full shock replacement (Path C): All of the above, plus successful completion of the OEM-required static and dynamic calibrations. This often includes specific driving cycles where the system “learns” new baseline values. Without this crucial step, the car may not enter certain drive modes or could default to a fail-safe setting, leaving you right back where you started.
The tool you need for all this? A professional scan tool with access to the ADS sensor data, solenoid control, and the full adaptation routines. Generic tools won’t cut it. You need something capable of both coding and calibration—these are different functions, and you’ll need both for a proper repair.
What This Is Going to Cost You
Costs are all over the map depending on your car’s make, model, and local labor rates. But here’s a realistic breakdown based on what I typically see in the shop.
| Repair Type | DIY Cost (Parts) | Shop Cost (Parts & Labor) | Success Rate (When Cause Correctly Identified) | Secondary Risk if Repair Fails |
|---|---|---|---|---|
| Clean/Repair Connector | < $50 | $150 – $300 | 90% |
Intermittent fault returns if the repair is poor; moisture may cause further corrosion if not properly sealed. |
| Replace Solenoid on One Shock | $200 – $400 (plus scan tool access) | $500 – $800 | 95% |
Improper installation or contamination can cause a hydraulic fluid leak, leading to needing a full shock replacement anyway. |
| Replace One OEM Adaptive Shock Assembly | $500 – $1200 | $1200 – $2200 | 99% |
Incorrect calibration or installation can damage the new unit—especially if driven before adaptation is completed. |
Here’s the economic reality I always tell my customers: if multiple shocks have failed and the total repair cost starts creeping past 40–50% of your car’s current market value, you really need to think hard about whether it’s worth it. These complex systems don’t age gracefully. At 80,000–100,000 miles, you might also be looking at failing air springs, ride height sensors, or even the control modules themselves. Factor in future dealership programming cost for module replacements—some require online coding that most independent shops can’t perform. Weigh the long-term reliability against the investment. Sometimes, it’s just time to move on.
How to Avoid This Problem Next Time
Prevention starts with proper service procedures. Trust me, doing it right the first time saves you a ton of grief. Here’s what I recommend:
-
Always use the manufacturer-specified hydraulic fluid when servicing adaptive shocks. The wrong fluid can degrade internal seals or cause valve stiction.
-
Apply dielectric grease to electrical connectors after cleaning or reassembly. It won’t fix a bad connection, but it’s great for keeping moisture and corrosion out.
-
Disconnect the battery before starting any suspension work that involves electrical components. This prevents voltage spikes and module confusion.
-
After any adaptive suspension component replacement—or even just a battery disconnect—perform the full EDC module reset procedure or equivalent. This includes ride height sensor calibration, solenoid adaptation, and wheel speed sensor alignment. On BMWs, this means using ISTA. On Audis, ODIS. Generic tools may clear codes but won’t run these critical adaptations.
-
Never lift or support the vehicle by the shock piston rod. It’s not designed for that load and you’ll bend it. Use proper jacking points or spring compressors.
-
Monitor live data periodically, especially if you have a scan tool. Before a hard fault appears, you might catch erratic solenoid current or inconsistent adaptation values. Catch it early, save yourself a headache.
If you’re replacing shocks on a car with air suspension, remember: adaptive damping and air leveling are separate systems, but they absolutely interact. A fault in one can trigger safe-mode behavior in the other. Always verify both are functioning independently after any work.