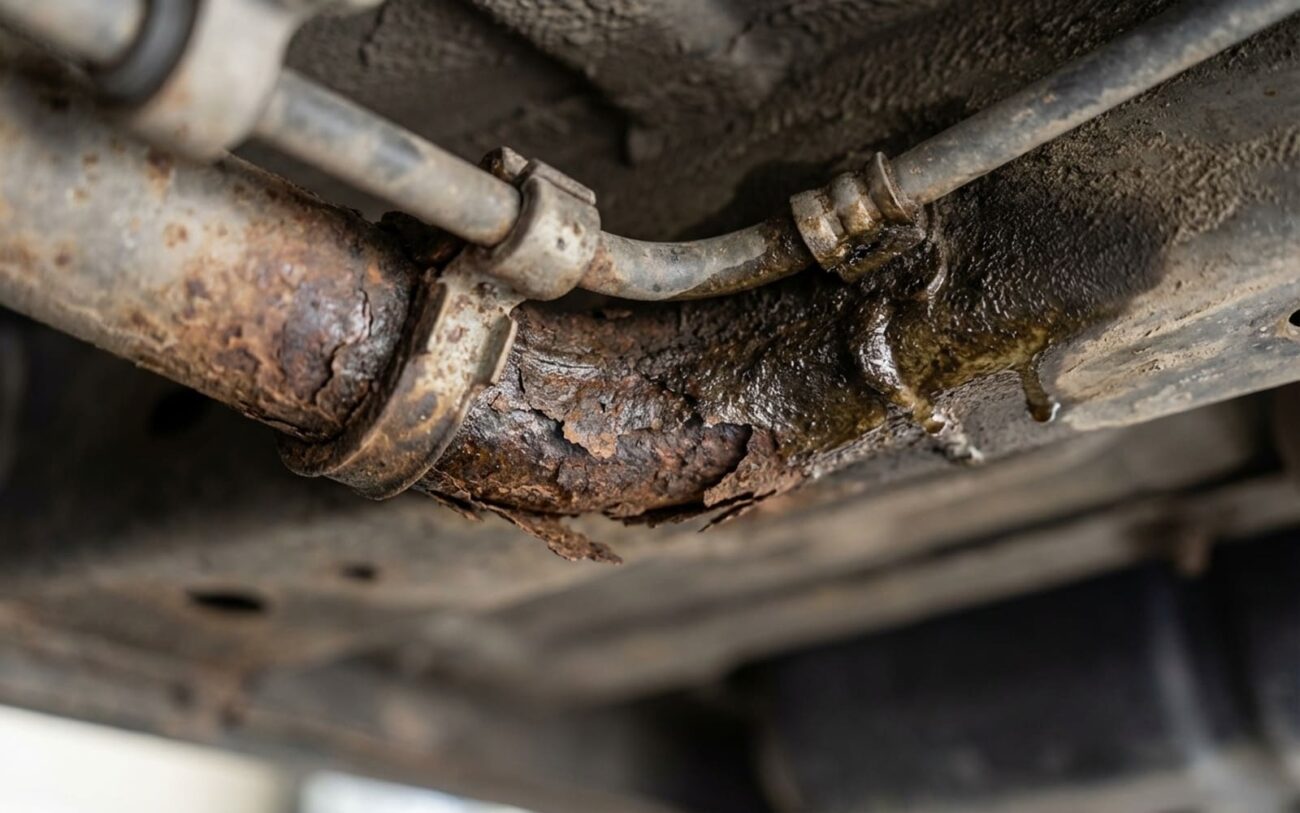
Look, if you’re spotting anything that looks like a crusty, flaky trail along the underside of your frame or suspension, especially if it’s coated in reddish-brown rust, you’re almost certainly looking at a corroded metal brake line. And let me tell you, this isn’t just some cosmetic issue; it’s a structural failure that’s already well underway.
I’ve pulled more seized lines off rusted frames than I care to count, and based on that experience, I can tell you this: once brake line corrosion gets to the point of visible flaking or, worse, fluid weeping, that line’s integrity is already compromised. Most of the time, this shows up after a few harsh winters, especially in areas where they’re heavy-handed with the road salt. You’ll usually catch it one of three ways: by looking, by checking your fluid, or by feel at the brake pedal.
First, the visual clues. You’re looking for rust scaling or those tell-tale “bubbles” of corrosion, particularly on the bottom surface of the line. Pay close attention near clips or any low points where water and road crud tend to collect. Those are hot spots for external pitting. Second, an unexplained drop in your brake fluid reservoir level, especially if you can’t find any visible leaks at the calipers or master cylinder, often points to a slow seep from a corroded hard line. Third, a soft or sinking brake pedal can signal air getting into the system through a tiny breach, or even worse, a developing internal leak that’s about to let go.
How I Pinpoint a Brake Line Leak (and Rule Out Other Stuff)
Now, before you go tearing into things, let’s make sure it’s actually the hard line. I’ve seen plenty of folks jump to conclusions, only to find it was a failing flex hose or a leaky fitting. Misdiagnosis here costs time and money, and nobody wants that.
Here’s how I approach it in the shop, looking for the real culprit:
| Symptom I’m Seeing | Often Points To (Hard Line) | Common External Mimics | My Definitive Test |
|---|---|---|---|
| Fluid leak at a low point on chassis | External corrosion perforating the line wall, especially on the bottom surface where crud collects. | Degrading rubber flex hose, a leaking junction block fitting, or even a weeping caliper bleeder screw. |
Clean the area thoroughly with brake cleaner. Apply 25 psi using a hand pressure bleeder. Watch closely for active weeping directly from the tubing, not just a fitting. |
| General low fluid level (no obvious external leak) | A pinhole leak from widespread corrosion in the hard line system, or sometimes internal master cylinder bypass. | Master cylinder internal bypass, a failing rear caliper piston seal, or even a slow leak at a wheel cylinder. |
Perform a full visual inspection first. If nothing, then a system pressure test. If pressure drops with no external leak, I’m looking hard at the master cylinder next. |
| Soft or spongy brake pedal | Significant fluid loss or air ingress from a compromised line. | Improper bleeding, failing master cylinder, air trapped in the ABS module. |
Pressure test the system first. If pressure holds, the issue is likely air in the system. If it drops, you’ve got a leak to find, probably in the hard lines. |
The real key to accurate diagnosis, in my experience:
Physical evidence. You need to see or feel the corrosion damage—thin, flaky metal, visible bubbles of rust, or fluid actually oozing directly from the tubing itself. A leak at a threaded fitting? That’s usually a torque issue or a bad flare, not the line corroding. Same with a cracked rubber flex hose. We’re talking about the body of the metal line itself being compromised by external pitting.
Why Brake Lines Rust From the Bottom Up
It’s not a coincidence that corrosion always seems to hit the underside of brake lines first. There are three main mechanisms at play here: galvanic/electrochemical corrosion, crevice corrosion, and mechanical abrasion. They all gang up on the lowest points and contact zones.
Electrochemical corrosion is the primary driver. When road salt, moisture, or brine coats that steel tubing, it creates an electrolytic environment. The steel basically becomes the anode in a tiny battery, slowly oxidizing and losing material. Crevice corrosion happens where the line contacts brackets, clips, or where debris builds up. Even small gaps trap moisture and restrict oxygen flow, creating a localized acidic environment that just chews through the metal. And mechanical abrasion compounds the problem; if a line isn’t secured properly, vibration can rub away any protective coatings, leaving bare metal exposed.
And just to clarify, because I see this misunderstanding a lot: a leak at a threaded fitting isn’t a “rusted brake line” failure—it’s a flare or assembly issue. Same with a cracked rubber flex hose. The real concern is when the body of the metal line itself is compromised by external pitting.
Repair Options: What Actually Works (and What Doesn’t)
High-Pressure Safety Warning
Brake systems operate at over 1,000 psi. Your life depends on these repairs holding. Never, under any circumstances, use compression fittings or hose clamps on a high-pressure brake line. I’ve seen the aftermath, and it’s not pretty.
Section Replacement DIY Feasible
Full Line Replacement Professional Only
Internal Corrosion Management
Quick Fixes High Risk
Validating the Repair: Don’t Skip This Step
A repair isn’t done when the wrench is put away—it’s done when the system is proven absolutely safe. There are two critical phases to this validation, and you can’t skip either one.
First, you need to pressure test that new line. Use a hand-operated brake system pressure tester to bring the system up to 25–30 psi. Hold that pressure for at least five minutes. Any drop in pressure, or any visible seepage at the fittings or along the tubing, means you’ve got a problem. Find it and fix it before you proceed. Second, bleed the system thoroughly and verify the pedal feel. Use clear bleed hoses so you can actually see air bubbles coming out. A properly bled system should give you a high, firm pedal with absolutely no sponginess. If it’s not perfect, you’ve still got air, or worse, a lingering leak.
Cost vs. Value: Is the Repair Worth It?
Now for the tough talk: cost versus value. Here’s a quick rundown of what you’re looking at, but remember, these are estimates and can vary wildly depending on your vehicle and location.
| Repair Type | DIY Cost (Parts) | Shop Cost (Est.) | Success Rate | Secondary Risk |
|---|---|---|---|---|
| Section Replacement | $30–$80 | $150–$400 | High (95%+) | Leak, partial brake failure if done improperly |
| Full Line Replacement | $50–$200 | $300–$1,000+ | High (95%+) | Leak, ABS contamination (if debris enters system) |
| Temporary Clamp/Putty | $5–$20 | N/A | Very Low | Catastrophic failure (guaranteed eventually) |
Here’s the hard truth I tell my customers: if the repair estimate starts pushing past, say, 40% of what your car is actually worth on the private market, and the undercarriage shows widespread rust, you need to think long and hard. You could be pouring good money into a vehicle that’s structurally at the end of its life. Sometimes, it’s just time to let go.
Preventing Brake Line Rust: What Actually Works
Proactive Maintenance is Key
Prevention is always cheaper and safer than repair. The whole goal here is to interrupt that corrosion cycle—get rid of the moisture, the salt, and any trapped debris.
-
Regular undercarriage washes. If you live where they use road salt, a thorough rinse every few weeks during snow season can make a huge difference. It washes that corrosive brine away before it can really dig in.
-
Apply a wax-based rust inhibitor or fluid film directly to the lines. These products are designed to displace moisture and create a protective barrier. I’ve seen them extend the life of lines significantly, especially on older trucks.
-
Routine inspections. Every oil change, take a few minutes. Get under there, feel the lines. Look for roughness, flaking, or any soft spots. Catch it early, and you can often clean it up and protect it before it becomes a leak.
-
Flush your brake fluid every two years. Brake fluid is hygroscopic—it absorbs moisture. That moisture, over time, can cause internal corrosion, even if the outside looks okay. A fresh fluid flush keeps the whole system healthier.
