Spotting the Sag: What Your Car is Telling You
Alright, let’s talk air suspension. You walk out to your vehicle in the morning, and one corner—maybe even an entire axle—just looks… tired. Flat. Like a deflated tire, but it’s your car’s stance. That’s the first sign, right there, that something isn’t quite right with your air ride system. It’s the hallmark of an air suspension issue.
But the real tell, the one that screams “air spring leak” to me, is what happens next. You unlock the door or turn the key, and you hear it: a distinct humming or whirring sound, usually from the front or rear. Within 20 to 30 seconds, sometimes a bit longer, the car raises itself back to normal ride height. This sequence—sag overnight, rise at startup—is textbook behavior for a leak in an air spring (or air strut, depending on the design) or its immediate connections.
What’s happening is simple: while the car’s off, air slowly escapes from a leaky component. The system can’t hold pressure. But as soon as you wake it up, the air compressor kicks in, sees the low ride height, and starts pumping to bring it back up. If it successfully gets back to height, that tells me the compressor and the main air reservoir are probably doing their job. The problem is usually localized to one corner, or sometimes a pair.
Now, if you’re hearing that compressor running every few minutes while you’re driving, even on smooth roads, that’s another big red flag. It’s constantly trying to compensate for a persistent leak. Compressors aren’t designed to run all the time; they’re for intermittent use. Constant cycling means it’s overworking, overheating, and heading for an early grave. I’ve seen more than one customer replace a leaky air spring only to have the compressor die days later because it had already been pushed beyond its limits.
Deviation: -45mm
The Concept
“Think of it like a balloon with a pinhole: it looks fine while you’re blowing into it, but leave it overnight and it’s flat on the floor.”
Pinpointing the Leak: My Diagnostic Approach
Now, don’t go ordering a new strut just because the left front is low. I’ve seen too many people throw parts at these systems without proper diagnosis, and it costs them. You gotta confirm the leak. A sagging corner doesn’t automatically mean that specific strut is bad. It could be a line, a valve, or even the compressor struggling to keep up with a smaller leak elsewhere.
One Corner Sagging Overnight
This is the most common scenario. If only one corner is consistently low in the morning, the leak is usually right there. It’s almost always the air spring itself, or perhaps a loose air line fitting at the top of the strut, maybe a cracked hose, or a faulty solenoid in the local valve block. But if the car regains height reliably after startup, the compressor and main reservoir are likely functional, pointing the finger squarely at that specific corner’s air spring or its local connections.
My Test: Inflate the spring to its maximum ride height (you’ll need a scan tool for this on most modern systems). Then, grab a spray bottle with soapy water – dish soap and water works fine. Spray down the entire rubber bellows, paying close attention to the folds, and all the air line connections at the top of the strut. Look for bubbles. If you see them, you’ve found your leak. If you have a dedicated air supply, you can also inflate the spring independently to 8–12 bar and monitor for a pressure drop over an hour. A drop of more than 0.5 bar confirms a leak in the strut itself.
Both Front or Both Rear Corners Sagging (Axle Pair)
If you’ve got both front or both rear corners dropping, it’s less likely to be two air springs failing simultaneously (though not impossible on high-mileage vehicles). This often points to a shared component. We’re talking about things like a shared tee fitting in the air lines, a height control valve that’s failing, or even a leak in the air dryer housing. These components manage air for an entire axle, so a fault there affects both sides.
My Test: Use a professional scan tool to command the system into a “hold” or “transport” mode. This closes the valve block solenoids, isolating the air springs from the rest of the system. If the pressure still drops in both springs, the leak is in the springs or their immediate connections. If the pressure holds, but the car still sags when the system is active, the leak is upstream—likely in the valve block or a main line.
Frequent Compressor Cycling (No Obvious Sag)
Sometimes the car doesn’t sag noticeably, but you hear that compressor kicking on more than it should. This usually means there’s a small, consistent leak that the system is constantly trying to top off. It’s often a tiny pinhole in the bellows folds, or a very minor line leak, or even a failing compressor seal that’s letting pressure bleed off. Don’t ignore this; it’s a precursor to bigger problems.
My Test: Again, soapy water is your best friend here. Get the car to max ride height, then meticulously spray all the bellows folds. Sometimes these tiny leaks only show up when the rubber is stretched to its limit. Also, check all air lines and fittings, especially near the compressor and valve block. A malfunctioning height sensor can also cause frequent cycling, so I’ll check live data on the scan tool to ensure the sensors are reading correctly.
Why They Fail: Root Cause Analysis
Once you’ve confirmed the leak is in the air spring assembly, it’s time to understand why it failed. I’ve replaced hundreds of these units, and the failure modes are pretty consistent. It’s rarely a sudden, catastrophic blow-out; it’s usually a slow, creeping degradation.
Material Fatigue & Environmental Damage:
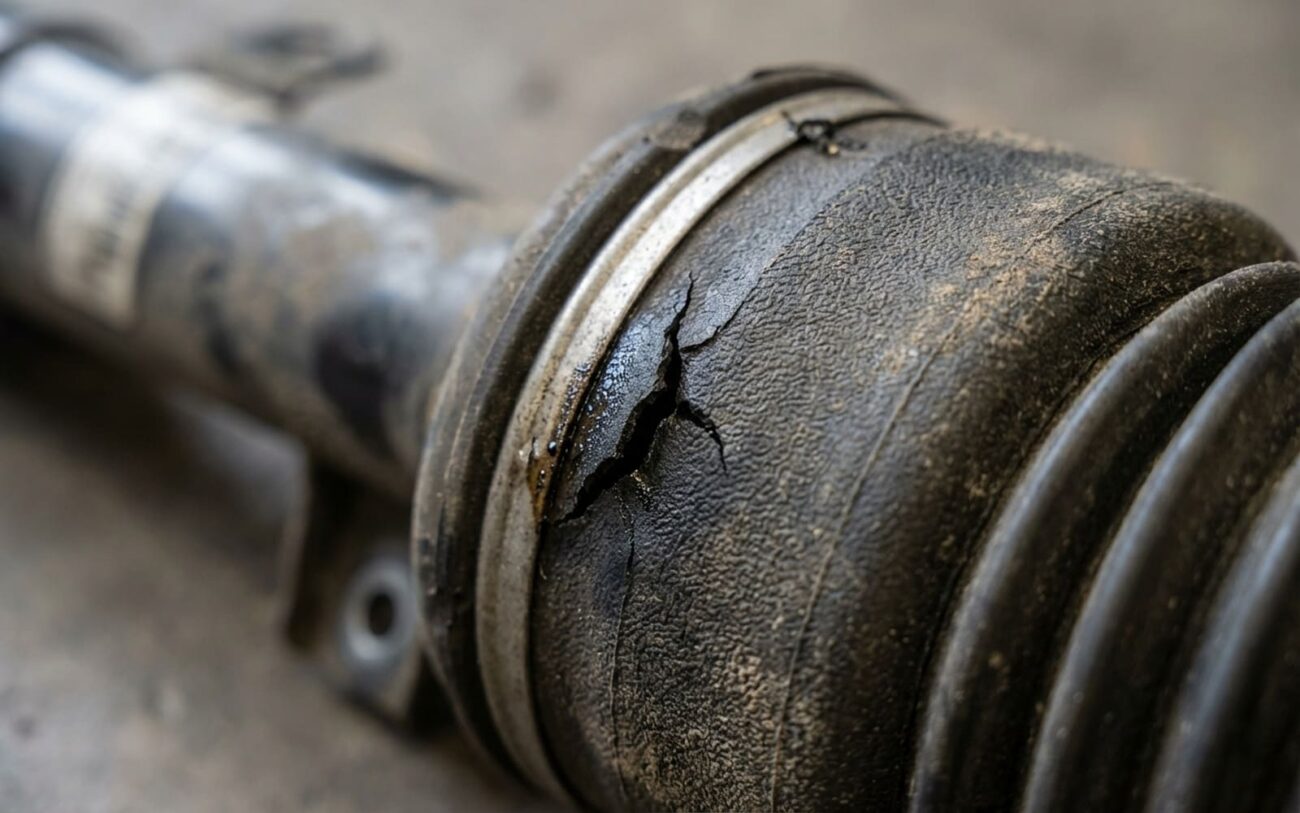
The biggest culprit. The rubber bellows flex with every bump, every turn. Over time, especially in the lower folds where they constantly rub, this leads to micro-cracks. Road salt, grit, and UV exposure act like sandpaper and acid, accelerating this process. I see it constantly on Mercedes W220 and W221 models, where the front struts take the brunt of road debris. You’ll often see fine, web-like cracks, what we call “crazing,” on the outer surface. That’s ozone and UV light breaking down the rubber’s polymers, making it harden and crack. No amount of cleaning can reverse that; it’s a chemical breakdown.
Then you have the less visible issues: internal construction failures. The bond between the rubber bellows and the metal piston can delaminate, allowing air to escape where it shouldn’t. On strut-style units, like those on an Audi A8 D4 or a BMW 7 Series, the air piston rides on a sealed rod. When that dynamic seal wears out, air can leak into the shock absorber’s oil chamber, causing the oil to foam up. That means reduced damping, a rougher ride, and eventually, a dead strut.
Fixing It Right: Repair Options & Safety
Safety First, Always.
Working on air suspension involves high-pressure systems and heavy vehicle components. This isn’t a job you rush. Always use proper jack stands, and for crying out loud, depressurize the system via a scan tool before opening any lines or loosening any components. You don’t want a strut exploding in your face.
The “Band-Aid” Patch Emergency Only
Full Assembly Replacement Professional Recommended
Checking the Schrader Valve (DIY Friendly)
Don’t Skip This: Post-Repair Validation
Replacing the part isn’t the end of the job—it’s just the beginning of verification. You absolutely must confirm the repair worked and that you didn’t introduce any new issues during the process. This separates a good tech from a parts changer.
For a full assembly replacement, you need OEM-level validation. That means using a professional diagnostic scan tool—something like Mercedes STAR or Audi ODIS. You’ll want to run a system-specific “Leak Down Test.” A typical pass condition is less than a 0.2 bar pressure drop over a 5-minute period. And don’t forget the old-school method: perform another physical soapy water check on all new connections and the new bellows while the system is fully pressurized. Skipping this step is how you miss a loose fitting that could fail days later, bringing the car right back to your bay.
The Bottom Line: Cost, Risk & Your Options
Temporary Patch
Low success rate (I’d say less than 30% long-term). High risk of contaminating the valve block, which can easily double your repair bill.
Single Strut
This is per corner. While it fixes the immediate problem, if one strut failed due to age or environment, the opposite side is usually not far behind. You often end up paying for labor twice.
Axle-Pair (Recommended)
This is what I always recommend if the budget allows. It’s the best long-term value. It ensures balanced handling and prevents repeat labor costs when the other side inevitably fails in 6-12 months.
I strongly recommend replacing air springs in axle pairs. If one fails, the other is almost certainly within 6–12 months of failure, especially if they’re original. You’ll save money on labor in the long run. However, if the total repair costs—and I mean for the entire system, not just one strut—start to exceed 40% of the vehicle’s current market value, then it’s time to have a serious talk about converting to conventional coil springs. Yes, it changes the ride characteristics, but it eliminates air suspension maintenance costs forever. It’s a valid economic decision for older vehicles.
Keeping Your Air Suspension Healthy: Prevention & Monitoring
My Maintenance Checklist:
-
Clean the bellows folds: Twice a year, especially after winter, get in there and clean out road salt and grit. That stuff acts like sandpaper, slowly grinding away the rubber.
-
Apply UV-protective dressing: Products like 303 Aerospace Protectant can help. It slows down the ozone cracking and UV degradation of the exposed rubber. It’s cheap insurance.
-
Monitor compressor run-time: After startup, if you hear that compressor running for more than 10 seconds, especially after the initial leveling, you’ve likely got a leak. Don’t wait for a warning light.
-
Watch for oily residue: If you see any oily film or residue on the rubber bellows, that’s a strong indicator of an internal shock absorber seal failure. The shock fluid is leaking out, and it’s usually a sign the strut is on its way out.
