Your Outlander PHEV Won’t Charge? Let’s Figure It Out.
Alright, so you plug in your Mitsubishi Outlander PHEV, and nothing. No lights, no happy little charging sound, just dead silence. Or maybe it tries to start, then cuts out with an orange light or an error message. I get it, it’s frustrating, especially when you’re counting on that electric range for your daily commute.
After 25+ years under the hood, I can tell you that most charging problems on these Outlanders usually boil down to one of two main areas: either it’s the On-Board Charger (OBC) inside the vehicle, or it’s your external charging equipment—that’s your EVSE, often called a “granny charger” if it’s the Level 1 unit that came with the car. The trick is knowing how to tell which one it is before you start throwing money at the wrong parts.
First Impressions: What Are You Seeing and Hearing?
Before you even think about grabbing a wrench or calling the shop, take a minute. Just observe. What exactly happens when you plug that cable in? The car is trying to tell you something, and those little clues can point you straight to the real problem.
If the issue is with the On-Board Charger (OBC) itself, the whole system usually stays dead. I mean dead. You won’t see a charge light on the dash, you won’t hear that tell-tale relay “click” from under the hood, and the Mitsubishi Remote Control app will likely show no response. Sometimes, you’ll get a specific fault message on the multi-information display, like “Charging System Fault” or “Check Charging System.” Now, a completely dead charging cable can mimic this, so don’t jump to conclusions—but if you get zero feedback from the car, the problem could very well be internal.
On the other hand, if the charging cable or EVSE is the culprit, you’ll often see some activity. The dashboard light might flicker on briefly, then go dark or start flashing in a repeating pattern. The EVSE box itself, that brick on the cord, might show a red light or a blinking error code. A classic sign I’ve seen countless times: you wiggle the connector at the charge port, and it works intermittently. That’s a dead giveaway for a cable or port issue. And of course, the easiest test: if you try a different charging cable—one you know is good—and charging resumes, then your original cable is almost certainly toast.
Digging Deeper: How I Isolate the Real Problem
Once you’ve got your initial observations, it’s time to move from symptoms to a proper diagnosis. You need to systematically rule things in or out. For this, you’ll want a good digital multimeter, access to a known-good EVSE (Level 1 or 2), and ideally, a professional scan tool like the Mitsubishi MUT-III. That scan tool is key for reading PHEV-specific data.
My Diagnostic Flow:
-
Start Simple: Check the Basics. Before anything else, verify your household circuit. Is the breaker tripped? Is the outlet working for other appliances? On the vehicle side, check the 12V auxiliary battery. A weak 12V battery can prevent the high-voltage system from initializing, which means no charging. Also, locate and check the main OBC fuse—it’s usually a larger amperage fuse in the under-hood fuse box. A blown fuse is a symptom, not the root cause of an OBC failure, but it’s a quick check that can save you a lot of grief.
-
Test the EVSE (Charging Cable). This is often the easiest to swap out. If you have access to another EVSE, even a friend’s, try it. If the car charges, you’ve found your problem. If you don’t have another EVSE, visually inspect your current one. Look for any signs of damage: crushed cable, cracked insulation, bent or corroded pins on the connector. If you’re getting partial activity or a flashing light, use your multimeter to check for continuity on the pilot signal pins (A and B on the J1772 connector) – but only if you know what you’re doing, otherwise, just swap the cable.
-
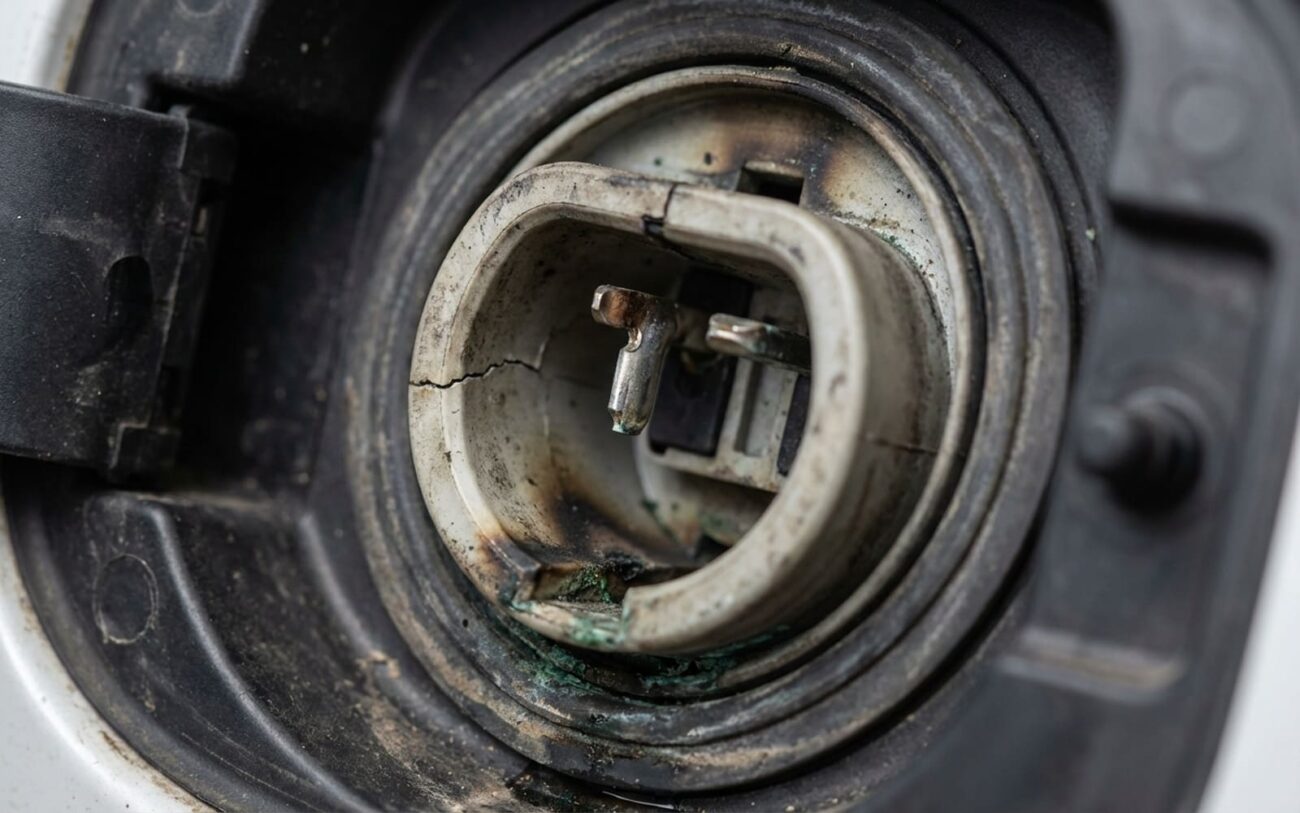
Inspect the Vehicle’s Charge Port. With the EVSE unplugged, carefully look into the charge port on the car. Are the pins clean and straight? Do you see any discoloration, melting, or corrosion? A poor connection here can cause arcing and intermittent charging, especially if you’re wiggling the cable to get it to work.
-
The Scan Tool is Your Best Friend. If the basics and the cable swap don’t fix it, you need a professional scan tool. The Mitsubishi MUT-III can communicate directly with the OBC. I always start by checking for Diagnostic Trouble Codes (DTCs). Look for anything related to the charging system. Then, and this is crucial, run the OBC self-test. If the tool returns “Status: Completed OK,” your OBC is functional. If it fails, or if the OBC doesn’t even respond to the scan tool, then you’re almost certainly looking at an internal OBC fault. I’ve seen techs skip this step and replace cables or even charge ports unnecessarily—don’t be that person. The scan tool tells you what’s really happening.
-
Advanced Multimeter Checks (Professional Only). For a “no dashboard light, no click” symptom, a qualified technician can test for 120V AC (or 240V AC for Level 2) at the J1772 inlet inside the vehicle after the EVSE is plugged in and the car attempts to initiate charging. This confirms if the OBC is even receiving power. If it is, and still no click or charge, that points heavily to an internal OBC component failure like a stuck AC relay or control board issue.
Pro Tip: Fuses & 12V Battery
Remember: a blown 15A OBC fuse is not an OBC failure. It’s a symptom of something else drawing too much current, or just an old fuse. Same with a tripped household breaker—it’s a circuit issue, not necessarily a cable fault. Always check fuses, the 12V battery strength, and your home outlet first. These are fast, cheap fixes that can save you a service call. I’ve seen a weak 12V battery prevent charging more times than I can count.
Why Things Fail: Common Culprits
Let’s talk about what’s actually inside these components and how they tend to wear out. Knowing this helps you understand the diagnosis.
On-Board Charger (OBC) Failures
Most OBC failures I see come down to heat, vibration, or just plain old age. The AC input relay is a common weak point; its contacts can weld shut or burn open from repeated engagement under load. The main power electronics, like the IGBTs (Insulated Gate Bipolar Transistors) and rectifiers, degrade over time from constant thermal cycling—heating up when charging, cooling down when not. Those large electrolytic capacitors in the DC-link stage? They dry out, especially in hot climates, which reduces efficiency and stability. If the OBC’s cooling system isn’t working right—say, a blocked vent or a degraded seal—moisture or excessive heat can cook the control board. And while it’s less common, vibration can crack circuit board traces, especially if the mounting points aren’t snug.
Charging Cable (EVSE) Failures
Charging cable problems are usually more mechanical. The thin wires that carry the control pilot signal are pretty vulnerable to breakage from repeated bending and tugging. If the connector doesn’t seat fully in the charge port, you can get arcing, which leads to melted plastic or discolored pins. Inside the EVSE box itself, the internal contactor can fail, or the ground fault circuit interrupter (GFCI) can trip repeatedly due to internal damage or moisture. Water intrusion, especially if you leave the connector outside in the rain or snow, can cause corrosion in the pins, leading to poor contact and charging failures.
The Fix: Doing It Right (and Safely)
Safety is Non-Negotiable. Period.
Fixing a charging problem depends entirely on what’s broken and where. High-voltage components in these PHEVs demand specialized training, tools, and strict safety protocols. There is no safe workaround for a failed OBC or a damaged EVSE. Seriously, don’t mess around with high voltage if you’re not trained.
Charging Cable Replacement
Vehicle-Side External Repair Professional Only
OBC Unit Replacement Professional Only
Confirming the Repair: How I Know It’s Fixed
For a simple cable replacement, validation is pretty straightforward: you plug it in, and it charges. Done. But for any internal repair, especially involving the OBC or charge port, you need more than just a green light.
After an OBC, charge port, or connector repair, the technician absolutely needs to clear all diagnostic trouble codes—especially any OBC-related ones like P1D26, which often points directly to a charging circuit fault. Then, you run the OBC self-test via the MUT-III or an equivalent scan tool. It must return “Completed OK.” Next, I always monitor live data during a charging session: input voltage, output current, OBC temperature, and communication status. Everything should be within factory specifications.
Here’s a smart extra step I always take: after 20–30 minutes of charging, I grab my thermal imaging camera and scan the OBC, the charge port, and the cable connector. Any hot spots above 60–70°C could mean a poor connection, a loose terminal, or a component that’s still struggling. I’ve caught loose terminals and even slightly degraded components this way, preventing a full failure down the road.
The Hard Truth: Costs, Value, and When to Repair
Let’s be real. Charging repairs can vary wildly in cost, and not all of them are worth it depending on your vehicle’s age and overall condition. Here’s a general idea of what you might be looking at:
| Repair Type | DIY Cost (Parts) | Shop Cost (Est.) | Success Rate | Secondary Risk |
|---|---|---|---|---|
| Charging Cable Replacement | $200 – $600 | $0 (if DIY) | 99% | None |
| OBC Connector/Seal Service | $50 – $150 | $300 – $600 | 85% | Coolant leaks |
| OBC Unit Replacement | $1,500 – $3,000 | $2,000 – $4,000 | 95% | HV system damage |
| Vehicle Charging Inlet | $300 – $700 | $500 – $1,000 | 98% | Pin misalignment |
Here’s the reality check I give my customers: if an OBC replacement is going to cost you $3,500, and your Outlander PHEV is only worth $6,000 in fair market value, you’re looking at putting in nearly 60% of the car’s worth. That’s a significant investment. At that point, you really need to consider if trading it in, selling it as-is (with full disclosure, of course), or switching to a different EV makes more financial sense. I’ve seen owners pour money into aging PHEVs only to face another $2k+ repair six months later. Sometimes, it’s just time to move on.
Keeping It Running: How to Prevent Future Charging Issues
My Maintenance Checklist:
-
Use quality equipment: Stick with the OEM cable if you can, or a reputable UL-listed replacement. Avoid those cheap, no-name chargers you find online. Always support the cable connector; don’t let it dangle and put strain on the charge port.
-
Maintain your environment: Ensure your home outlet is tight, properly grounded, and not on a shared circuit that’s already pulling a lot of power. If you use a GFCI outlet for charging, test it monthly.
-
Inspect monthly: Make it a habit to look at the charge port on your car and the connector on your cable for any signs of melting, discoloration, or corrosion. Gently clean out any debris. Listen for that relay click when you plug in. And check your 12V battery voltage regularly—it’s often overlooked.
